Image Sequence encoding
OptionalPrior to Depthkit version 0.6.0, encoding in FFMPEG was required for maximum quality, but now high-quality video encoding is built right into Depthkit exports.
You can still use FFMPEG to encode to a custom video codec other than H264 MP4 for performant playback on certain platforms.
Combined Per Pixel image sequences can be encoded in any video editing tool. However, some video editing tools may have resolution limitations or can exports with unintended color conversions. As a result, the following is a set of recommendation for FFmpeg, which is recommend for maximum control over your encoding parameters.
Video encoding guide with FFmpeg
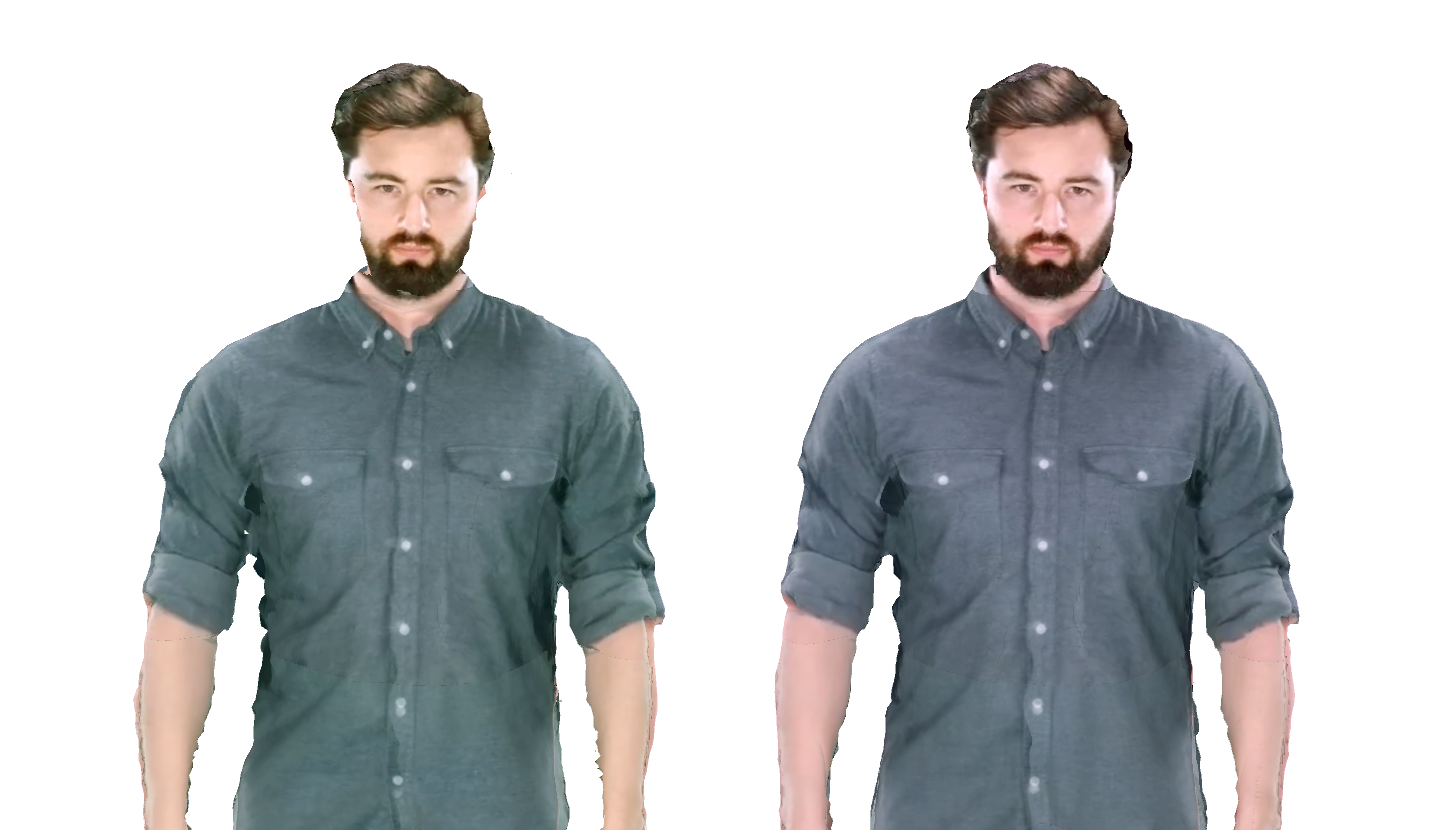
FFmpeg is a powerful command-line tool that allows for very specific parameters to be set during encoding. These parameters are critical to the performance and quality of the assets once they are played back in Unity. Minute changes in color space or aspect ratio metadata can be the difference between an immaculate reconstruction and one riddled with distortion and artifacts.

Left - Default color settings applied. Tinted color, and artifacts in geometry.
Right - BT.709 color settings applied. Correct color and geometry.
For an introduction to FFmpeg, explore the documentation below.
FFmpeg Documentation portal →
We recommend adding FFmpeg to Windows Path as described in this guide so that you don't have to jump around to different directories in the command line interface.
The following examples assume that you will be starting from a Combined Per Pixel image sequence as the input to FFmpeg, which preserves the most quality in the resulting asset.
ffmpeg -r 30 -f image2 -start_number 0 -i source_img_sequence_prefix_%06d.png -c:v libx264 -x264-params mvrange=511 -vf "scale='min(4096,iw)':'min(ih,4096)':force_divisible_by=2:out_color_matrix=bt709:out_range=full,setsar=1:1" -colorspace bt709 -color_primaries bt709 -color_trc bt709 -color_range pc -b:v 5M -pix_fmt yuv420p output.mp4Image sequence source options
-r 30(framerate) - interprets the source image sequence at 30 frames per second to match your Depthkit footage. If you captured at 15fps, set the framerate to 15.-f image2(format) - interprets the source as an image sequence.start_number 0- specifies which image in the sequence to start on. This can be found in the filename of the first image in your image sequence.-i source_img_sequence_prefix_%06d.png- uses only frames which begin withsource_img_sequence_prefix_(replace this with the filename prefix of your image sequence), and end with a%06d(6-digit zero-padded number) and.pngextension.
Video codec options
-c:v libx264(codec) - encodes using thelibx264(H.264) codec. This can be changed to other codecs likelibx265(H.265/HEVC) codec depending on your target publishing platform.-b:v 5M(bitrate) - encode with a target bitrate of5Mbps. You can adjust this based on your preference to balance file size and quality.
Using constant bitrate with-crf 15(constant rate factor)An alternative to encoding a variable bitrate with
-b:v (x)Mis to use a constant bitrate with-crf 15(constant rate factor), which targets uniform quality across the clip. It ranges from 0–51 (0 is lossless and 51 is heavily compressed) with a default of 23. We recommend 15 for a high quality asset, but dialing this down will reduce file size if needed.
-pix_fmt yuv420p- applies the YUV 4:2:0 pixel format, which reduces file size.-x264-params mvrange=511- For H.264 videos, this prevents artifacts generated when the motion vector range (mvrange) exceeds the H.264 level 5.2 specification [-2048, 2047]. Keep this value at or under511to stay within spec. See this documentation from Oculus for further information.
Video filter options: Scaling
Downscaling your Combined Per Pixel video filesYou may need to downscale your Combined Per Pixel video files due to hardware decoding resolution limitations on your computer or target device. In the example below, we are downscaling to 4096 to fit within hardware NVDEC resolution limitations, but you may need to specify a lower maximum resolution, such as 2048 for mobile.
-vf scale='min(4096,iw)':'min(ih,4096)'(video filters) - scale the video to maximum width of4096, a maximum height of4096. The image aspect ratio doesn't need to be maintained, so this command scales the width and height independently to fit within your desired target resolution.setsar=1:1forces a pixel aspect ratio of1:1which, when scaling, is necessary to ensure the best performance in Unity.
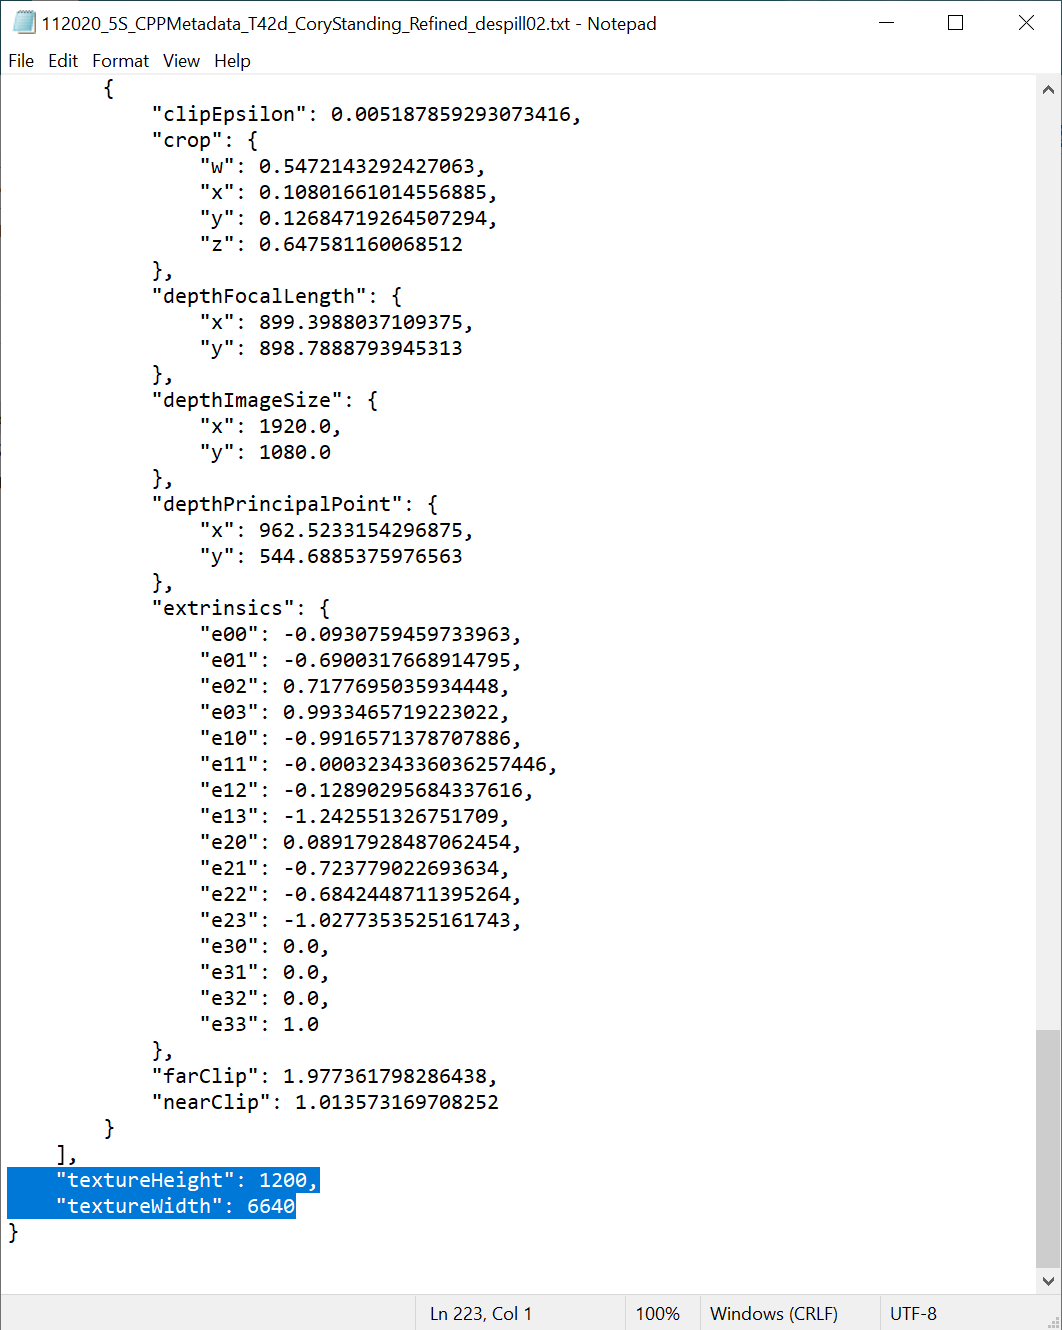
When resizing a Depthkit clip, you must also edit your metadata file to reflect this change in resolution.
Metadata Editing Instructions. To edit these values, open the metadata file which was exported with the Image Sequence in a text editor and scroll to the very bottom of the file.
Edit the textureHeight and textureWidth to match the resolution of your re-encoded clip. If you have calculated the height automatically, verify the video resolution by right clicking the video file, selecting properties, and viewing the frame height/width under Details.

Video filter options: Color Space & Color Range
Color spaces in FFmpegBy default, FFmpeg exports video in the BT.601 color space, which will subtly shift the colors of the of the Combined per Pixel video, and cause the geometry to misalign in the Unity renderer. Include all color matrix and color space options to ensure that the exported videos are encoded and stamped using BT.709 standards.
FFmpeg only honors one instance of the
-vfoption per command, so use:to merge multiple settings into one command.
out_color_matrix=bt709:out_range=fullapplies abt709color matrixscale=out_color_matrixandout_range=fullspecify to use full range color (also called PC color) as opposed to limited, (aka TV) range color. This ensures that the color ranges for depth remain full and undistorted. Read more about FFmpeg color space here.
Color Space metadata
-colorspace bt709,-color_primaries bt709,-color_trc bt709, and-color_range pcinject color space metadata into the output file so that the resulting video is interpreted properly by the player.
Using FFprobe to determine video Color Space and Color RangeIf you are uncertain about the color range of a video already encoded and want to determine if it has encoded the proper color range, you can use FFprobe command
FFprobe is a tool that comes along with FFmpeg for reading data from existing video files. If you've received a Combined Per Pixel video file, use the following command to see its encoding settings and metadata.
ffprobe -hide_banner -select_streams v:0 -show_streams <videofile>.mp4You will see a dump of metadata about the video. The Stream information near the end of the dump should look like this, most importantly the color format contains both PC and BT.709 encoding.
Stream #0:0(und): Video: h264 (High) (avc1 / 0x31637661), **yuvj420p(pc, bt709),** 4096x2560 [SAR 1:1 DAR 8:5], 5071 kb/s, 30 fps, 30 tbr, 15360 tbn, 60 tbc (default)
Another way to see this same information is if you scroll up on the dump from the video to the sections on color space and range, you should expect to see:
color_range=pc
color_space=bt709
color_transfer=bt709
color_primaries=bt709
Incorrectly encoded videos will look something like this:
color_range=unknown
color_space=unknown
color_transfer=unknown
color_primaries=unknown
Additional options
Optimizing for scrubbing in Unity & Proxy workflow
Quickly scrubbing H.264 videos requires frequent I-Frames, which are useful when setting reconstruction settings or blocking. By default FFmpeg places them at most 250 frames apart, which leaves large gaps on the timeline where the player doesn't have a complete frame to reference. Add I-Frames to every frame by adding -g 1 to the FFmpeg command.
Making each frame into an I-Frame dramatically increases the file size, so we recommend encoding multiple versions of your asset:
- Low-Resolution 'Proxy' - Encode this with an I-Frame every frame, but smaller dimensions for a working asset that scrubs quickly to speed up the placement and timing of the asset in Unity.
- Full-Resolution Final Asset - Encode this at the final resolution, with only enough I-Frames to avoid artifacts. Once the asset is timed and placed in Unity and you don't need to scrub the timeline, replace the proxy version with this full-resolution asset for the final build.
Options
-sc_threshold 99sets the "scene cut" threshold to 99, meaning that if 1% of the frame is different enough, it will be considered a different "scene" which needs to be cut to via inserting a new key frame.-keyint_min 1 -g 30sets the minimum distance between any two keyframe is set to1, and the maximum to30. Meaning that the encoder is allowed to put subsequent keyframes next to one another, and must put at least one keyframe every thirty frames. If blocky artifacts persist even with these settings, reduce the-gparameter until they are gone.
Updated 10 months ago
