Camera Pairing

Now that your camera and lens combination has been solved for lens distortion, and your camera and depth sensor have been mounted together, you are ready to pair your camera and depth sensor in Depthkit!
In this page
Requirements →\ Sensor configuration →\ Camera configuration →\ Capturing pairing samples →\ Linking pairing samples →\ Reviewing pairing results →\ Pairing metrics →\ Improving camera pairing →\ Importing a camera pairing →\ Validating a camera pairing →\ Next steps →
Requirements
This stage is focused on capturing the relationship between the camera and the sensor. You will need:
- A computer running Depthkit
- Your assembled camera and sensor rig
- A completed lens correction profile
- A calibration chart
- A tripod or stand for your calibration chart
- A tripod for your camera rig

Create a project and connect your depth sensor. Once launched, you will find yourself in the Pair Camera window.

Sensor configuration
Make sure your desired sensor is selected in the Sensor Configuration panel under Sensor. For this walk through, we are going to pair the Azure Kinect to our camera. Please note that sensor configuration settings will vary per sensor.

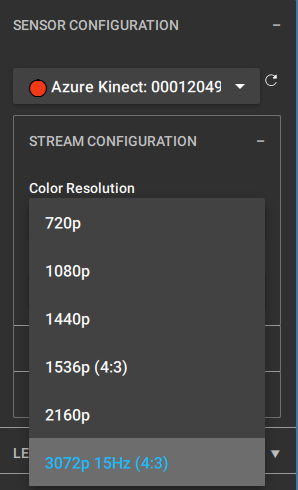
Set your color resolution and depth mode in the Stream Configuration menu. At this stage, these settings are only being set to optimize for camera pairing because they are the highest resolution. You will need to change color and depth modes before you begin recording.
❗️ Azure Kinect: 15Hz Modes for Camera Pairing Only
While we recommend that you conduct your pairing workflow at the maximum resolution in color and depth, those settings only record at 15Hz. During recording, you must change this to a resolution that is not 15Hz. If you use 15Hz in the Record panel, you will not be able to sync your sensor and camera footage.**
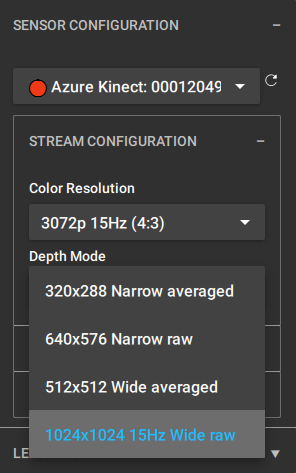
Set your depth mode to 1024x1024 Wide raw for maximum coverage. Similar to the sensor color resolution, this is optimized for Camera Pairing and we will change this depth mode when we are ready to record later on.
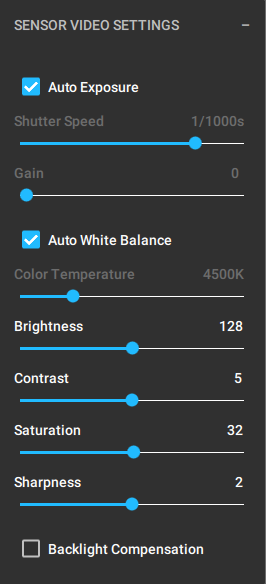
Set your sensor video settings, keeping a close eye on your exposure. If your footage is too bright or too dark, it will be difficult to pair your camera and depth sensor later.
Camera configuration

At this stage, your camera and depth sensor should be securely rigged together as described in Rigging.
❗️ Lock in Resolution, Zoom, and Rig
Do not change camera resolution, zoom or alter your mount after this point. If you do, it will make your pairing invalid.
Once your rig is ready, you can now set up your camera just as you would for any video shoot when it comes to exposure and optimizing your camera settings for your capture environment. There are a few additional things to keep in mind when using your camera with Depthkit.
You will need:
- A well exposed area. If the area is under or over exposed, you will not be able to pair your devices properly.
- A wide depth of field. Your capture space should be sharp and in focus during pairing. Set your aperture at f5.6 or higher to ensure that your entire checkerboard is in focus.
- Ensure your resolution is set to match the resolution you used to generate your lens correction profile. This must be the same resolution that you intent to shoot with.
- Lock the focal length. If you zoom your lens after pairing, you will not have successful camera pairing data. We recommend that if your lens doesn't have a zoom lock that you put a piece of gaffer tape around the body of the lens covering the zoom lens and the lens body to prevent it from getting accidentally zoomed.
- Lock the frame rate to match the frame rate of the sensor. This will likely be 30fps. If you do not set your camera fps to match your sensor, it will be difficult to synchronize your footage later on.
📘 30 fps doesn't always mean 30 fps
Some cameras, when set to 30 fps, may actually be recording at 29.97. You may want to test your camera to check for this. It is still possible to record at 29.97, but you may find that your synchronized sensor and camera footage is not fully in sync.
Capturing pairing samples
Under the Lens Profile panel, import the lens correction profile that you generated in the previous steps.

Once the lens correction profile is loaded, you are ready to record pairing samples from both the camera and the depth sensor. These are short video recordings of the calibration chart located at various sections of the frame and z-space.
Positioning the Calibration Chart\ Firmly attach your calibration chart to an adjustable stand. If you do not have a stand, you can use the back of a chair or similar stable object.

❗️ Calibration Chart Must Remain Stable
For best results position your calibration chart securely on a tripod or stand. Do not rely on a person holding the chart still while capturing a sample. Even minor inconsistency in position between the Sensor and Cinema Samples will invalidate the pairing data.
You will take one sample from the sensor, the Sensor Capture, and one sample from the camera, the Cinema Capture, for each calibration chart position. In Depthkit, you capture a sensor sample with Capture Sample button. On your camera, you will record each sample in the same position without moving the chart.
📘 Capture Pairing Samples on Both Camera & Sensor
- Place your checkerboard.
- Ensure that it's visible in Sensor and Camera views and camera is focused.
- Capture Sample on your computer.
- Record a short, 1-3 second clip on your camera.
- Repeat!
With each sample, make sure you are working in a well lit space and that your calibration chart is in focus. A blurry sample will not generate a successful result.
As you place the calibration chart in the capture space, Depthkit will indicate if the checkerboard pattern in being detected by showing a grid of pinks dots, seen in the 3D viewport. Make sure the calibration chart is detected before you capture your Sensor Capture with Depthkit.

Positioning the Calibration Chart
You should capture a series of samples by moving the calibration chart around in the space. You can also angle the camera/sensor rig to make sure you are filling the desired sections of the frame.
The key is to place the calibration chart across the frame in x, y but also in z. You can think about your capture space as a volume. With each sample, you should think about representing not just the 3D space that your subject will be located, but also the near and far distances from the rig. At minimum, you should capture at least three samples, but more samples will improve the quality of your pairing.
This does not mean you have to fill all sections as you did in the lens correction workflow. Instead, we recommend thinking about the 2D frame and the 3D z-space in quadrants. Each quadrant should have a sample to represent your entire capture range.

🚧 Check That Your Chart Is Visible In Both Frames
Always check that the calibration chart is in the frame in both the sensor and the camera views, since the two may not perfectly overlap.
Linking pairing samples
When it comes to the sensor samples, since the sensor is recording right to Depthkit, the sensor samples will be populated in the Library panel under Pairing Samples.

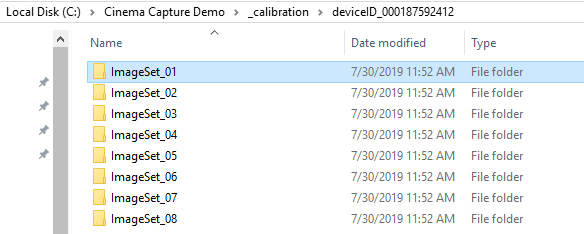
For reference, these sensor samples are located in your project folder and can be found in the _calibration folder, categorized by the depth sensor used for pairing.
Once you have captured a series of both sensor and cinema samples filling the 2D frame and 3D z-space, you are ready to pair the camera and depth sensor in Depthkit.
- Transfer the video files from your camera to your computer.
🚧 Camera Codecs
Depthkit does not support all codecs. If you are using a camera that records with an uncommon codec, you will need to re-encode the video samples. We recommend re-encoding to H.264 in an mp4 container if you have any issues.
- Double click a sample to expose the sample thumbnail preview and import the Cinema Sample. Click Cinema Sample and point the file dialog to the corresponding video sample clip.
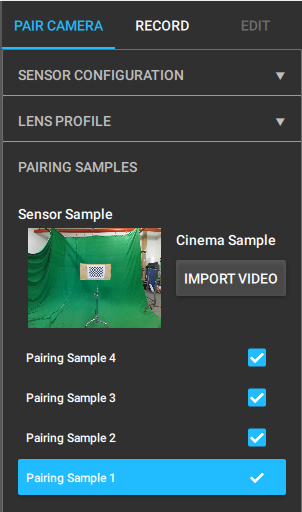
When the Cinema Sample is successfully linked, you will see sample thumbnail populated in the preview panel.
Repeat this step for all samples.

- When all of the Pairing Samples are linked with their corresponding Cinema Samples, click the Pair Camera button and in a few seconds, you will have a Camera Pairing! Enable the Preview Pairing checkbox to view your results.

Reviewing pairing results
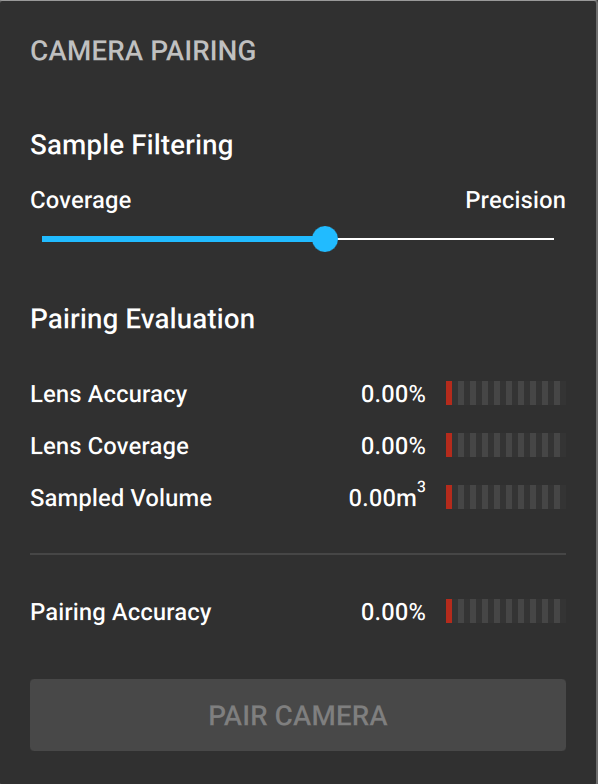
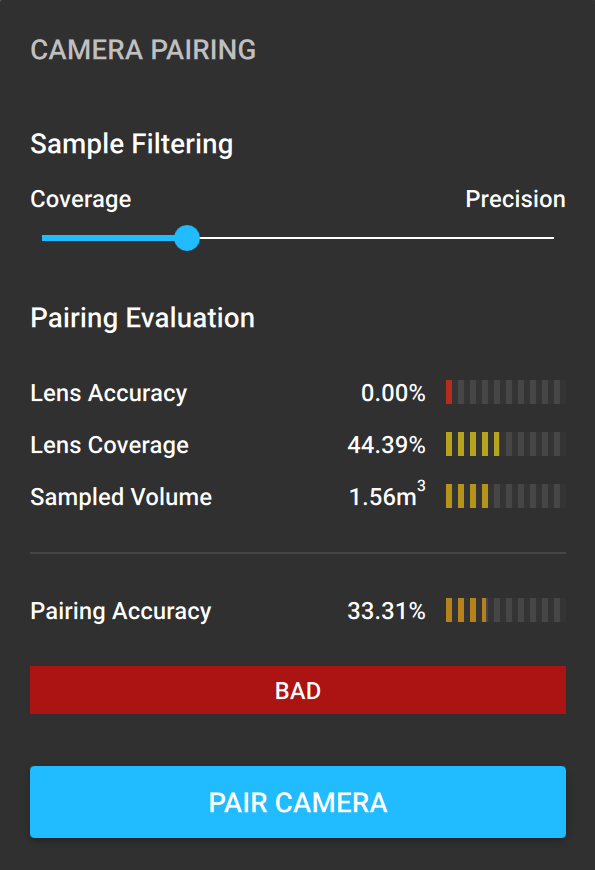
The quality of your pairing is represented by the Pairing Evaluation in the Camera Pairing panel. This is designed to give you qualitative feedback on the pairing of your camera and sensor, providing insight into the success of the data.
Before you begin capturing samples, the panel will display the following:
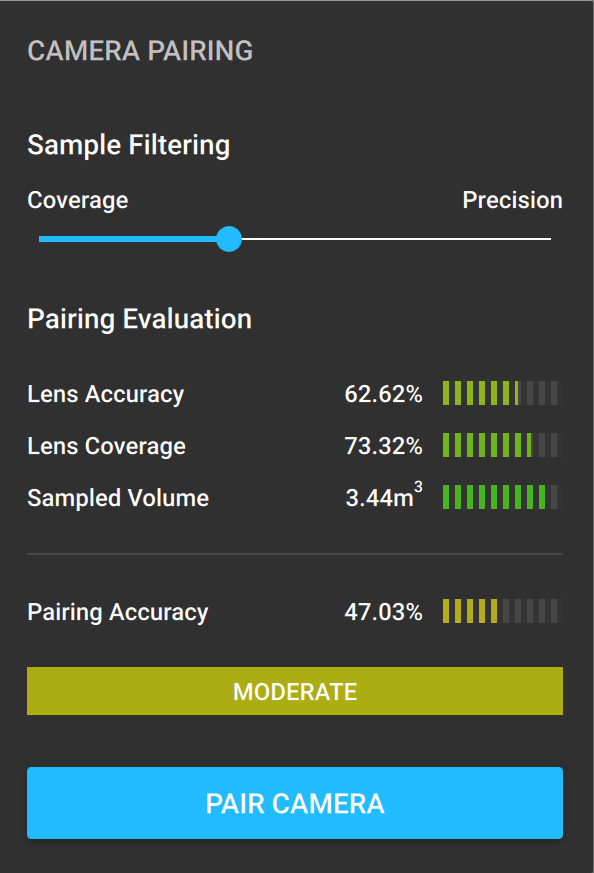
If you have a moderate or bad Pairing Accuracy, you will need to go back and take more samples or replace your lens correction profile to improve your pairing.
See our section on Depthkit Cinema calibration issues for other troubleshooting steps.
Pairing metrics
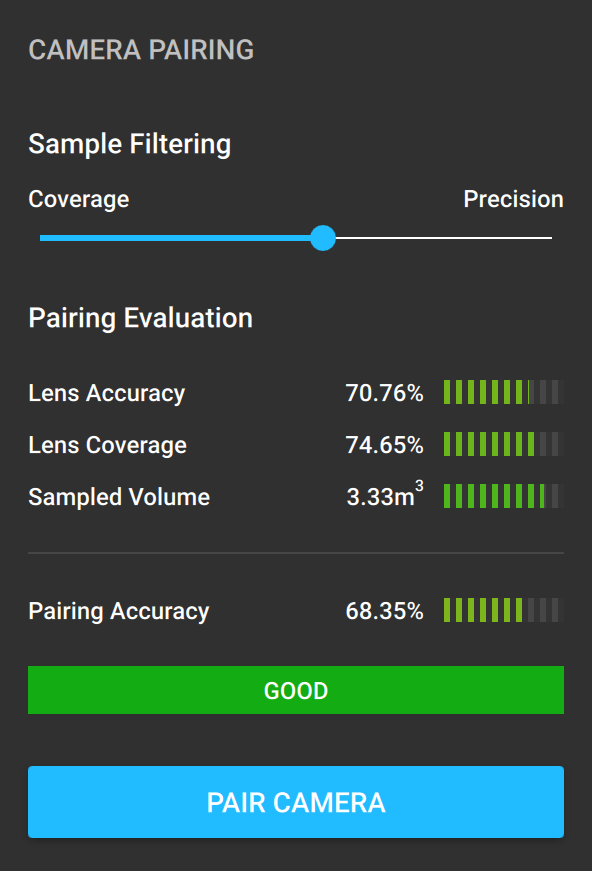
Sample Filtering: impacts the error metrics.\ It allows you to specify coverage of the frame versus precision of the points in your samples. In a way, it gives you the chance to filter out points that are not as accurate. This can be useful if you have many samples and would like to remove points that are not successful. In this case, you would shift the slider towards precision so it can filter out less precise point on the calibration chart. In contrast, if you have only a few samples, you might shift the slider towards coverage to improve your metrics.\ Please note that you should wait to shift this slider until you have clicked Pair Camera, so see the final Pairing Accuracy before correcting it.
- Lens Accuracy: represents the quality of the Lens Correction Profile.
- Lens Coverage: represents the combined coverage of the calibration chart across the sensor and cinema samples. This is represented as a percentage of the frame and the higher the percentage, the better. However, it is unlikely that you will reach 100%.
- Sampled Volume: represents both the 2D frame and the z-depth of the capture space. If you imagine the depth sensor range as a volume, the sampled volume will represent the successful samples captured in the 3D capture space. For best results, place the calibration chart at varying distances from your rig to maximize the sampled volume. This value is represented as cubic meters.
- Pairing Accuracy: indicates the overall success of your Camera Pairing. This is the the key number to look at as a success indicator. For best results, make sure this value is above 66%.
Alignment Indicators in the 3D Viewport
You can also check the quality of each sample by double clicking on a sample and viewing the 3D viewport. As seen below, a well paired sample will appear to have a grid of white dots at the intersections of the calibration chart.
Each white dot is actually made up of an interior dot and an outer white ring, which will overlap when representing a good quality sample. This interior dot represents the sensor view and the ring represents the cinema view.
A good pairing sample has consistent white dots with white circles fully within the white rings.
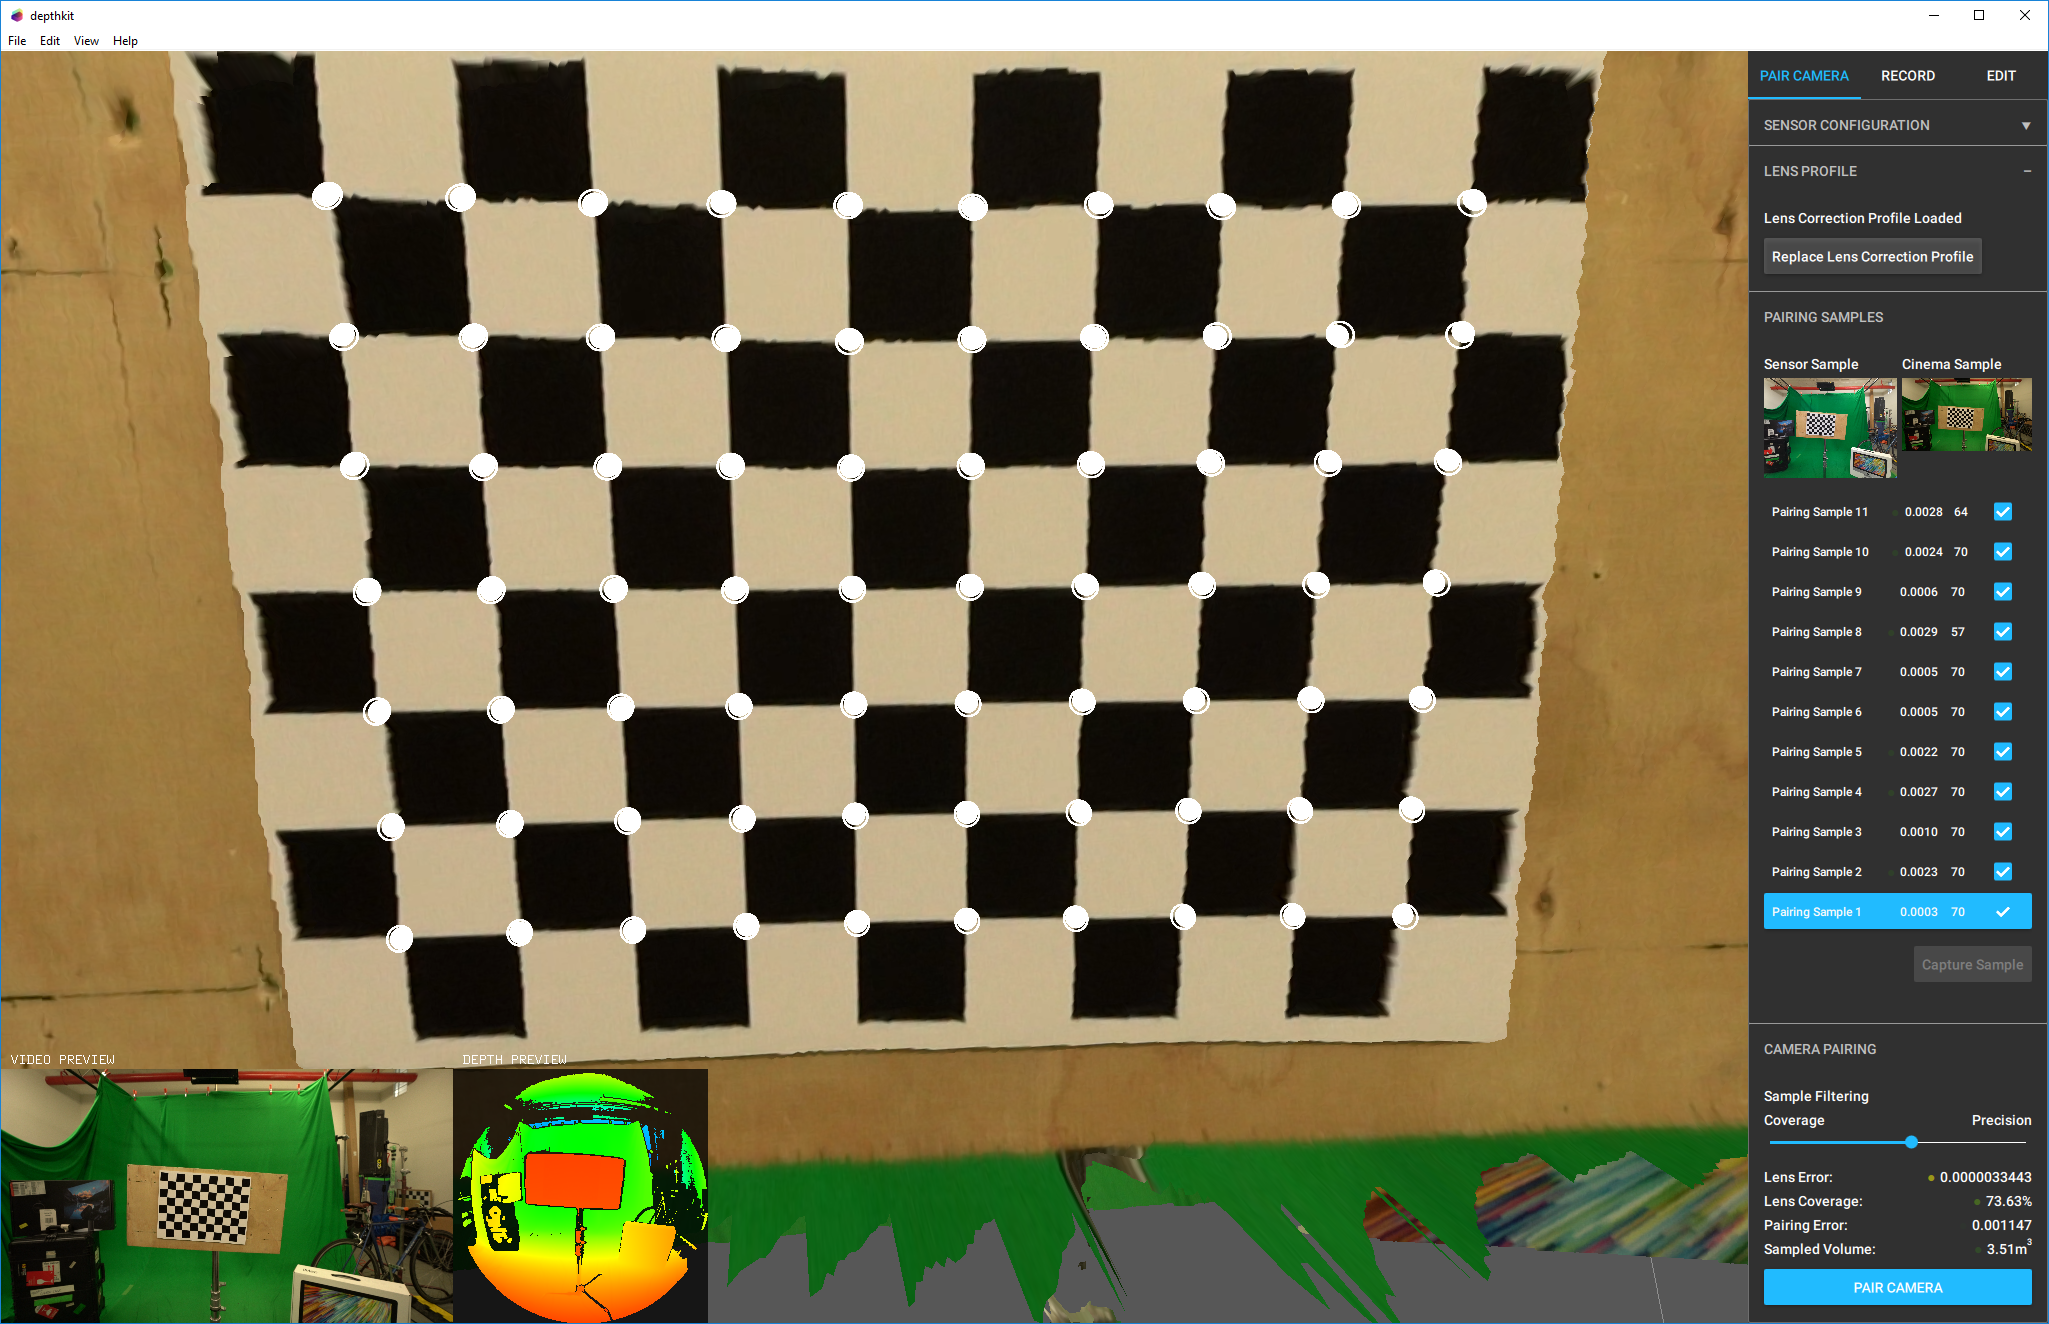
If a sample is not well paired, you will see a misalignment. If the dot outside the ring or you see a line connecting the two indicators, it is not fully aligned.
Zoom into each sample preview to see these results. Notice in the example below, the bottom right hand section of the calibration chart is well aligned, whereas the upper left section is not as successful.

Improving camera pairing
If you have a bad or moderate Pairing Accuracy, no worries! There are several steps you can take to reach a successful Camera Pairing.
📘 Rule of Thumb: Capture more Samples
At any point during your Camera Pairing process, you can go back and capture more samples to improve your existing Camera Pairing.
Increase Lens Coverage & Sampled Volume
- Increase the Lens Coverage by increasing the x and y positioning of the calibration chart across the frame.
- Increase Sampled Volume by increasing the x, y, and z positioning of the calibration chart. Position the chart across the frame and at various distances from your rig.

Increase Lens Accuracy\ If your Lens Accuracy is below 33%, you may need to:
- Capture more samples
- Adjust the Sample Filter
- Re-shoot your lens correction profile

Deselect Low Quality Samples\ If you have taken many samples, it may be helpful to look through each one and double click on the sample to view the alignment indicators. If there is a clear distance between the grid of white dots (Sensor Sample) and the grid of white circles (Cinema Sample), you can deselect the sample checkbox and click Pair Camera again.

Importing a camera pairing
If you have already generated a successful Camera Pairing and your are using a secure camera/sensor rig, you can import this previously generated pairing into a new Depthkit project. You should only use an existing Camera Pairing if your camera/sensor rig is mounted in the same configuration, you are using the same lens, and the camera resolution, zoom, and focal length are the same.
To import a Camera Pairing, go to the Depthkit menu under File and select Import Camera Pairing.

Locate your existing Depthkit Cinema project and select the parent project directory folder that contains your camera pairing data. This will automatically pull in your existing samples into your new project.
❗️ Overwriting a Camera Pairing
If you import a Camera Pairing into a project that already contains a Camera Pairing, it will ask if you want to overwrite the data. If you opt to overwrite, you cannot undo this action.
Validating a camera pairing
We always recommend capturing a test take to verify your Camera Pairing before production. It doesn't have to be scientific, simply grab a matte object with some defining features and make a quick recording while moving the object around the 3D space. In the example below, we grabbed a cardboard box with some colorful tape and walked around the capture area. The goal here is to verify that the box depth data and color are properly aligned in all areas of the frame.
To check this take, import the camera capture and synchronize the sensor and color footage as described in Processing Cinema captures .

Next steps
Once you have generated a successful camera pairing and validated it, you are ready to record with Depthkit Cinema .