Processing Studio captures
Once you’ve recorded captures with Depthkit Studio, the Editor panel allows you to review, manage, clean up and export your volumetric videos.

In this page
Editor overview →\
Studio Editor workflow →\
Recordings Library →\
3D Viewport →\
Timeline →\
Toolbar →\
Linking Cinema captures in Depthkit Studio (optional) →\
Setting In and Out points →\
Isolating capture with the bounding box →\
Building the surface with fusion →\
Blending textures →\
Next steps →\
Editor overview
See below for a breakdown of the different components of the Editor.
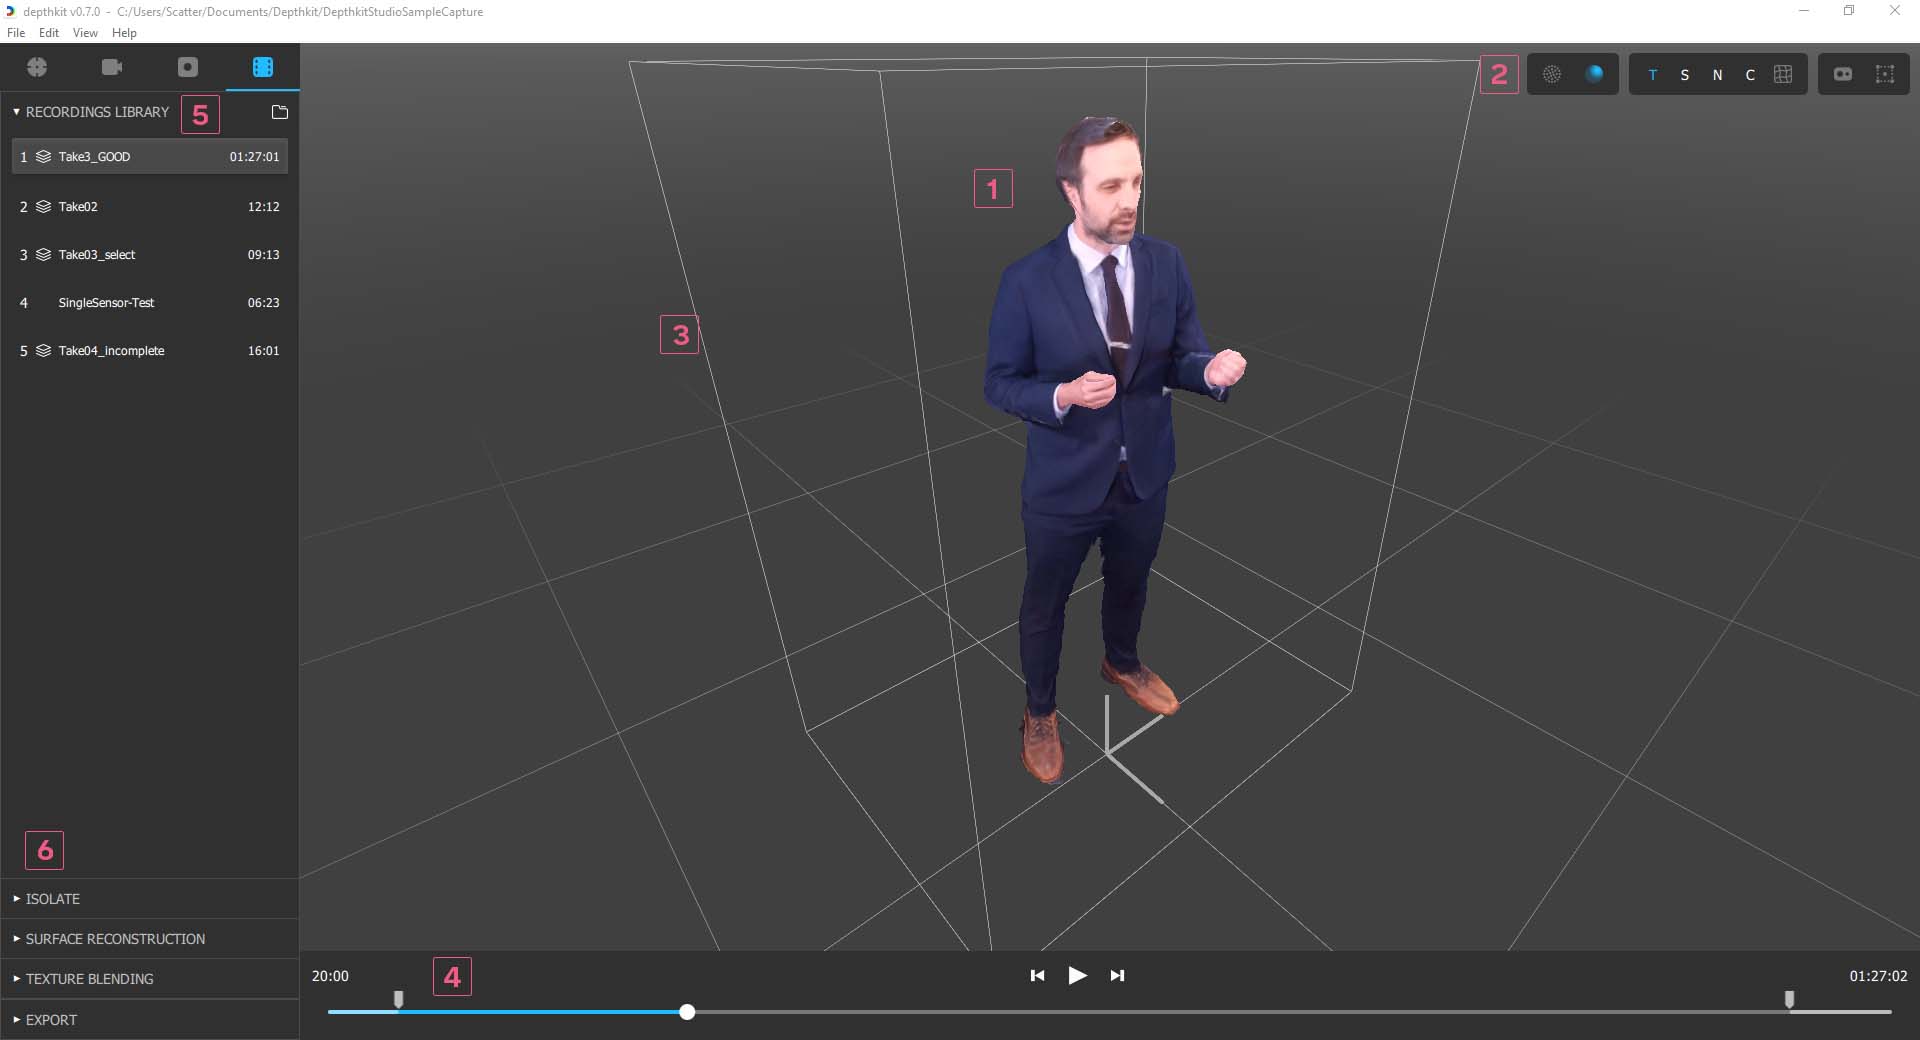
- 3D Preview Shows the results of the capture in a 3D interactive view.
- Toolbar Provides controls for visualizing the capture data and ability to toggle widgets in the viewport.
- Bounding Box Sets the region of interest in the capture. Only the data within the bound is processed and exported.
- Timeline & Transport Controls Enables scrubbing and playback of the currently selected clip.
- Recordings Library Lists all media captured in the project and renaming and deleting captures.
- Editing & Export Panels Panels for adjusting how the capture is reconstructed, and the format of the exported data.
Studio Editor workflow
The Editor workflow starts with selecting a capture in the recordings library. Double-clicking the capture loads it in the 3D Viewport, allowing you to inspect and adjust the capture results. The Editor workflow tasks are to:
- Scrub through the timeline to set the performance in and out timecode points;
- Isolate the figure in space with the volume bounding box;
- Adjust surface reconstruction and texturing settings;
- Export the sequence in the appropriate format for your destination.
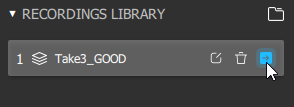
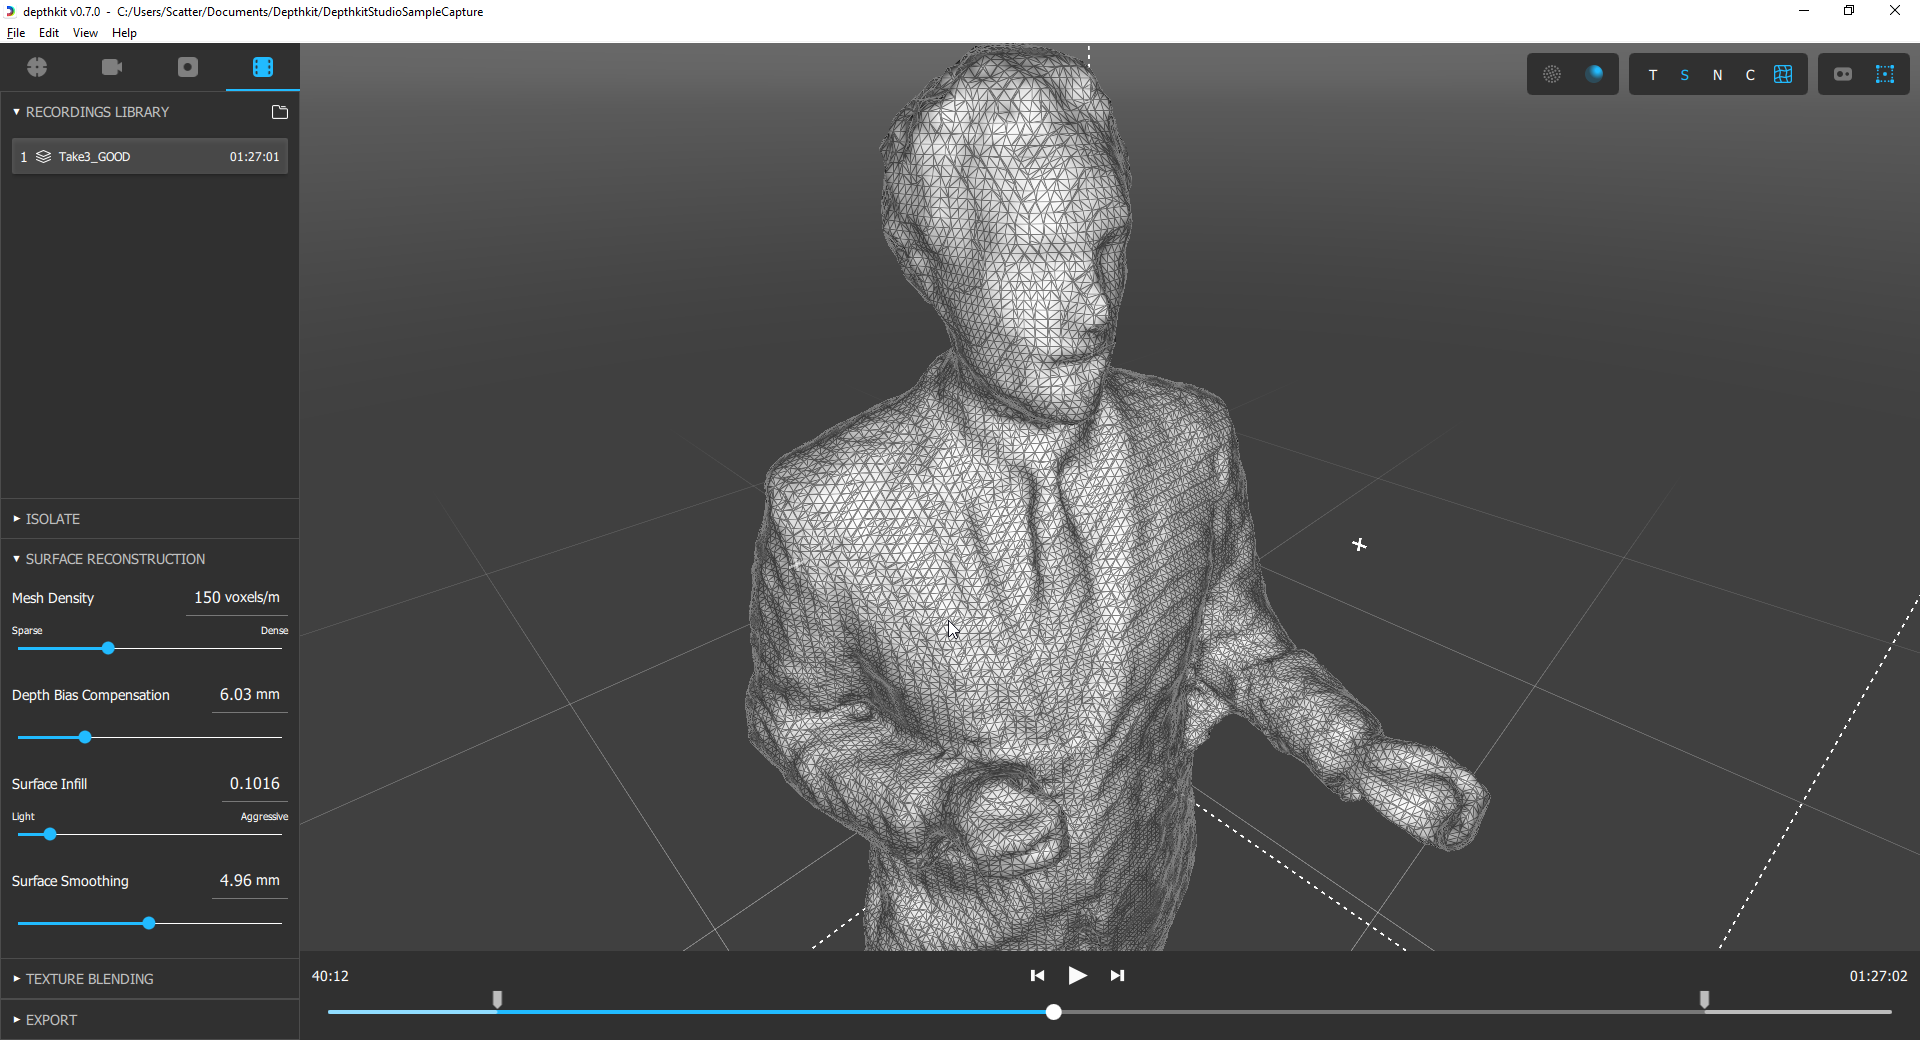
Recordings Library
In the top-left Library panel, double-click the capture you would like to edit and export to bring it up in the 3D viewport. Once active, it will be highlighted in the Library.
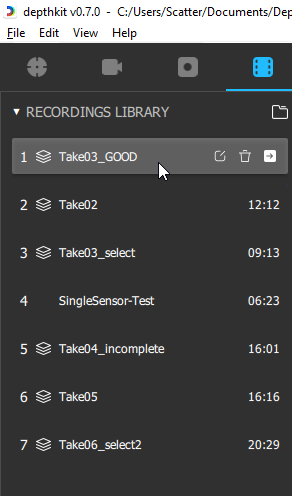
The elements of an entry on the Record Library are:
- Capture sequence number
- Icon indicating Depthkit Studio capture containing multiple sensors
- Recording Name
- Rename Recording Button
- Delete Recording Button
- Open Recording’s Perspectives Button (Studio Only)
🚧
Drilling in to see the individual perspectives is only needed for inspecting individual perspective for quality diagnostics, and attaching a Cinema capture for the Studio + Cinema workflow.
- Recording Duration in timecode format (HH:MM:SS)
Renaming Recordings
Renaming recordings in the library enable you to keep your project organized with more recognizable recording names.
🚧
Renaming a Recording does not change its filename on disk.
Renaming does change the name of clips exported out of Depthkit.
Deleting Recordings
Deleting recordings let you keep a tidy project and remove media that you know you don’t need.
❗️
Deleting a Recording removes the media permanently from the hard drive. This cannot be undone.
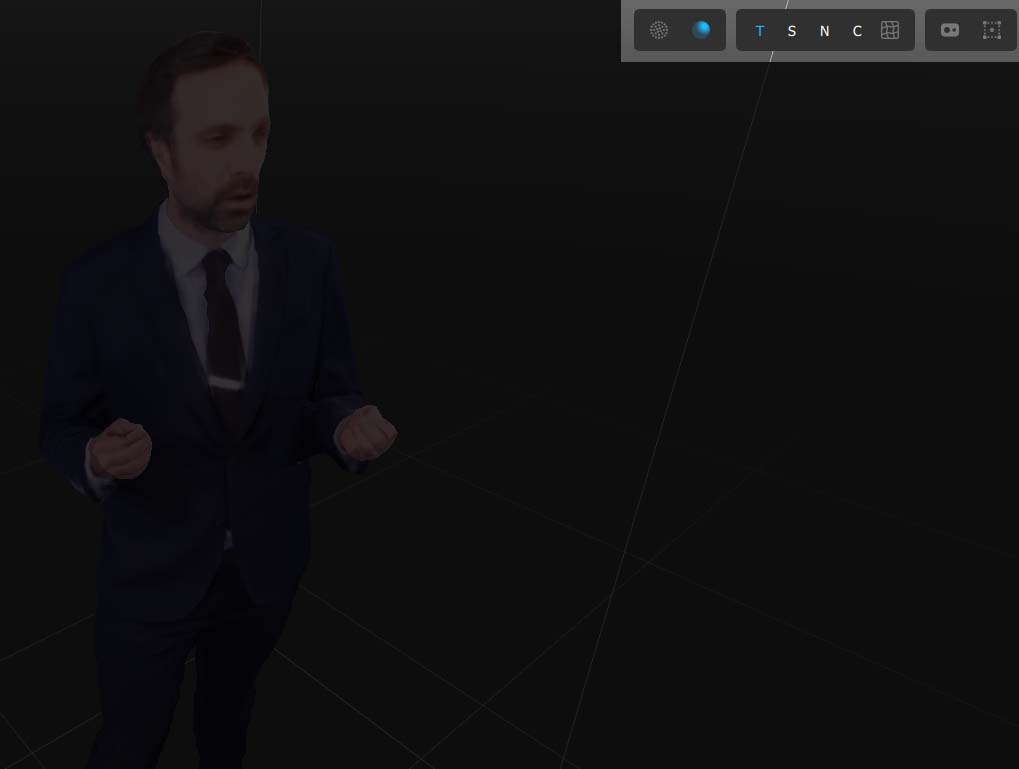
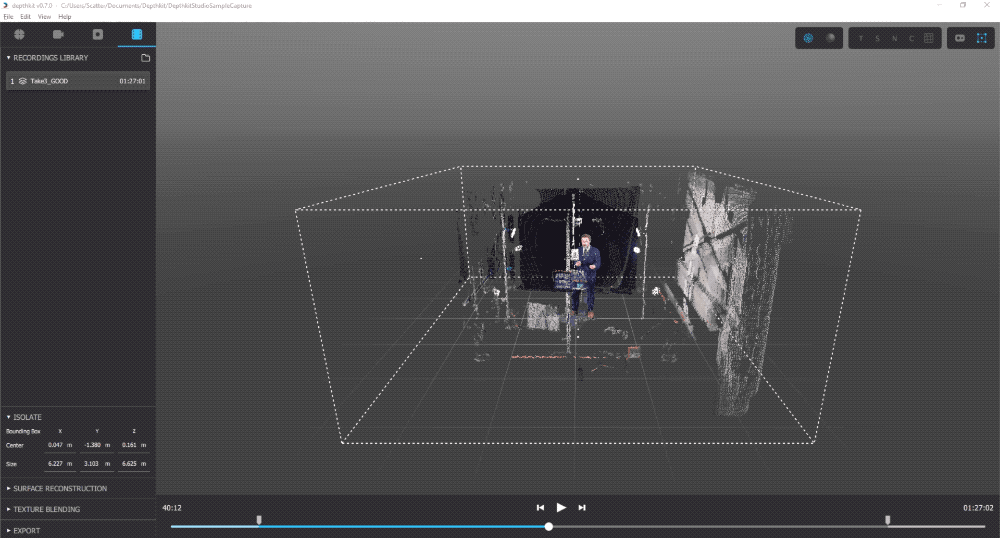
3D Viewport
The 3D Viewport shows the results of the capture, including the current volume bounds and floor grid and world origin.
Navigating the Viewport Camera:
- Reset: Double click the viewport to reset the camera view to center on the bounding box
- Spin: Click and drag the Left mouse to rotate the view
- Zoom: Click and drag Right mouse or scroll wheel
- Pan: Click and drag middle mouse
- Rotate: Click and drag near the edge of the viewport
Timeline
The timeline below the Viewport allows you to scrub through the clip, as well as set the in and out timecode marks of what will be included in the exported.

- Curently selected timecode Displays the current frame’s timecode in HH:MM:SS:FF format.
- In point handle: Specifies the beginning of the current recording when exported.
- Playhead handle : Shows the current position in the timeline. Drag this to scrub through the capture.
- Jump to In point: Instantly moves the playhead to the In point.
- Frame-step backward: Moves the playhead back one frame.
- Play/Pause
- Frame-step forward: Moves the playhead forward one frame.
- Jump to Out point: Instantly moves the playhead to the In point.
- Out poin handle: Specifies the endof the current recording when exported.
- Clip duration: Displays the recording's total duration in HH:MM:SS:FF format.
Toolbar
To the top right of the Viewport is a toolbar with several components for assisting in visualization of the capture results prior to exporting.
Rendering Preview Modes
Preview Streams as Points shows the raw depth data as a colored point cloud. This view is useful for fast preview of the performance.
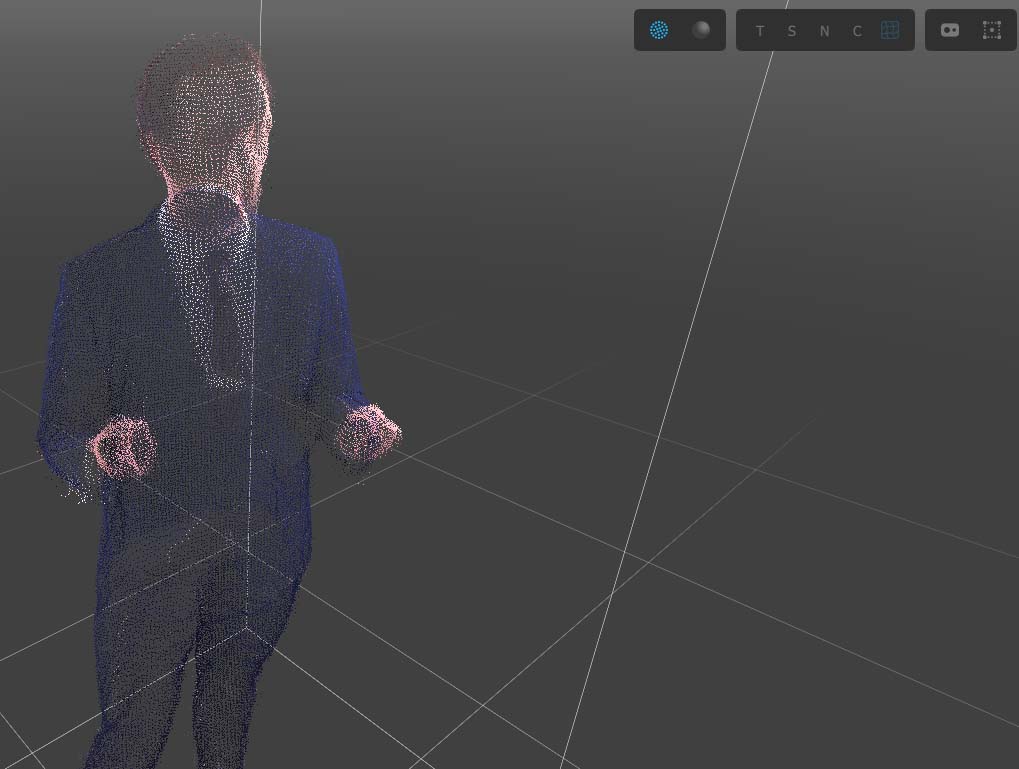
🚧
Note that there is no raw-point export format. All exports use the Fused Mesh format. To achieve a pointcloud styled-look in Unity, use the Visual Effects Graph particle system.
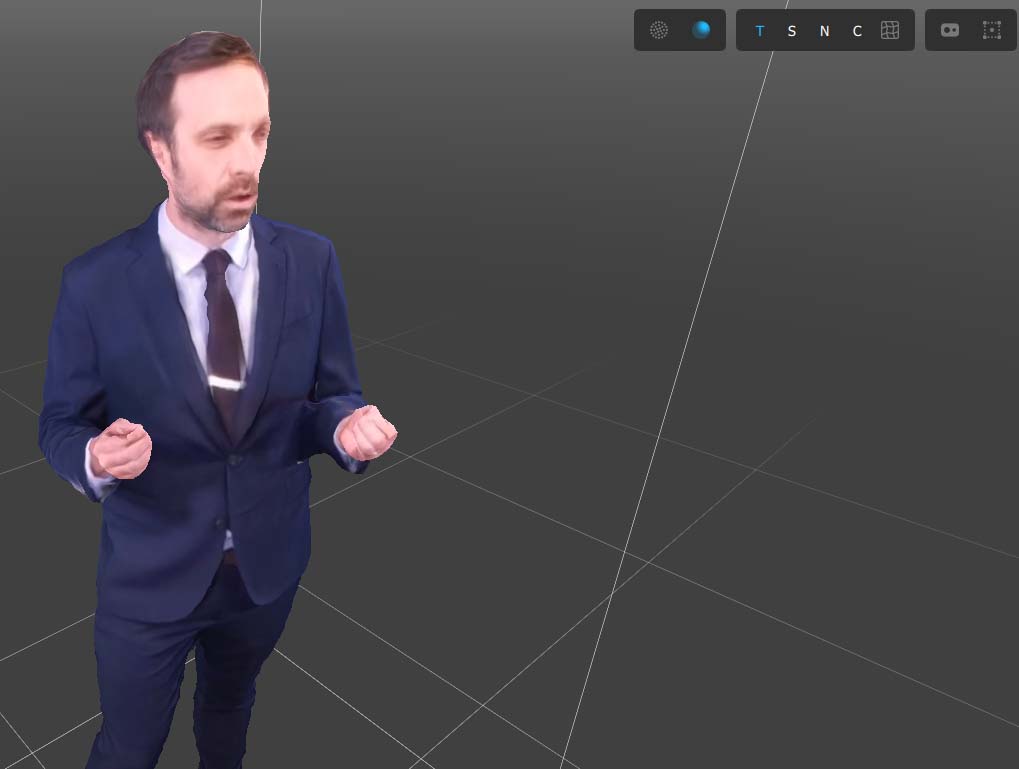
Preview streams as a Mesh shows the results of the perspectives fused into a single mesh. This mode has several associated preview modes in the following panel.
🚧
The Fused Mesh previews may be very slow to playback and scrub in realtime. For performance reasons, it’s recommend to view Preview Points when scrubbing to review performances, set the the Bounding Box.
Mesh Visualizations
Preview Mesh with Texture - This mode shows the results of the blended textures on the mesh. It is the standard visualization and designed for assessing the full surface and texture quality of the capture.

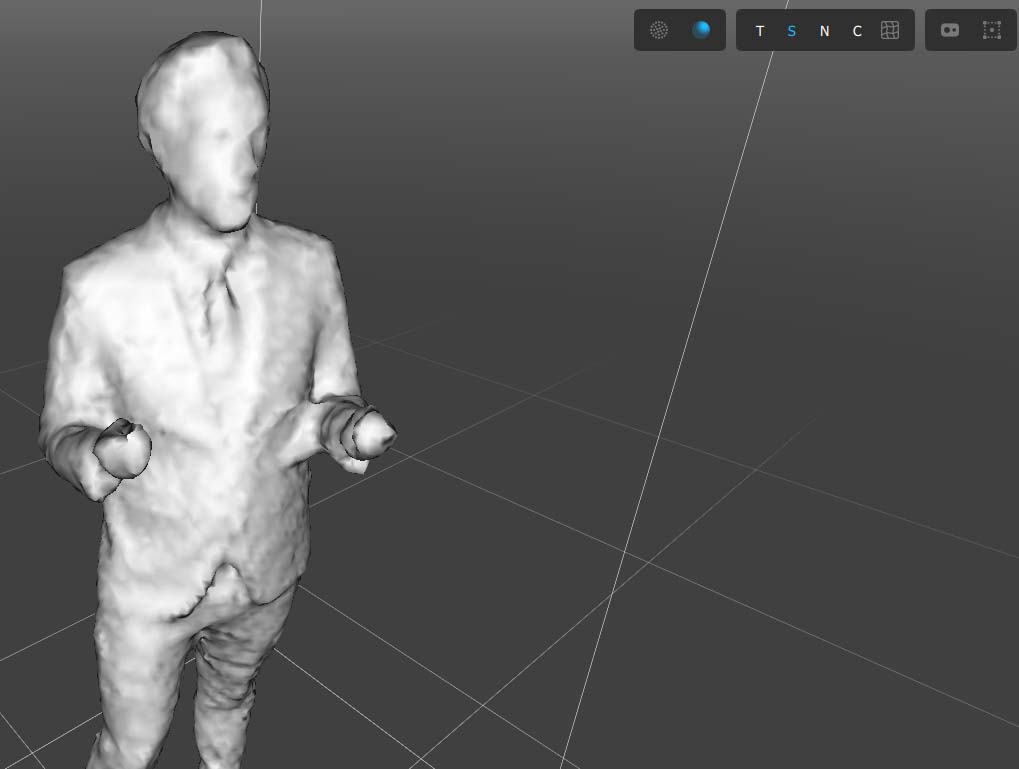
Preview Mesh Shaded with no texture - Removes the texture and adds a simple point light shading. This preview mode is helpful for inspecting the surface reconstruction quality in isolation, alone without contributions from texture. Use this preview conjunction with the Surface Reconstruction settings to better see the results of those adjustments.
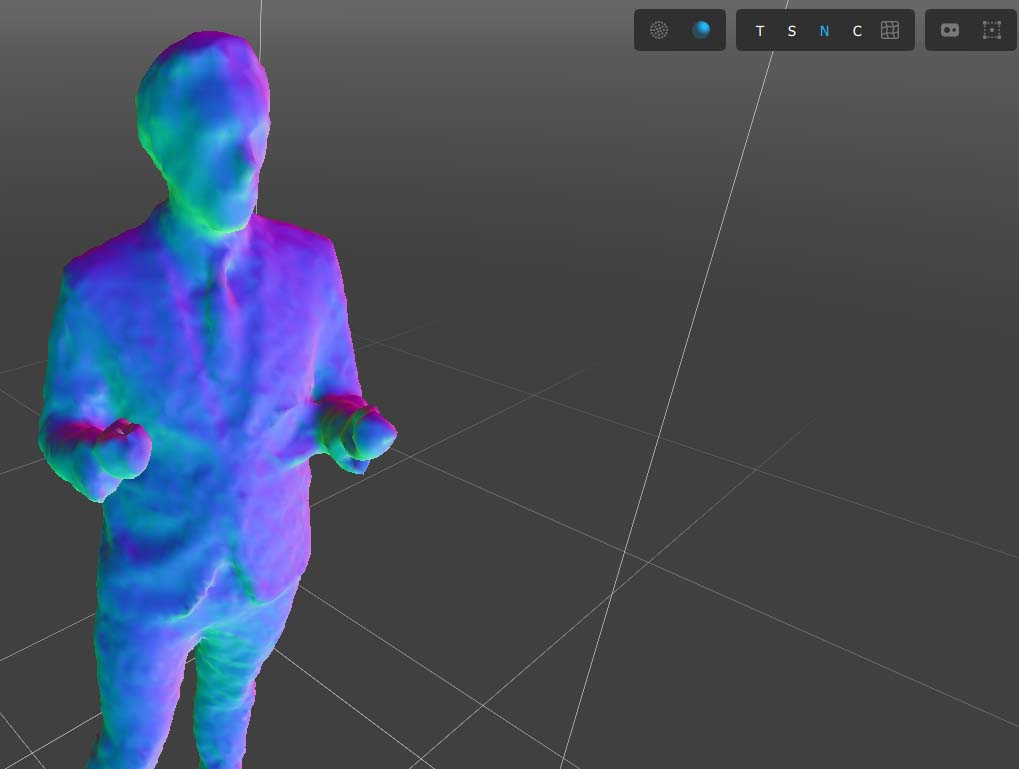
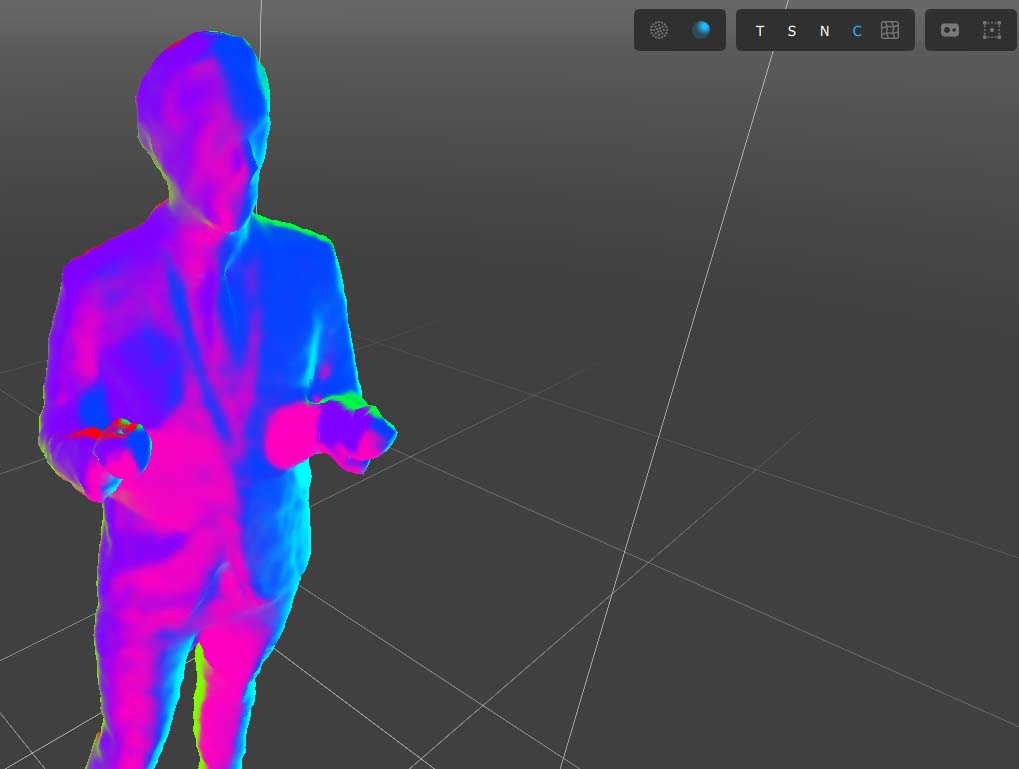
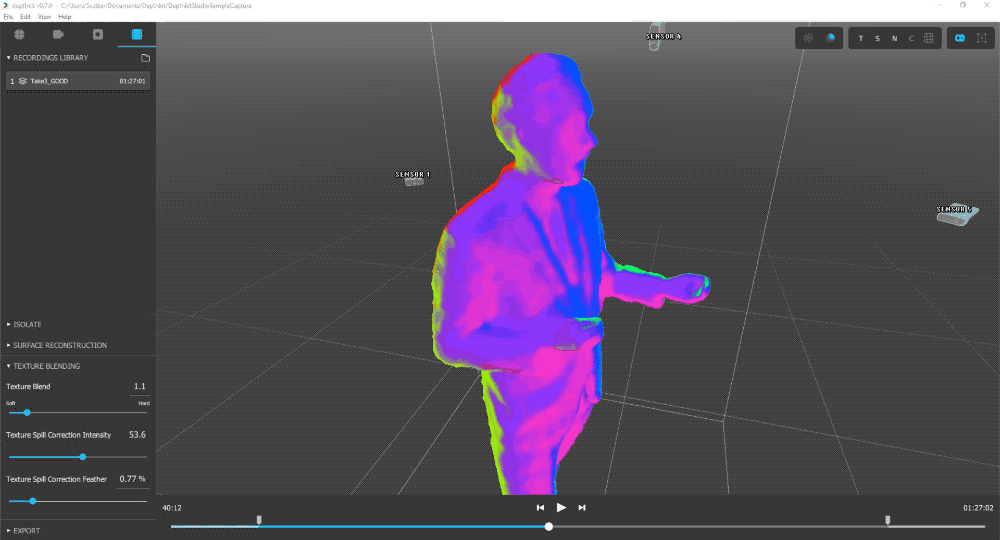
Preview Mesh with Surface Normals - Removes the texture and adds a colorized normal map. Similar to Shaded view, this visualization mode is helpful for adjusting Surface Reconstruction settings.
Preview Mesh with blend contributions to texture blend - Replaces the texture with a color-coded map that illustrates how each individual color source camera is contributing to the final textured results. The colors are coordinated with the sensor colors seen when enabling the Sensor Gizmo. This preview mode is helpful while adjusting the Texture Blending settings.
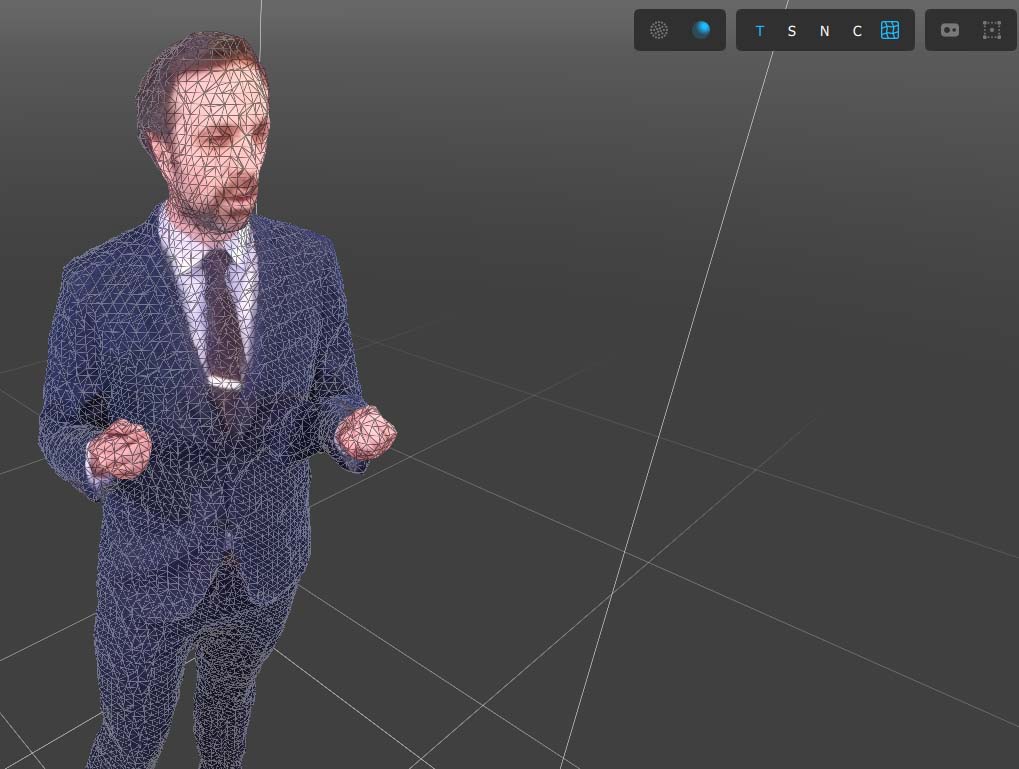
Toggle Mesh Wireframe Preview - Enables a wireframe overlay onto the fused Mesh preview. This illustrates the topology of the surface as well as the density of the mesh resulting from the Mesh Density setting under Surface Reconstruction settings.
Gizmos
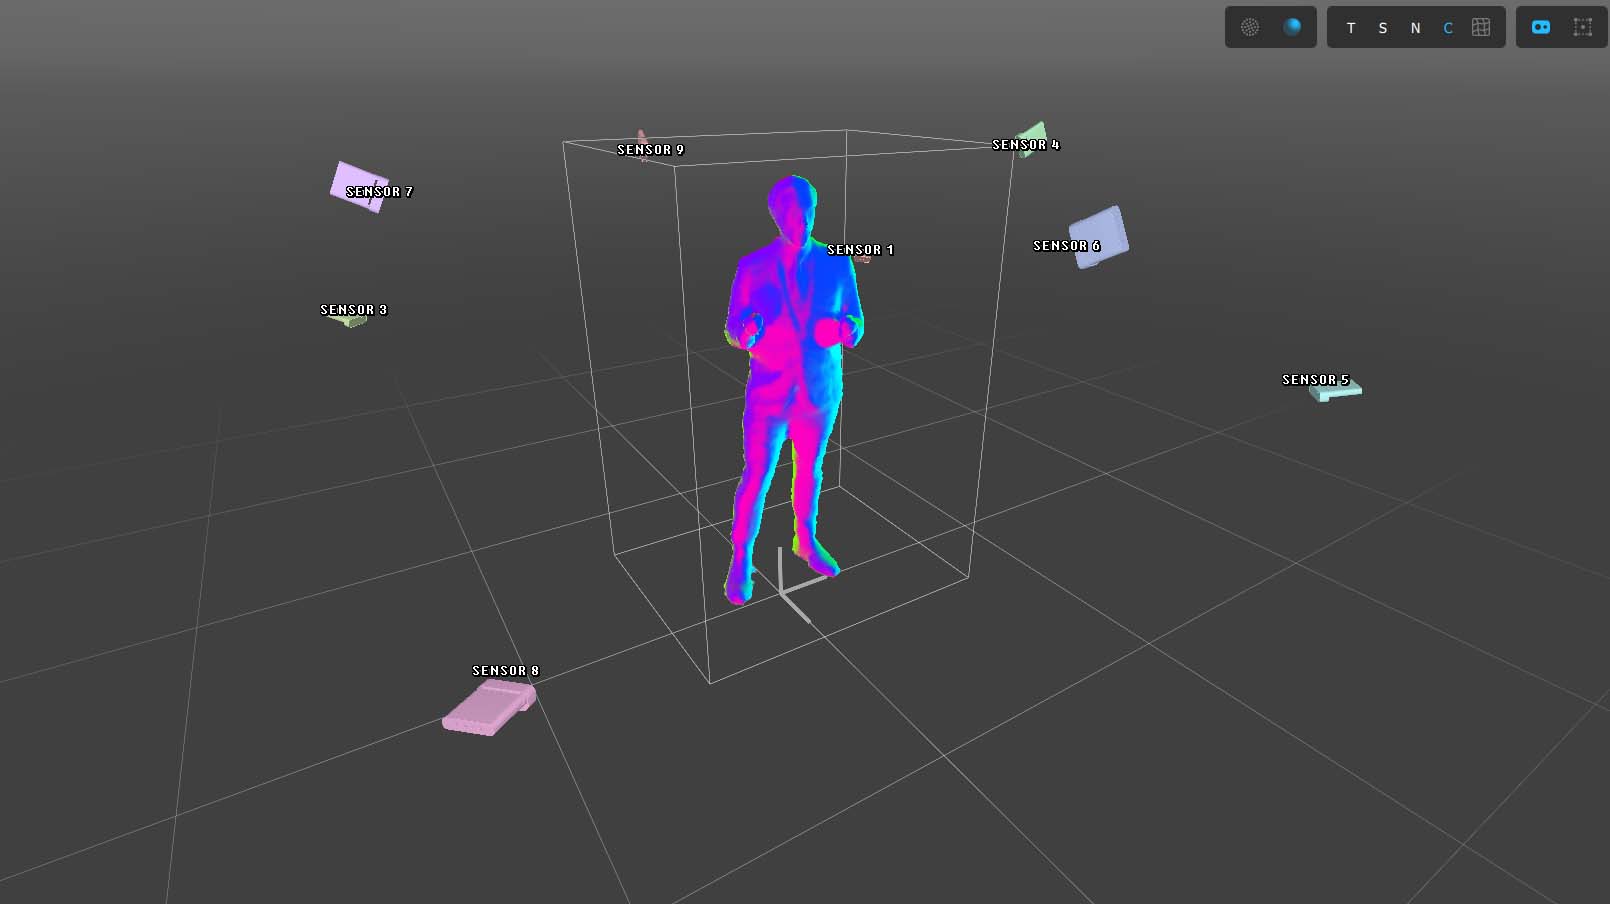
Visualize Sensor Positions - Enables color-coded sensor models placed throughout the volume corresponding to their real world location as determined during calibration. The camera colors correspond to the color in the blend contribution visualization. Useful when investigating camera positioning and texturing contributions. In the Studio Calibration Context, this also shows active sensor links (solid blue) and unused sensor links (dashed grey).
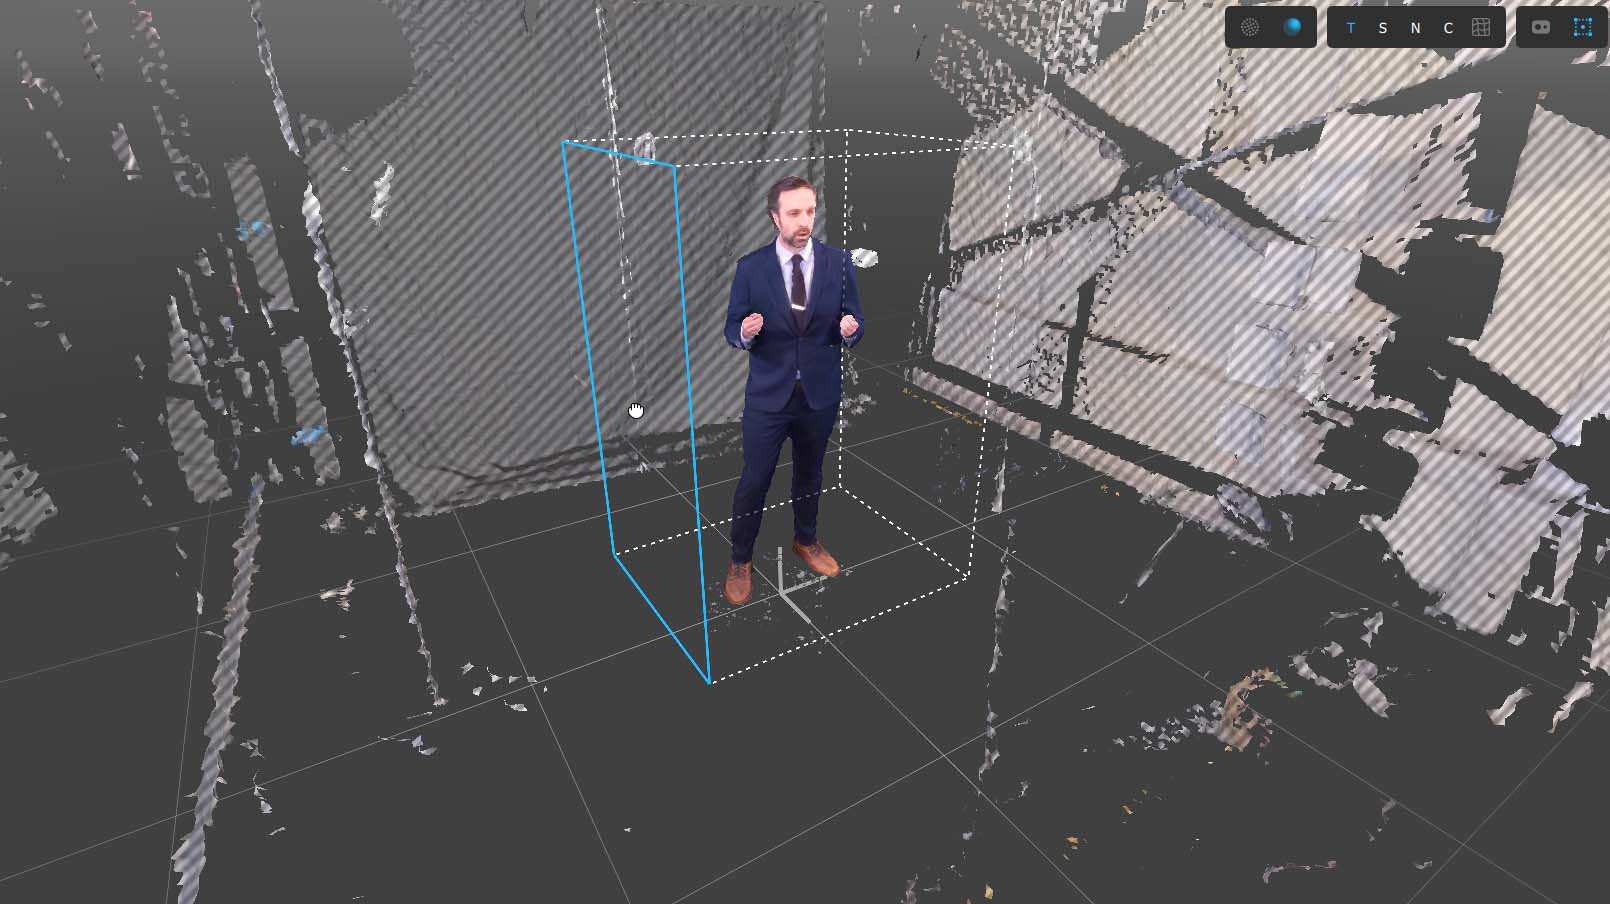
Enable Bounding Box Editing - Turns on adjustable handles for editing the bounding box sides. Turn this on when adjusting the bounding box in the Viewport. When actively adjusting the bounding box handles, the entire volume is outside of the bounds is rendered as a preview in order to assist in setting the bounds. Read more about Isolating the Capture with the Bounding Box.
🚧
We recommend disabling Bounding Box editing when not actively adjusting the bounds to avoid accidentally grabbing a handle and moving your bounds when navigating the 3D Viewport.
Linking Cinema captures in Depthkit Studio (optional)
If you have recorded a Cinema clip for any of your sensors following the Depthkit Studio + Cinema guide, you can drill into each sensor by clicking the arrow next to the clip's name in the Library.
From this view, each individual sensor’s perspectives can be loaded and the associated Cinema perspective linked.

🚧
In a Depthkit Studio capture, the frame crop and depth ranges are automatically set based on the bounding box. The frustum and frame previews in the viewport is for diagnostic purposes only.
Then apply the Cinema color clip to it's corresponding sensor in the same fashion as a single-sensor capture - Follow the steps here to do so.
Setting In and Out points
Moving the In and Out points on the timeline determines which portion of the capture will be exported. Use the Jump to In button to play the capture from the In point, and preview the duration of the selected timeline region.
Isolating captures with the bounding box
📘 Depth range adjustment no longer used
As of Depthkit v0.7.0, the near and far planes of each sensor are now automatically calculated based on the position of the Bounding Box.
The Bounding Box in the viewport indicates the 3D region of interest of your Recording. The Bounding Box is set once for each Recording. Set the bounds as close to the subject as possible without clipping any of the desired performance.
🚧
The bounds are aligned to your capture via the Floor Plane sample taken during the Calibration process. An accurate floor sample is required for your capture to face forward by default and for the floor geometry to line up to the bounds.
Adjusting bounds by number - When a Depthkit Studio (multi-camera) Recording is selected, the Isolate panel is the first set of controls. This allows for precise numerical control over the capture bounds.
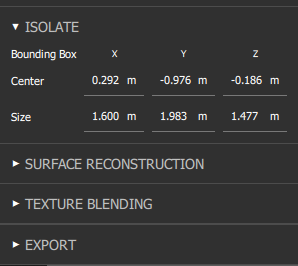
📘
You can type in a number, or use the mouse scroll wheel or arrow keys to nudge the numbers in small increments.
Bounds & Combined Per Pixel Export Quality - Upon Exporting a Combined Per Pixel (video or image sequence), the Bounding Box is used to set a crop on the individual perspectives, as well as automatically configure the depth preview ranges. Having focused crops and preview ranges dramatically increases the quality of data and reduces frame sizes, therefore it’s important to ensure the bounding box is set tight as possible, without cropping the performance.
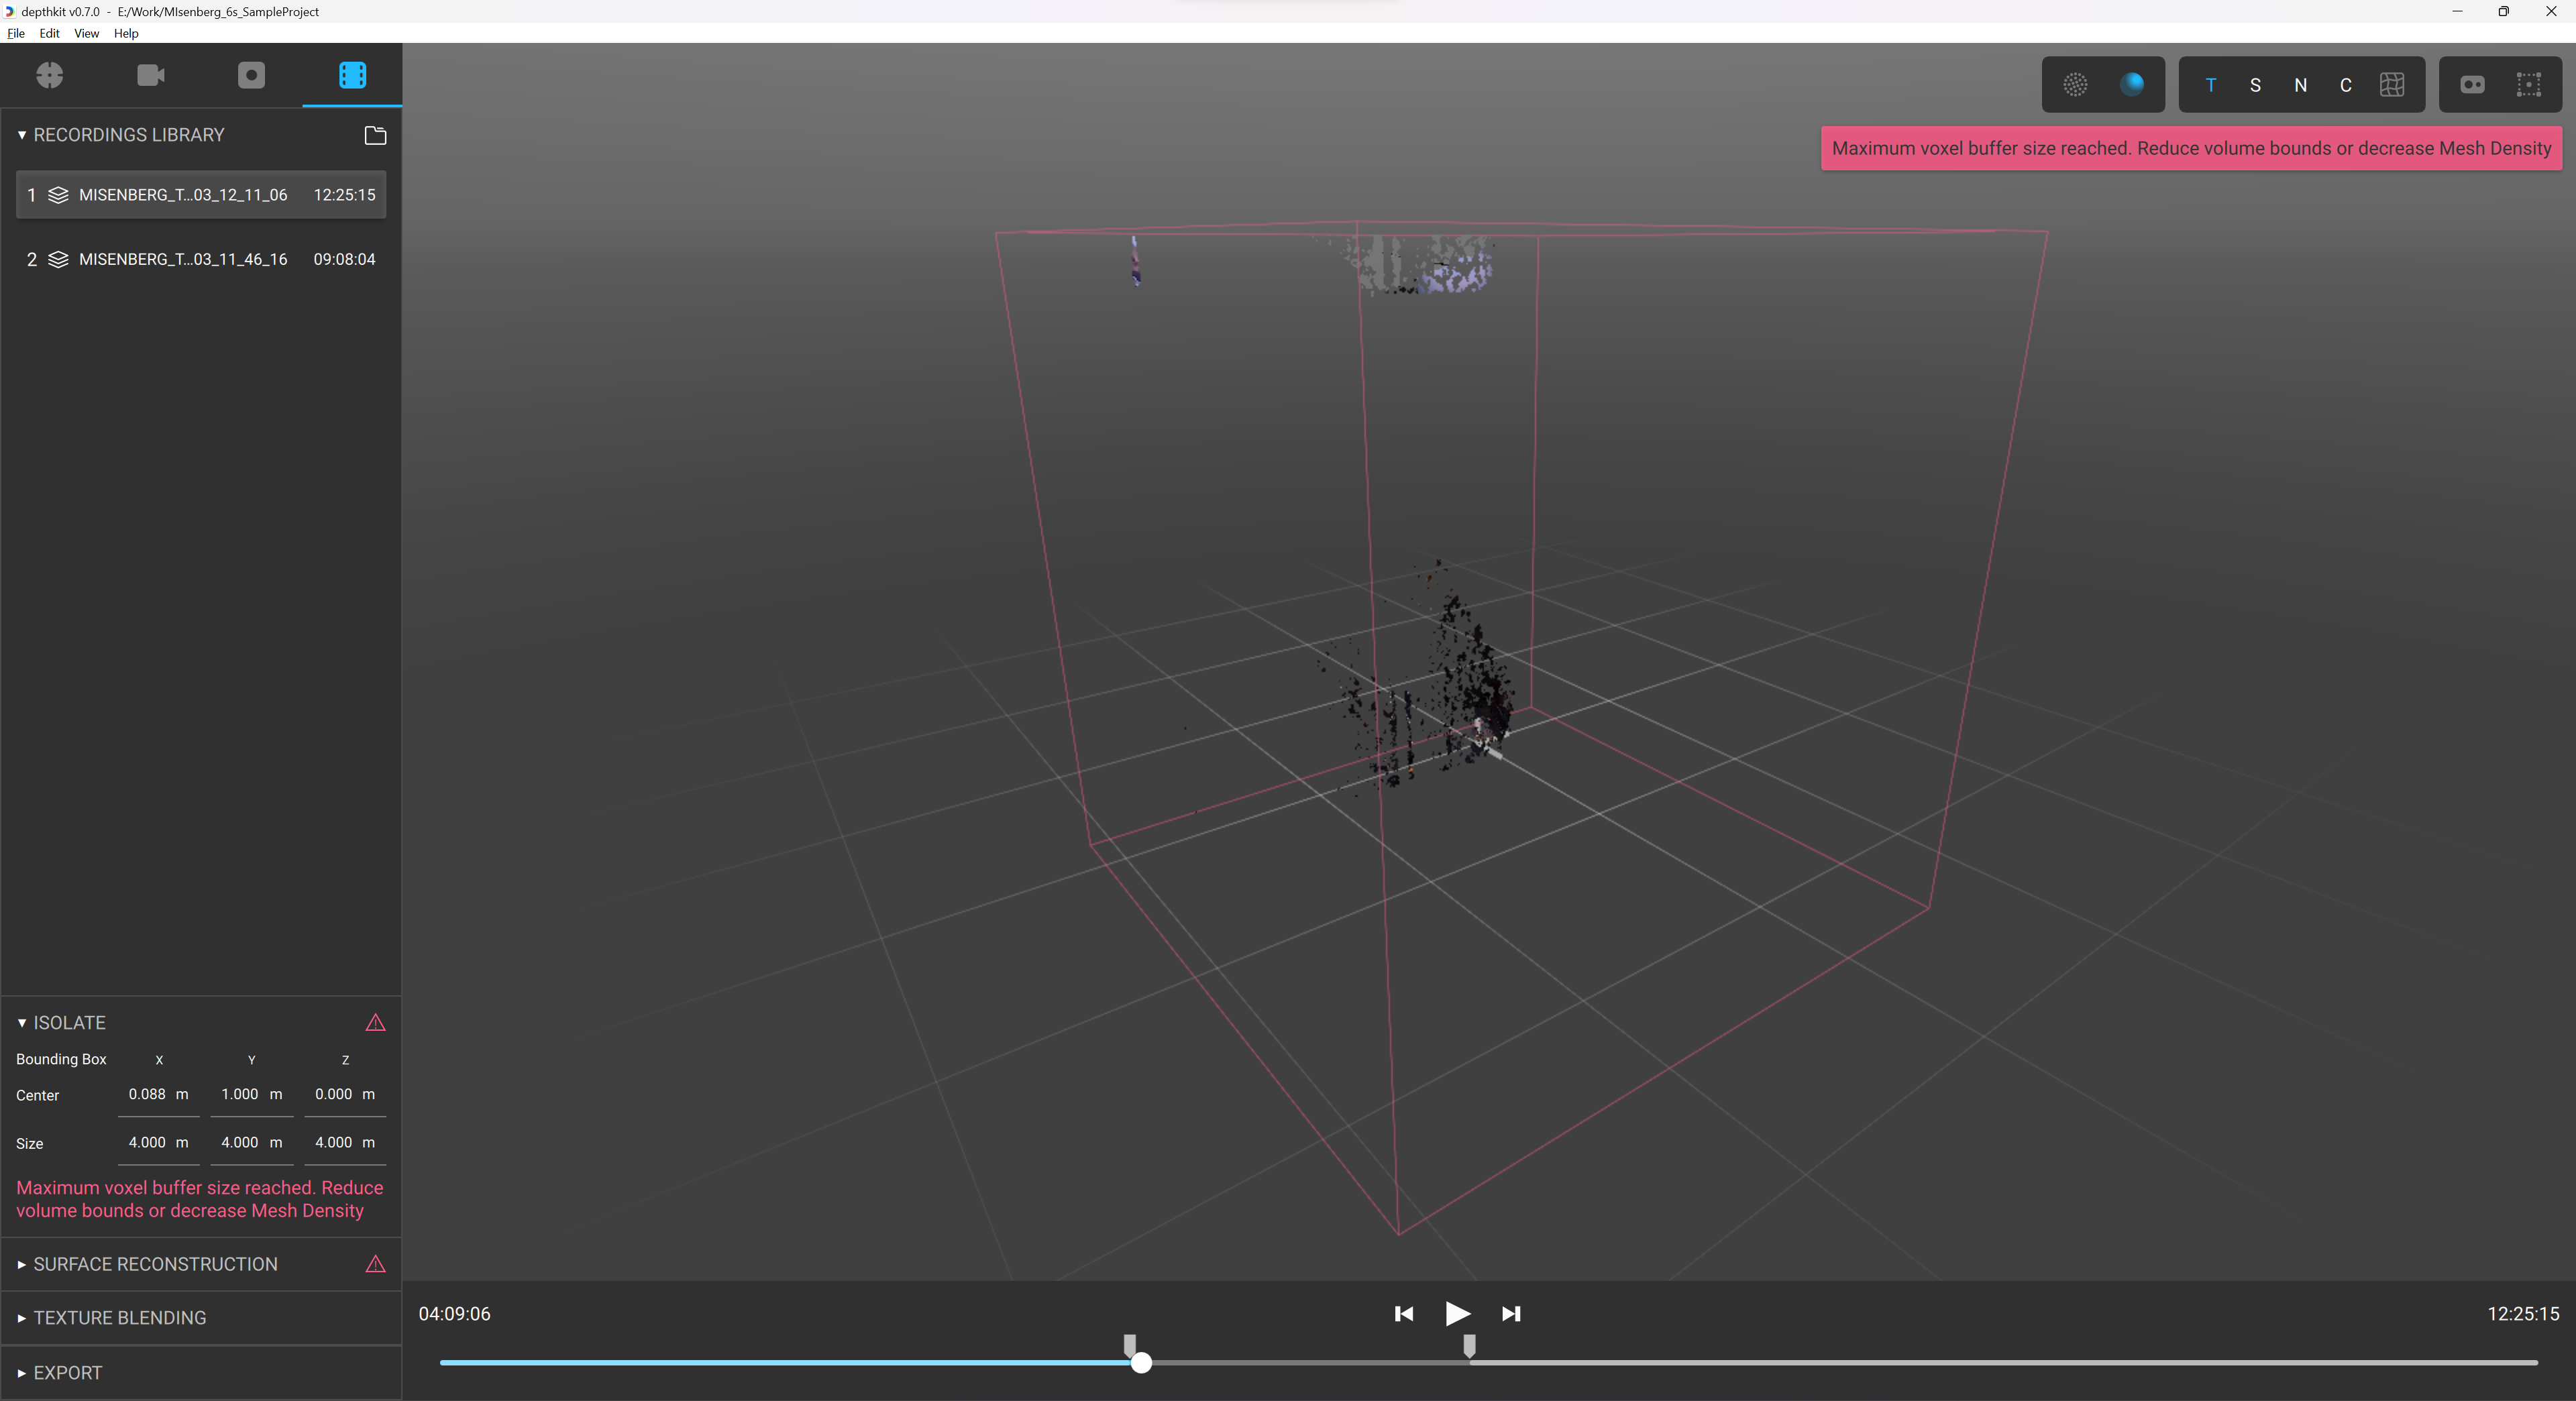
Bounds too large - If you exceed the maximum allowed voxel buffer size, you will see a message to reduce the bounds size and/or volume density. Adjust the bounds to create a smaller bounding box, or reduce the Volume Density in the Surface Reconstruction panel to address this.
Building the surface with fusion
Once the capture has been isolated, the next task in the workflow is configuring the Surface Reconstruction settings that fuse the raw depth maps into a Fused Mesh.
Turning on the Shaded Preview and Wireframe mode can be helpful when fine tuning the Surface Reconstruction settings.
Surface Reconstruction Settings
Depthkit’s Surface Reconstruction system constructs a new, coherent mesh by fusing the various independent calibrated depth maps together into one. We explain the settings one by one below.
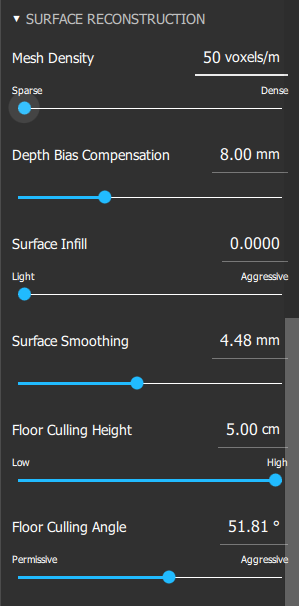
Mesh Density - Adjust the density of the mesh reconstruction in voxels per meter. A denser mesh captures more geometry details but results in larger file sizes in the case of Textured Geometry exports. Mesh Density set too high may lead to increased surface noise and slower preview rendering in Depthkit.
Depth Bias Compensation - The Depth Bias Compensation is a sensor error correction adjustment. Time of Flight cameras like the Femto Bolt and Azure Kinect DK measure surfaces farther away than they are in reality. The amount of bias needed depends on the material of the surface being measured. Skin in particular has a large bias. Depthkit corrects for this error by pulling the surface back towards their true depth. It’s most useful for recovering high quality faces, hands and fingers on otherwise well-calibrated captures. The larger the value, the larger the compensation. 0 means no depth bias compensation is applied.
Surface Infill - Depthkit attempts to infill missing and occluded geometry when constructing the surface. Adjust this parameter to control the amount of surface infill. High values will close larger holes but may introduce bubbles or webbed geometry.
Surface Smoothing - Apply a global smoothing to the capture. Smoothing is helpful at removing high frequency noise or floating geometry near the surface.
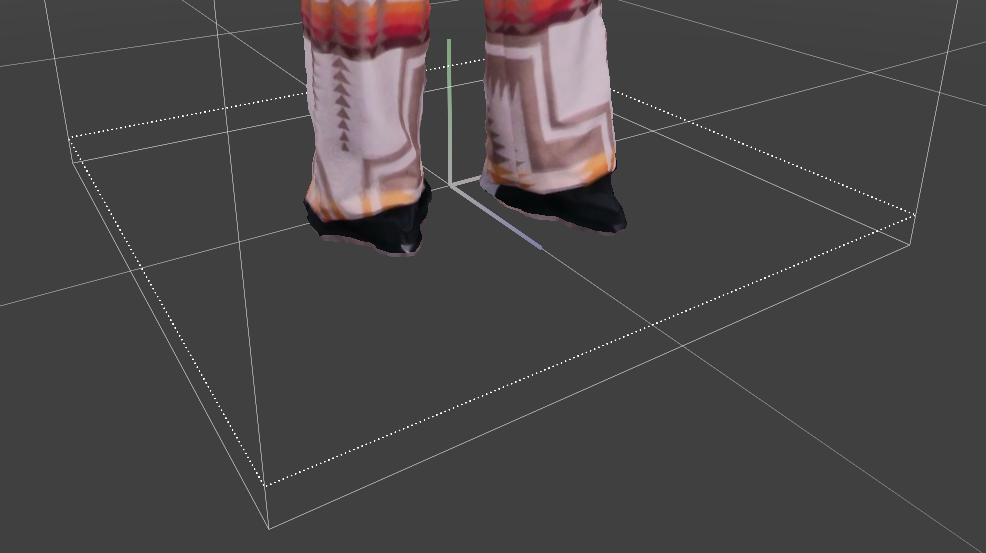
Floor Culling Height - Raise this threshold to remove geometry that's parallel with the floor plane up to a height of 5cm. This is effective at removing the floor of the capture volume without cropping the shoes or feet of your subject.
Floor Culling Angle - This angular threshold determines how flat a triangle on the floor needs to be to be removed. Permissive will cull only those that are the most parallel; Aggressive will cull more geometry which is less parallel with the floor.
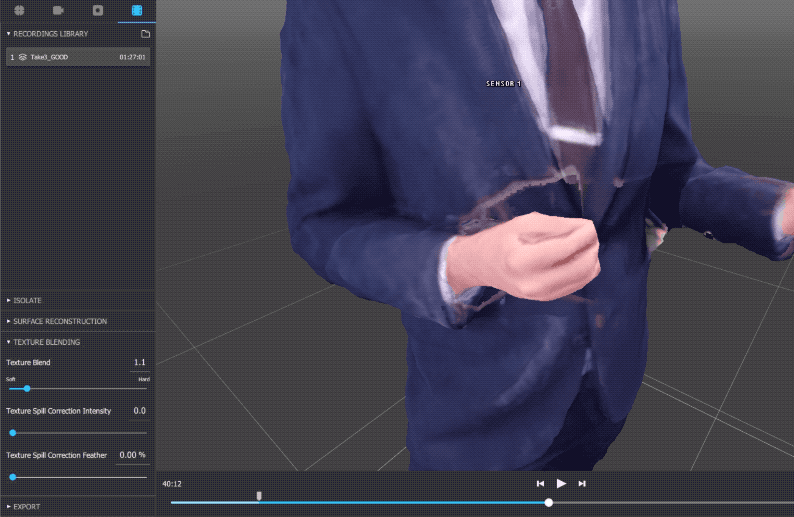
Blending textures
Once the Mesh is Fused from the Surface Reconstruction step, the next step is to texture the mesh with the various color camera perspectives. Depthkit creates the final texture by intelligently blending overlapping areas in a way that prioritizes quality textures and smooths away edge artifacts and spill. There are some user defined settings in Texture Blending that can be adjusted for a perfect blend.
Fixed Texture Blend - Adjust how the texture is blended between camera perspectives. Soft blending will lead to smoother blending at the risk of ghosting artifacts from misalignment. Hard blending will lead to more crisp textures at the risk of hard seams between perspectives.
Dynamic Texture Blend - Enables the texture blend to change based on the virtual view angle. By prioritizing the textures from physical cameras that are close to the virtual view, a more pleasing texturing results.
Adjust this slider from 0, which is no dynamic adjustment to maximizing the dynamic blend.
🚧
This setting is only available for Combined Per Pixel Exports. It will be disabled when exporting Textured Geometry Sequences.
Texture Spill Correction Intensity - Corrects texture spill between surfaces, such as fragments of hands appearing on clothing.
Texture Spill Correction Feather - Softens texture spill correction. Needs to be adjusted visually and varies based on the Texture Spill Correction Intensity applied above
📘
When exporting Combined Per Pixel outputs for Unity, the Texture Blending parameters continue to be adjustable in the engine. The settings in Depthkit are used for preview and are set as the default values when the clip is loaded Unity.
Next steps
When the geometry and texturing of your asset have been adjusted, you're ready to export