Low capture performance

Once recording, you will notice the addition of a Diagnostics panel. This represents the performance of the capture and will alert you to dropped frames or issues during capture.
| Recording | Displays the elapsed duration of the capture. |
| Frame Backlog | Some computers may not able to keep up writing frames to disk as fast as they are captured. The frame backlog feature allows you to capture recordings without dropping any frames, even on these machines. Frames queue up in system memory and are written to disk after recording completes. The Frame Backlog meter represents the maximum amount of frames that can be stored in the backlog. If the meter fills up, the recording is automatically stopped. Depthkit then finalizes the recording by writing all frames to disk before the next capture can begin. You can click the backlog value to toggle the view between frames queued and the amount of memory being used. |
| Frames Dropped | Displays how many frames have been dropped during the current capture. Unlike frame backlog, dropped frames are actually lost data, which is not recoverable. This highlights if your computer is underperforming for the current sensor configuration. A few dropped frames are OK (less than 10 per minute) and will not be too noticeable. However, large number of dropped frames means you have a serious performance issue. |
👍 Successful Test
If you make a test recording with the desired sensor configuration where there are few-to-no dropped frames, and the backlog doesn't fill up, you are ready to record!
🚧 Recording to Backlog
If your backlog is filling up but you are not dropping frames, that's OK - The recording will need extra time after the recording is stopped to finalize. Be aware that when your backlog fills all the way up, your recording will stop automatically so Depthkit can write this data to disk.
❗️ Low Performance & Dropped Frames
If you see the "Low Performance Warning" as pictured above, don't worry! There any many steps you can take to reduce dropped frames and increase capture performance.
General recommendations
Before following these recommendations, please check our Depthkit Core hardware requirements to make sure Depthkit can be supported on your system.
📘 Azure Kinect Performance at High Resolutions
If capturing with an Azure Kinect, please reference the Depthkit Core hardware requirements for high resolution capture.
** Enable/disable GPU accelerated capture pipeline. **\ In the Edit menu, go to Preferences to enable/disable GPU hardware acceleration. Some PC hardware configurations benefit from GPU video acceleration, and some do not. Make a test recording on your computer to see if GPU video acceleration results in higher performance.

❗️ Known Issue with AMD Radeon driver 19.30.01.33
If recording 3840x2160 footage with the Azure Kinect on a computer that uses AMD Radeon driver 19.30.01.33, Depthkit may crash if GPU acceleration in enabled in Depthkit preferences. To work around this issue, go into your Depthkit preferences and disable the GPU accelerated video encoder.
Reduce the resolution of your monitor.\ It may increase performance to reduce the resolution of your display. This may be particularly helpful for Nvidia Optimus laptops.
** Make sure Depthkit is the active window while recording.**\ If you hit Record and then click onto another application window, this might drop more frames. For best results, keep Depthkit active as your primary selected window while you are recording.
** If recording on an Intel computer, download the Intel Extreme Tuning Utility to update a selection of drivers that may increase performance.**\ The drivers that will be updated with this utility are below:
- IOCBIOS Device Driver
- Intel® XTU Extension Device
- Intel® XTU Component Device
- ACPI Device Driver
- Watchdog Device Driver
- ICC Proxy Service Version
Femto Bolt performance
COMING SOON
Azure Kinect performance
** Ensure that your sensor is receiving adequate power. **
- The best way to check this is via the sensor's power indicator LED, located on the back of the device. If the indicator is not a consistent white light, the sensor is not properly powered.
| LED Status | What this means... |
|---|---|
| Solid white | Sensor is working properly and powered on |
| Flashing white | Sensor is powered on, but may not be connected to a USB 3.0 port |
| Flashing amber | Sensor is not receiving adequate power |
| Amber + flashing white | Sensor is powered on and updating or being reset |
-
If powering the Azure Kinect with a USB-C to USB-C cable instead of the supplied power adapter, ensure you are using one that can sufficiently power the device.
-
Use an
- Avoid USB extenders
- Verify your USB controller is compatible with the Azure Kinect
- Try powering the Azure Kinect with its own power supply to see if that fixes the issue.
Reduce the color resolution.\ High color resolutions may contribute to low preformance, especially on less powerful computers. For best performance, set your color resolution to 1080p or lower to see if this will reduce dropped frames.

Performance improvements are currently in development. Until then, please see recommended computers for systems that support high resolution recording.
Kinect for Windows v2 performance
** Ensure that your sensor is securely plugged in and powered on. **\ If it is a power issue, you may want to try plugging it directly into the power outlet in case an extension cable is causing insufficient power.
** Make sure your sensor is connected via a USB-3.1 / USB-C (gen 2) port.**\ Gen 2 ports have a much higher data transfer rate and will promote a more stable connection and data stream from your depth sensor. If you computer does not have a USB 3.1 (gen 2) port, try a USB to USB-C adapter. Learn more about Sensor connection issues and how to find which one you are currently using.
** Install the Kinect Configuration Verifier Tool. ** Plug in the Kinect to your computer and open the Kinect Verifier Tool. Ideally, all sections should be checked green for best performance, with the exception of the USB Controller (you can disregard the yellow warning). If the Verifier indicates a warning, follow the steps below.
🚧
You cannot run the Kinect Configuration Verifier while you are running Depthkit, as you will find that the depth/color streams may not show up in Depthkit when both apps are active. With this in mind, once your Kinect performance is confirmed, close the verifier before you open Depthkit.

What if my sensor keeps disconnecting from the computer?
The Kinect Verifier indicates that my sensor is not connected or there is a warning in the depth/color streams.
Make sure you have your sensor connected to your computer via a USB-3.1 / USB-C (gen 2) port. Gen 2 ports have a much higher data transfer rate and will promote a more stable connection and data stream from your depth sensor. If you computer does not have a USB 3.1 (gen 2) port, try a USB to USB-C adapter.
**The Kinect Verifier indicated that my framerate is fluctuating in the Verify Kinect Depth and Color Streams section. Or the sensor seems to be disconnecting repeatedly. **
First, update your WDF Kinect Sensor Interface driver. You can find this in the Device Manager, under Kinect sensor devices. In the drop down, right-click on WDF KinectSensor Interface and select update driver.

If that doesn't solve the problem, it may also be due to new Intel CPUs and their power saving features. If that is the case, try to following steps:
- Double click the registry file here that will change these power saving settings.
❗️ Important
This registry file will lower your computer battery performance.
- You may also need to disable your USB power saving settings. You can find this going to your Control Panel, select Hardware and Sound and then select Power Options. In this menu, click Change plan settings on your power plan.

- In the next menu, select Change advanced power settings.

- Under USB settings, select USB selective suspend setting and disable.
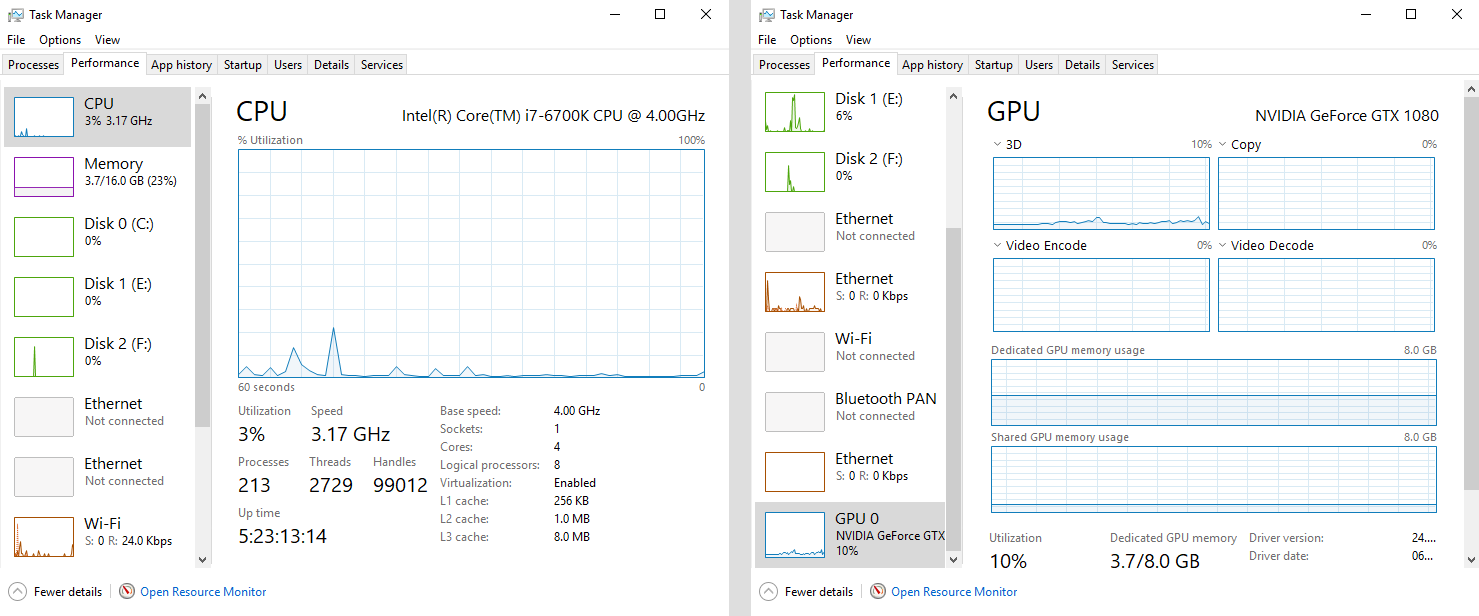
My computer is still under performing. What next?
Make sure you don't have any other applications running in the background. To check this out, open up your Task Manager and click the Performance tab. If your CPU and GPU are over allocated, you may need to quit the other applications to increase Depthkit performance.
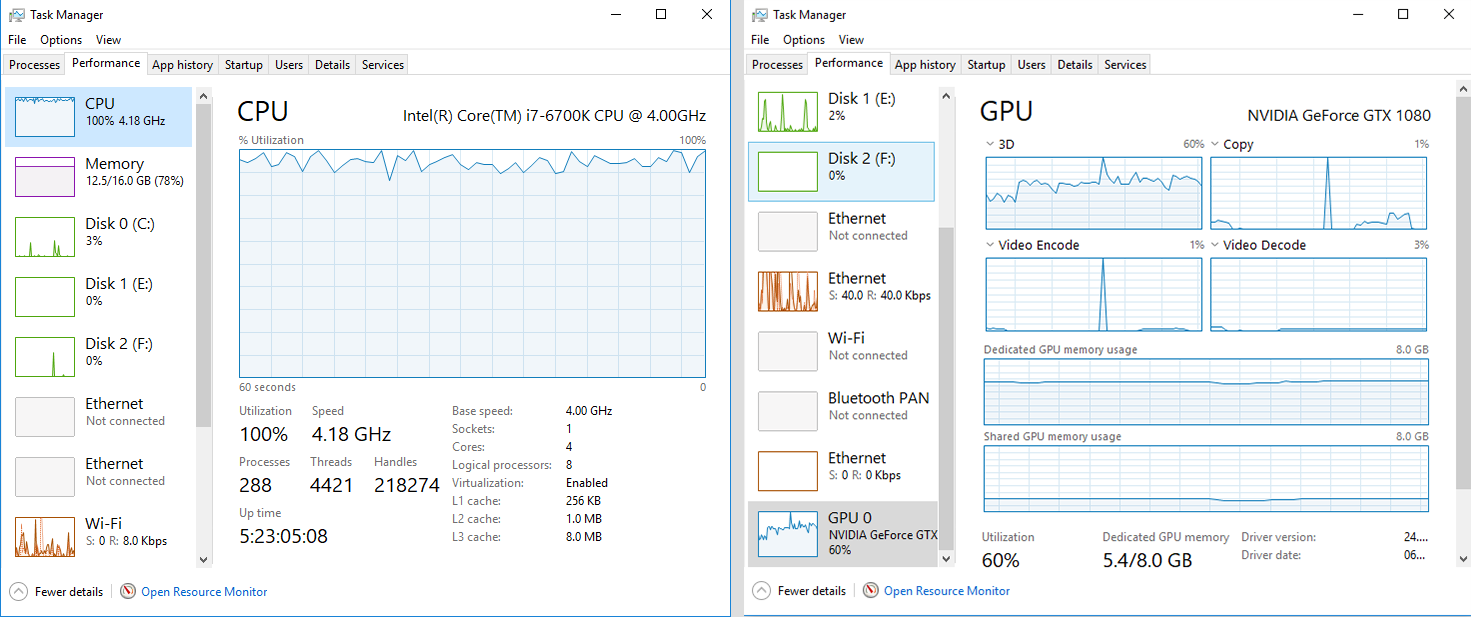
You can identify which applications are using up your performance in the Processes tab of the Task Manager. Click on CPU to view the allocation of CPU usage and what programs need to be closed to help performance.

Once the background applications are closed, you will see reduced utilization rates as seen in the example below.