Depthkit Studio hardware requirements
v13
View
Edit
My Developers
Documentation Recipes API Reference Changelog Custom Pages
New Category Depthkit Studio hardware requirements Description (optional) Depthkit Studio software needs only one PC, and combines data from up to 10 Femto Bolt or Azure Kinect depth sensors. It is a modular solution, designed to work with your own equipment.
Purchasing everything you need with Depthkit Studio Hardware.
This document is intended for anyone who wants to source their own equipment for a Depthkit Studio configuration. Alternatively, Scatter sells complete hardware solutions, including pre-tested depth sensors, a PC, specialized cabling and calibration charts. You can avoid guesswork, purchasing hassles and delays and just get straight to creating. Learn more about Depthkit Studio Hardware solution → and contact sales@depthkit.tv to purchase and for more details.

Guidance on sourcing your own hardware components
If you'll be sourcing all of the components yourself, read on below for technical considerations to ensure that Depthkit Studio successfully captures performantly.
In this page
Depthkit Studio quick start hardware checklist →\ Capture computer → Depth sensors → Cables → Calibration markers → Lighting → Equipment setup → Next steps →
Depthkit Studio quick start hardware checklist
Here's a quick checklist to see if your hardware will work with Depthkit Studio.
- Computer: Workstation PC running Windows 10 or Windows 11.\ Depthkit is not compatible with macOS or Linux.
- **Sensors: **As few as 3 and as many as 10x Femto Bolt cameras.\ Depthkit Studio maintains legacy support for discontinued Azure Kinect DK. You cannot cannot simultaneously mix Femto Bolts with Azure Kinects on one system.
- **CPU: **Intel i9 12th generation process or newer.\ Depthkit is not verified on AMD processors..
- GPU: Professional NVIDIA graphics card such as the RTX A4000 or better.\ Depthkit is not verified on NVIDIA consumer graphics cards like the RTX 30-series line above 5 sensors.
- USB Ports: A Startech PEXUSB3S44V USB PCIe expansion card for every 4 sensors.
- USB Cables: A StarTech 10m USB 3.0 Active Extension Cable for each sensor.
- Sync Hardware:
- One Orbbec Sync Hub Pro (power supply & cable not included), USB power supply, and USB Type-C power cable for up to 9 sensors, or **two **hubs, power supplies, and power cables for 10 sensors.
- As many Orbbec Sync Adapters as sensors.
- As many 30ft CAT-5e cable as sensors to connect each sensor to the sync hub.\ _If using 10x sensors, one additional Ethernet cable is needed to bridge the two sync hubs together. _
- Legacy Azure Kinect DK systems require one3.5mm audio cable per sensor for sync.
Read below for detailed hardware requirements and some alternatives to the above check list.
Capture computer
Depthkit Studio requires a PC verified to support your preferred number of sensors. Capturing with multiple Femto Bolt or Azure Kinects requires specific hardware depending on your sensor configuration of choice.
🚧 Be sure your capture computer matches our computer specifications.
If you purchase any hardware outside of this recommendation we cannot ensure success with performance.
Looking to purchase? Scatter can connect you with trusted vendor, Boxx, to purchase an off-the-shelf computer, verified to perform with Depthkit Studio and your specified sensor configuration. Contact us for an introduction to the vendor.
PC Configurations
The following hardware is the minimum specification required based on the number of sensors you intend to use for capture.
| Up to 3 Sensors | Up to 6 Sensors | Up to 10 Sensors | |
|---|---|---|---|
| CPU | Intel i9-9900K @ 3.6-5.0 GHz | Intel Core i9-11900K CPU @ 3.50GHz | Intel Core-i9 14900K @ 3.2GHz |
| GPU | NVIDIA GeForce RTX 3070 | NVIDIA RTX A4000, NVIDIA 4070 Ti* See consumer GPU section below. | NVIDIA RTX 4000 Ada Generation |
| RAM | 32 GB | 64GB Dual Channel (2x 32GB or 4x 16GB) | 64 GB Dual Channel (2x32GB) |
| USB Expansion | Optional for better performance | (1-2) 4 Port USB3.0 PCIe Cards with 4 Dedicated 5Gbps Channels required* | (2-3) 4 Port USB3.0 PCIe Cards with 4 Dedicated 5Gbps Channels required* |
| Maximum Color Resolution | 2160p per sensor | 1440p per sensor | 1440p per sensor |
CPU
To record a high number of sensors, you will need a high-performance CPU. The number of logical cores in the CPU directly affects performance. We recommend:
- 8+ cores for 3-sensor recording
- 10+ cores for 6-sensor recording
- 18+ cores for 10-sensor recording
Intel vs. AMD. The CPU platform also dictates the chipsets used on the motherboard.
- Intel-based motherboards usually include at least one or two Intel USB controllers
- AMD-based motherboards might not include USB controllers compatible with the Azure Kinect.
GPU
❗️ AMD-based GPUs are not supported.
To capture with multiple sensors, Depthkit Studio requires a GPU from NVIDIA with enhanced hardware video encoding capabilities in the driver. The most recent line of Nvidia professional GPU's (e.g. RTX 4000 Ada Generation) are recommended.
If you have a specific graphics card that you'd like to evaluate whether it will work with Depthkit Studio, you can refer to your cards specification in NVIDIA's Encoding table. The key factors to Depthkit Studio capture performance are:
- whether the number of concurrent sessions is unrestricted or restricted. The professional line of GPU's is unrestricted, but the consumer/GeForce line of GPU's is restricted, which will affect the number of sensors you can capture simultaneously.
- the total number of NVENC engines - a higher number of NVENC engines will enable performant capture of more sensors at higher resolutions.
See the tables below for a recent segment of relevant cards:
👍 The following Professional-Series GPUs are Unrestricted
| Board | Family | Chip | NVENC Generation | Desktop /Mobile | Chips # | NVENC /Chip # | NVENC # (total) | Max # of concurrent sessions |
|---|---|---|---|---|---|---|---|---|
| Quadro P2000 / P2200 | Pascal | GP106 | 6th Gen | D | 1 | 1 | 1 | Unrestricted |
| Quadro RTX 5000 / RTX 4000 | Turing | TU104 | 7th Gen | D/M | 1 | 1 | 1 | Unrestricted |
| Quadro RTX 6000 / RTX 8000 | Turing | TU102 | 7th Gen | D/M | 1 | 1 | 1 | Unrestricted |
| NVIDIA RTX A4000 | Ampere | GA104 | 7th Gen | D | 1 | 1 | 1 | Unrestricted |
| NVIDIA RTX A5000 | Ampere | GA102 | 7th Gen | D | 1 | 1 | 1 | Unrestricted |
| NVIDIA RTX A6000 | Ampere | GA102 | 7th Gen | D | 1 | 1 | 1 | Unrestricted |
| NVIDIA RTX 4000 Ada Generation | Ada Lovelace | AD104 | 8th Gen | D | 1 | 2 | 2 | Unrestricted |
| NVIDIA RTX 4500 Ada Generation | Ada Lovelace | AD104 | 8th Gen | D | 1 | 2 | 2 | Unrestricted |
| NVIDIA RTX 5000 Ada Generation | Ada Lovelace | AD102 | 8th Gen | D | 1 | 3 | 3 | Unrestricted |
| NVIDIA RTX 6000 Ada Generation | Ada Lovelace | AD102 | 8th Gen | D | 1 | 3 | 3 | Unrestricted |
🚧 The following Consumer-Series GPUs have restrictions.
Over time, Nvidia has raised the limit of concurrent encode sessions on consumer/GeForce GPU's, and as of early 2024, the limit is 8 concurrent sessions. The performance of these GPU's has not been tested since the updates in performance, but consumer GPU's with multiple NVENC chips may be suitable for up to 8-sensor capture. This said, always verify performance yourself before entering production with a particular configuration.
| Board | Family | Chip | NVENC Generation | Desktop /Mobile | Chips # | NVENC /Chip # | NVENC # (total) | Max # of concurrent sessions |
|---|---|---|---|---|---|---|---|---|
| GeForce RTX 3070 | Ampere | GA104 | 7th Gen | D | 1 | 1 | 1 | 8 |
| GeForce RTX 3080 | Ampere | CA102 | 7th Gen | D | 1 | 1 | 1 | 8 |
| GeForce RTX 3090 | Ampere | GA102 | 7th Gen | D | 1 | 1 | 1 | 8 |
| GeForce RTX 4070 Ti | Ada Lovelace | AD104 | 8th Gen | D | 1 | 2 | 2 | 8 |
| GeForce RTX 4070 Ti Super | Ada Lovelace | AD103 | 8th Gen | D | 1 | 2 | 2 | 8 |
| GeForce RTX 4080 16GB | Ada Lovelace | AD103 | 8th Gen | D | 1 | 2 | 2 | 8 |
| GeForce RTX 4080 Super | Ada Lovelace | AD103 | 8th Gen | D | 1 | 2 | 2 | 8 |
| GeForce RTX 4090 | Ada Lovelace | AD102 | 8th Gen | D | 1 | 2 | 2 | 8 |
USB ports
For desktop computers, we highly recommend installing Startech PEXUSB3S44V USB PCIe Expansion cards, which are tested and validated to work with up to 4 Femto Bolts or Azure Kinects each. The Renesas Host Controllers found on the Startech PCIe cards come with older Renesas drivers which are incompatible with the Femto Bolt and Azure Kinect. If the Renesas driver is installed, open the Host Controller in Device Manager and uninstall the device. Windows will automatically install a recent Microsoft driver, which is compatible.
📘 Are you using untested USB ports?
Check the of the USB controller to ensure you are using compatible controllers to ensure they are compatible with the Femto Bolt and Azure Kinect.
- Intel, Texas Instruments (TI), and Renesas USB chipsets are compatible.
- ASMedia chipsets are not compatible.
Learn more in Microsoft's documentation for USB host controller compatibility.
Also ensure that your sensors are plugged into a port where each sensor has its own USB controller. Sharing USB controllers between sensors can cause bottlenecks in the data streams, and and result in dropped frames.

Recording storage
🚧 Recording to Boot Drive
On some systems, Depthkit performs better if the Depthkit project is on an SSD other than the boot disk. If you computer has multiple SSD's, using the secondary drive as your project location is recommended.
Depthkit requires storage with fast write speeds to keep up with multiple streams being written to disk at once. Standard NVMe or SATA SSD's generally work well, but record a few minutes of footage at your desired resolution to ensure your drive can keep up.
Depthkit records at a data rate of roughly 500MB per minute per sensor (Depth Mode: NFOV Raw; Color Mode: 1080p), and slightly higher for higher color resolutions. Multiply this by the number of sensors you are recording to calculate your total disk usage.
Test your computer
- Connect your preferred number of sensors to your computer. Launch Depthkit.
- Select your desired color resolution for capture.
- Capture a 1-2 minute test recording in the Multicam tab. See our Recording guide.
- Observe the diagnostics panel, available when you hit record. Confirm that you are not reporting dropped frames. Observe that the frame backlog is not filling rapidly. See details on Performance Diagnostics.
Depth sensors
Depthkit Studio supports up to 10x Femto Bolts. Legacy support for up to 10x Azure Kinects is also still maintained.
📘 The Femto Bolt is the successor to Azure Kinect DK
Microsoft has discontinued the Azure Kinect DK as of August 2023. They licensed the underlying depth sensing technology to Orbbec who have implemented it in the Femto camera line. The Femto Bolt matches the Azure Kinect's camera quality with superior color camera and higher precision electronics and calibration.
🚧 Depthkit Studio supports one type of sensor at a time.
Depthkit can only be used with Femto Bolts or Azure Kinects on one system at a time. If you connect both types of sensors to the same computer simultaneously, Depthkit will prompt you to disconnect one type of sensor.
Not sure how many sensors are right for you? No worries! Read on for details on sensor configuration possibilities.
Cables: Data, Power, Sync
Femto Bolt and Azure Kinect USB data cable with verified extension cable
The data cable supplied with the sensor will need to be extended in order to span your capture array.
When sourcing data extenders, it is essential to use a cable that meets the sensor requirements. The Femto Bolt and Azure Kinect require cables that can maintain the data transmission with the help of a semiconductor chip to increase cable performance. Cables without this chip are considered passive, and should not be used if the cable is longer than a 1.5 meters, as this may result in a drop in performance or power.
The following cables have been tested and can be recommended by our team:
| Cable | Orbbec Femto Bolt | Microsoft Azure Kinect |
|---|---|---|
| StarTech 10m USB 3.0 Active Extension Cable M/F → | :white-check-mark: Verified for use with Depthkit Studio & Core | :white-check-mark: Verified for use with Depthkit Studio & Core |
| Tripp Lite 10m USB 3.0 Superspeed Active Extension Repeater Cable M/F → | :warning: Untested | :white-check-mark: Verified for use with Depthkit Studio & Core |
| Cable Matters #200010 Active USB Extension Cable Male to Female (USB 3.0 Extension Cable) with Signal Booster → | :white-check-mark: Verified for use with Depthkit Studio & Core | :white-check-mark: Verified for use with Depthkit Studio & Core |
| Cable Matters #200040 Active USB Extension Cable Male to Female (USB 3.0 Extension Cable) with Signal Booster → | :warning: Untested with Depthkit Studio, Verified for use with Depthkit Core | :x: Not compatible |
Power extensions for each sensor
Power for the sensor can be extended two ways:
- For distances up to 16'/5m, you can add a USB 2.0 extender between the power supply and the provided power cable.
- For distances above 16'/5m, standard AC power extension cables must be used.
We recommend using the Microsoft power supply, but any USB AC adapter can be used if it provides enough current.\ Read more about Azure Kinect power and USB requirements in the Microsoft Azure Kinect documentation.
Synchronization
Femto Bolt sync
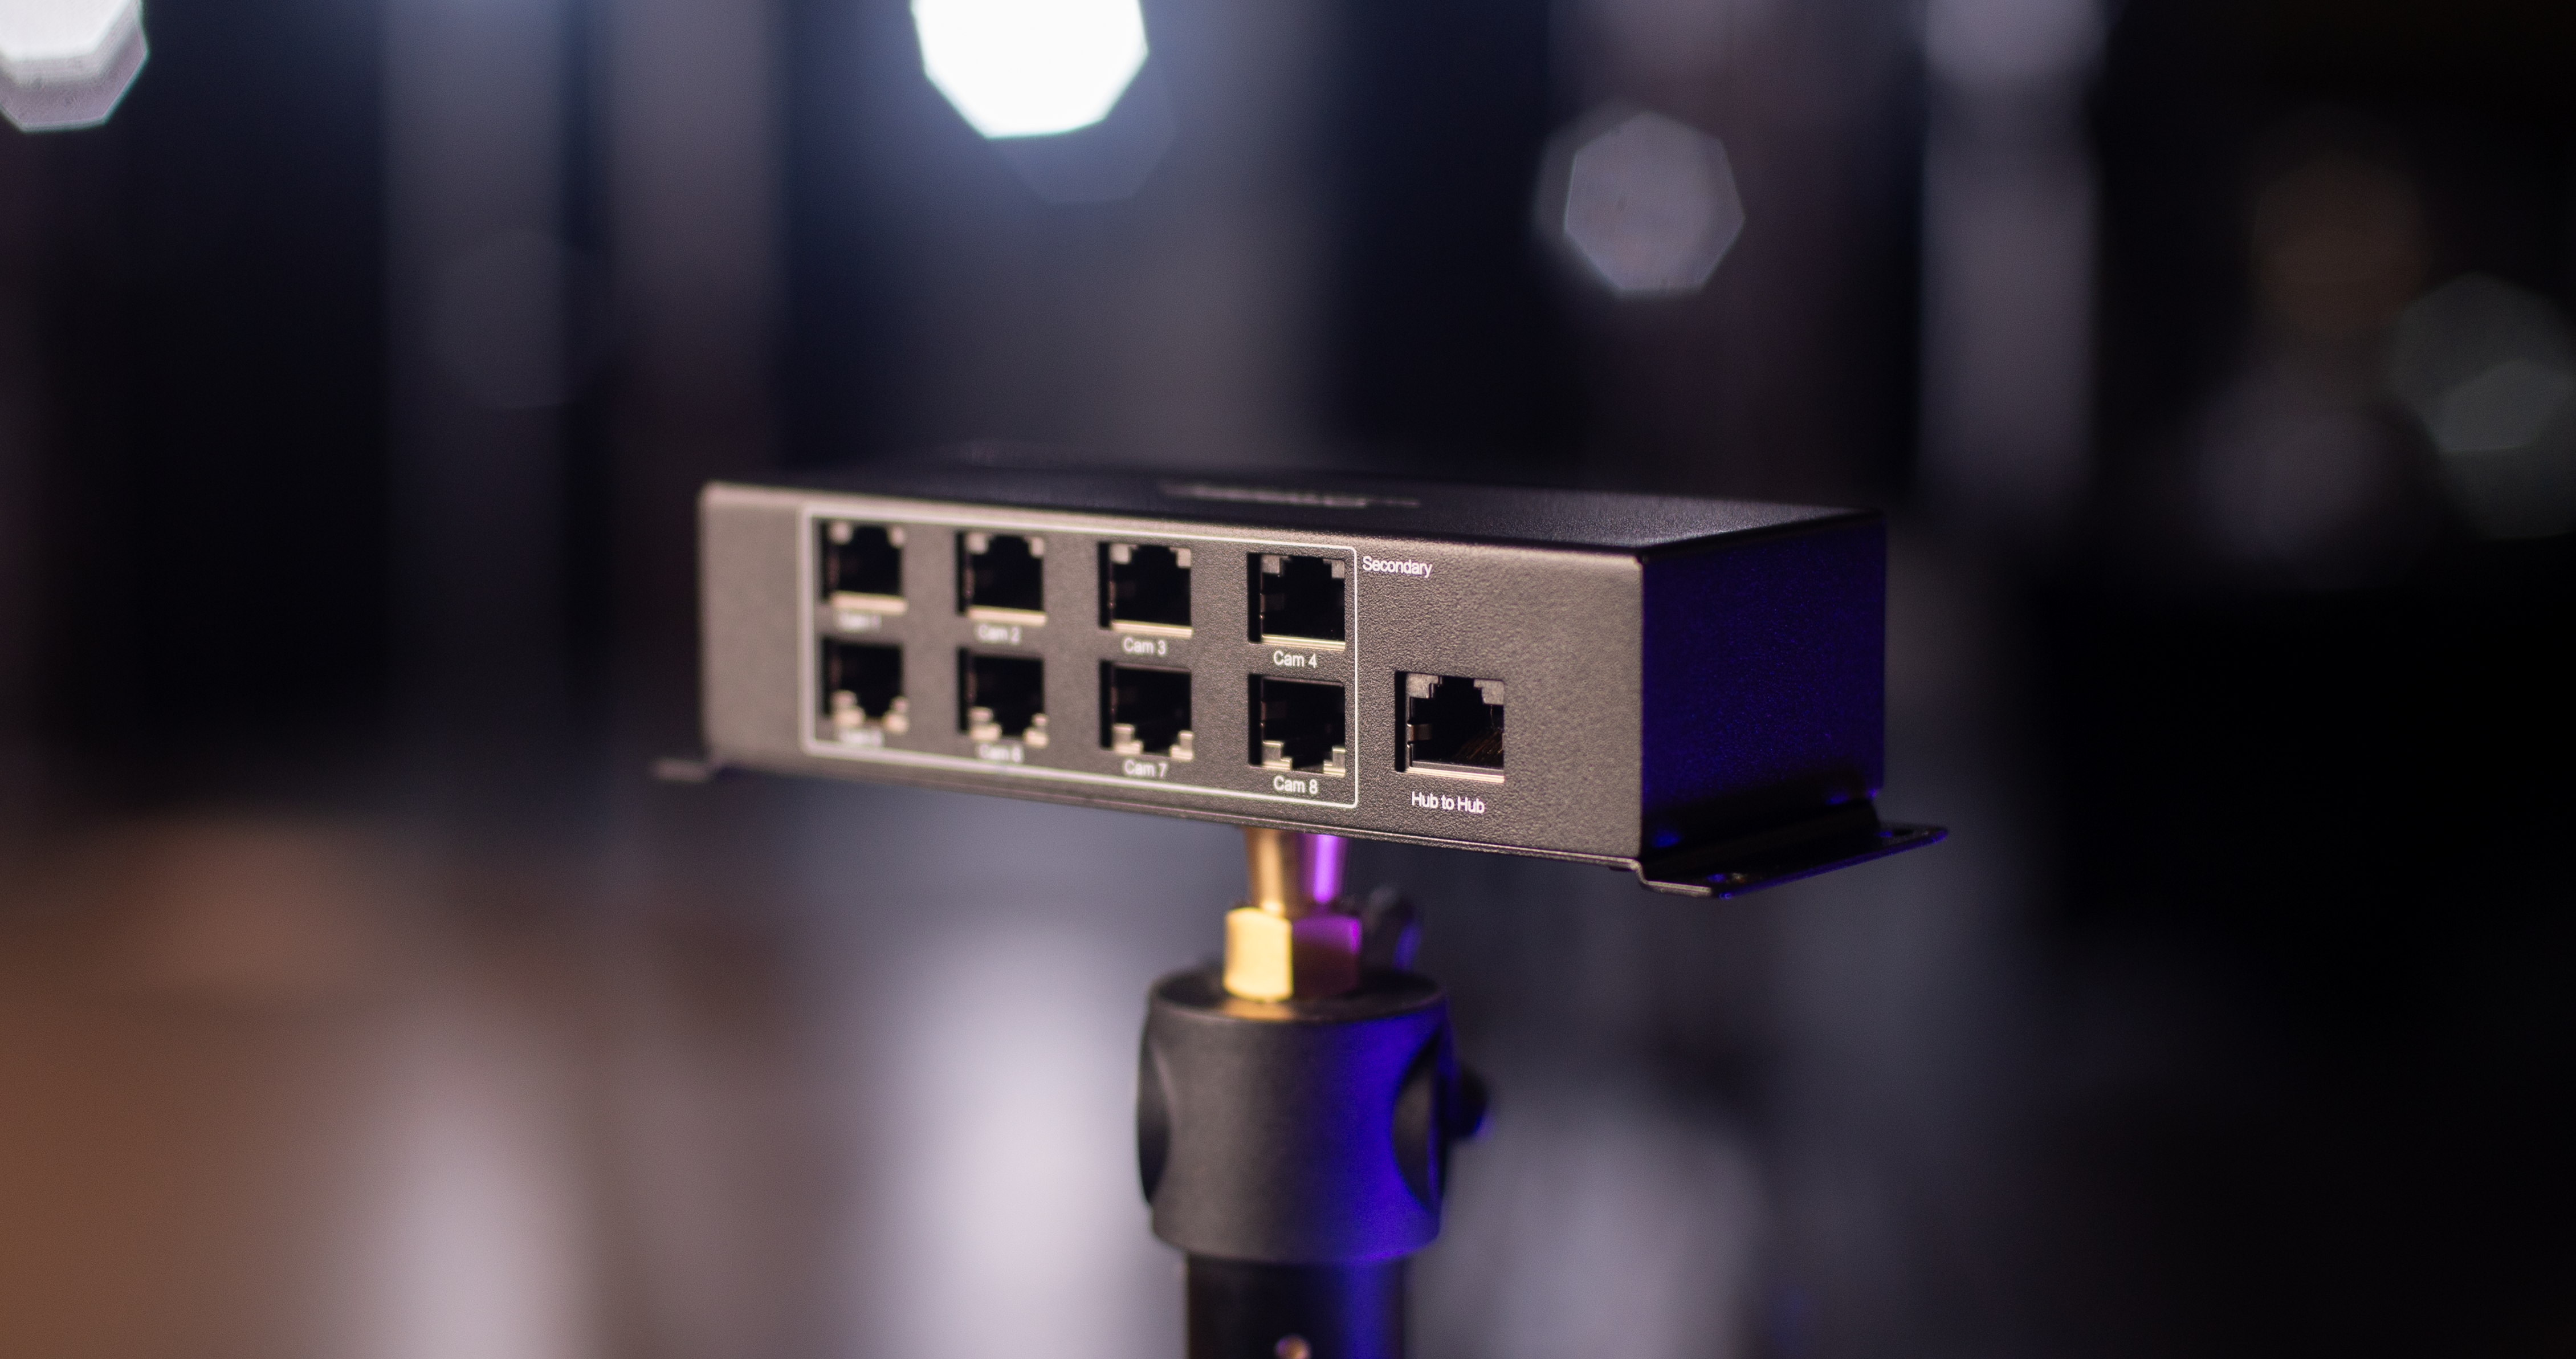
- One Orbbec Sync Hub Pro (power supply & cable not included), USB power supply, and USB Type-C power cable for up to 9 sensors, or **two **hubs, power supplies, and power cables for 10 sensors.
- As many Orbbec Sync Adapters as sensors.
- As many 30ft CAT-5e cable as sensors to connect each sensor to the sync hub.\ If using 10x sensors, one additional Ethernet cable is needed to bridge the two sync hubs together.
To configure your the synchronization hardware for your Femto Bolt sensors, see the Femto Bolt Sensor sync page.
Azure Kinect Sync
3.5mm audio cables are required for the synchronization of your Azure Kinect. These cables connect each sensor, creating a daisy-chain in your sensor configuration. You will need one sync cable for each subordinate sensor (total number of sensors minus 1).
Ensure you will be purchasing audio sync cables that will span the length of your capture volume. In same cases you might need optional extension cables, for a total length of up to 10m.

To synchronize the sensors:
- Expose the sync ports on the back of your Azure Kinects by removing the two screws in the rear of the device (a Torx wrench is included with the Kinect), and slipping off the white plastic casing.
- Pick one sensor to be your primary or master sensor. This sensor will have nothing plugged into its Sync In port. Connect a cable from its Sync Out port to the Sync In port of the next sensor. Repeat this for every sensor in the chain, until you reach the last sensor, which will have nothing plugged into its Sync Out port.
- Once the hardware is setup, synchronization will occur automatically within Depthkit. This can be confirmed by starting to stream the sensors, then looking at the sensor configuration options to see that they all either say Multicam Master (one sensor) or Multicam Subordinate (the remaining sensors) - If any say Standalone, check your sync cable routing.
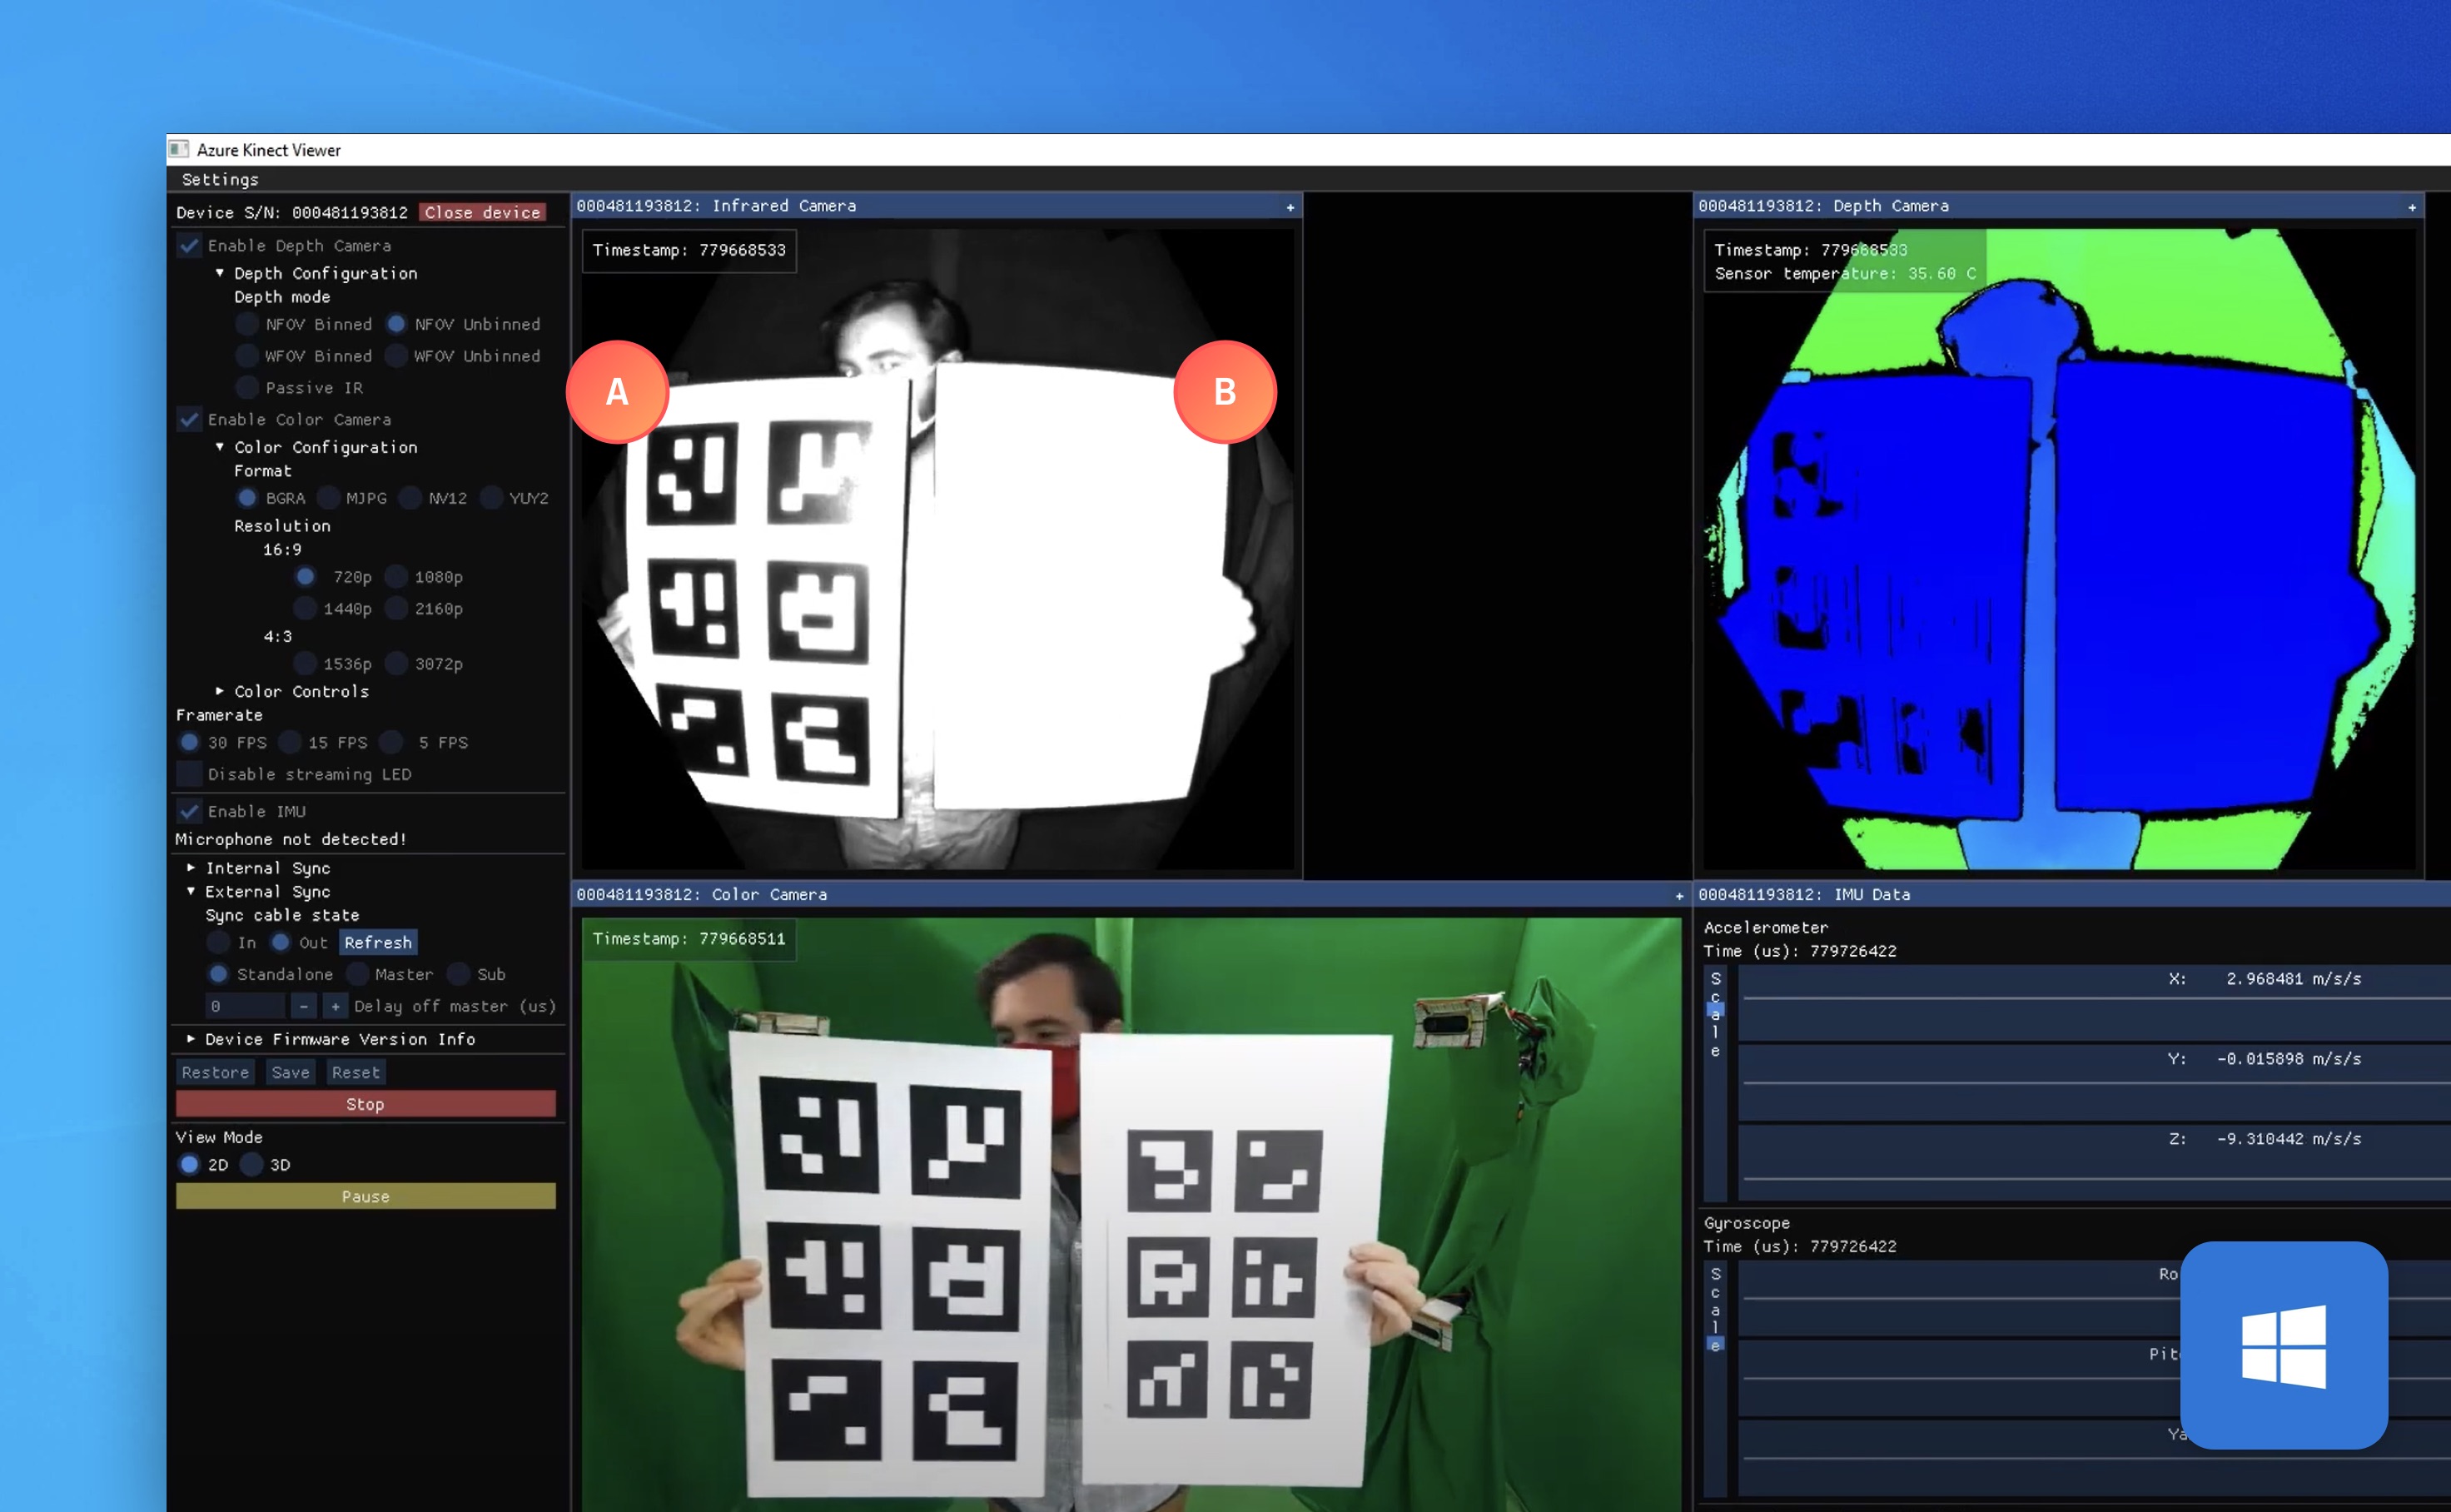
Calibration markers

Depthkit provides a wide selection of ArUco markers to calibrate your sensors, however, you only need a few unique markers for your calibration object.

You can customize your calibration object based on your sensor configuration and capture needs.
- Increase the number of markers used, up to 100.
- Increase the size of each marker
- Place different markers on different sides of a three-dimensional object. More information can be found here.
🚧 Use only the provided ArUco markers.
Depthkit supports standard ArUco 4x4 markers up to ID #99. Using any other markers, including ArUco 4x4 markers with higher ID numbers, may invalidate your calibration.
The complete set of supported markers can be downloaded here.
Printing requirements
As of Depthkit v0.5.7-8, our calibration pipeline has been upgraded to a more robust and reliable infrared detection. This results in an improved calibration process, but it mean that your calibration markers must follow the printing specification below in order for them to be successfully detected by infrared.
Some printer, ink, and paper combinations are not readable by the depth sensor's infrared light, and some methods absorb too much infrared light.
You can check if your chart is detectable by viewing it through the Azure Kinect SDK's Kinect Viewer utility.
👍 IR-Compatible Printing Methods:
Though challenging to predict IR-compatibility, these methods generally will work, but be sure to test your printing method by viewing the calibration fiducial through the Azure Kinect's depth and IR cameras as described above.
- Laser Printers
- Photocopy Machines
- UV printing on foam-core - Note that this option may add some shine to your calibration marker. While it should still be detected, stick to matte materials if you have them available.
❗️ IR-Incompatible Printing Methods:
- Inkjet printer with standard printer paper
If you do not have access to these machines, you can use select inkjet printers if the paper is a lightly coated matte paper or cardstock. If you have a marker that cannot be detected by IR, a quick fix could be to photocopy the marker and use that copy as your detectable option.
A great place to start is with a 11"x17" matte board. Affix a grid of unique markers with sufficient white space (include the margins) clearly separating each marker. Ensure the markers are flat and wrinkle-free.
Calibration objects must remain entirely stationary during each calibration sample, so attach the board to a stand or tripod.
Lighting
See Preparing for Depthkit a shoot section for notes about which types of lighting work.
Equipment setup
- Set up your sensors so that they are securely mounted on your preferred tripods or stands. Sensor configurations will vary based on your unique creative and technical needs.
- Ensure all sensors have adequate power, are connected to your capture computer via proper USB cables, and connected to each other with sync cables as described above.
Additional Equipment Setup for Legacy Azure Kinect DK
- Ensure all Azure Kinects are updated with the latest firmware. See the Sensor firmware to verify your firmware version and update your devices. You can update multiple sensors at once when when plugged into the same computer.
- Check each sensor's factory calibrations some Azure Kinects have severe misalignments from the factory. Follow this guide below to verify your equipment: Azure Kinect alignment verification →
Next steps
When you have all of your equipment gathered in one place, proceed to learn more about the Depthkit Studio interface or Positioning sensors. In this section Tell your users what they should do after they've finished this page
Save v01 Edit v02 Edit v03 Edit v04 Edit v05 Edit v06 Edit v07 Edit v08 Edit v09 Live Edit v10 Edit v11 Edit v12 Edit v13 Edit v14 Live Edit
New Version