Remote livestreaming with WebRTC
While the ultimate goal and solution to livestreaming will be a more direct integration with WebRTC within Depthkit and Unity, in the mean time you can use the prototype workflows below.
These workflows are designed for a unidirectional stream of video, but could be extended to be bidirectional by duplicating the workflow for the opposite direction. At a high level, they leverage existing technologies and services built on WebRTC to transport a Depthkit livestream over the internet or a local network very quickly and with very low latency.
In this page
Relaying Depthkit Livestreams with OBS and VDO.ninja →\ Unity Render Streaming →
Relaying Depthkit Livestreams with OBS and VDO.ninja
The main components of this workflow are the Depthkit capture app, OBS, Spout, OBS Ninja, Unity, and the Depthkit Studio Expansion packages for Unity.
VDO.Ninja
VDO.Ninja, formerly known as OBS.ninja, is a web application created specifically to facilitate low latency, high quality, peer-to-peer video streaming using WebRTC and make those streams available within software like OBS.
At its core, VDO.Ninja is like a Zoom or Google Meet built for video engineers. It supports video chat rooms, but more importantly for our purposes it supports unidirectional video streaming with lots of options to control quality, and is easy to integrate into OBS.
Sending peer setup
To set up the sending side of the workflow, follow these steps:
- Installation.
- Install OBS.
- Install the Spout 2 OBS plugin.
- Launch Depthkit and start the livestream.
- Send the livestream_multicam_meta.txt file to the receiver.
- Launch OBS and create a new scene.\
- Go to Settings → Video.\
- Set the Base (Canvas) Resolution to the same resolution as the spout stream being sent out of Depthkit. This can be found within the livestream_multicam_meta.txt file that Depthkit produces in the export folder.\
- Set the Output (Scaled) Resolution to the same as the Base (Canvas) Resolution.\
- Add a Spout2 Capture source for the Depthkit livestream.\
- If you would like to embed audio into your Depthkit live stream, add an Audio Input capture source to the scene.\
- Start the virtual camera.\
- Go to vdo.ninja and click on Add Your Camera to OBS. Choose the OBS virtual camera as the video source.\
- Click Start, and send the generated link to the receiver.\
Note: the default settings on OBS Ninja have a max resolution of 1920x1080. To use a custom resolution append the following string to the URL and reload the page:
&w=2256&h=1184where 2256 and 1184 are the width and height of the actual source video being sent. IF you do not do this, the receiver may have a cropped or distorted image which will not reconstruct in Unity.
Receiving peer setup
To set up the receiving side of the workflow, follow these steps:
- Installation.
- Install OBS.
- Install the Spout 2 OBS plugin.
- Launch OBS and create a new scene.
- Go to Settings → Video.
- Set the Base (Canvas) Resolution to the same resolution as the spout stream being sent out of Depthkit.
- Set the Output (Scaled) Resolution to the same as the Base (Canvas) Resolution.
- Add a Browser source.
- Enter the same resolution as the Video Base (Canvas) Resolution.
- Use the link generated by the sender as the URL for the Browser source.
- Click OK.
- The texture should appear in OBS momentarily as long as the sender is still active.
- Go to Tools → Spout Output Settings and configure the spout output to be used by Unity.
- Obtain the metadata file from the sender and configure a Unity clip to use the OBS spout output via the Live player.
VDO.Ninja advanced configuration options
To automate and customize this workflow more, additional URL parameters may be added.
Sender:
w=<width>,h=<height>Use this to set the max video resolution to be sent. Importantly this also controls the aspect ratio of any scaled resolution that may be sent due to bandwidth constraints. This is very important to set accurately.ovb=20000sets the Outbound Video Bitrate to a target of 20 mbps (20,000 kbps). Higher values will produce better quality, but lower values will make the connections more stable.mfr=30Sets the max frame rate to 30FPS, which is the maximum Depthkit will ever provide. You can set this lower if you are bandwidth constrained.ad=0disables audio, eliminating the need to choose a microphone.vd=OBSwill attempt to find a video camera device that contains the string 'OBS' in the name, eliminating the need to choose a camera.push=<id>uses a custom stream ID. 1 to 49-characters long: aLphaNumEric-characters; case sensitive.pw=<password>Optionally define a password that is used to encrypt the stream.autostartSkips some set up options to get to streaming faster.
Receiver:
view=<id>must match sender'spushparameter.pw=<password>must match sender's.vb=5000Video bitrate in kbps. This is the maximum bit rate that will be used for video. Lower rates will be used if necessary to maintain a good connection.codec=h264You can define the video codec to use. Available options areh264,vp8,vp9, andav1though on windows it appears that only h264 is hardware accelerated encode & decode.vp8is the default, so this should always be set toh264if you want to use HW acceleration.
VDO Ninja allows you to craft URLs to be used and re-used without any registration step. Using unique push/view parameters for each use case allows you to set up a configuration in OBS and leave it that way, so next time it is needed there are no configuration steps.
For example:
- Sender URL: https://vdo.ninja/?push=depthkit\&pw=test\&w=2256\&h=1184\&mfr=30\&ad=0\&vd=OBS\&autostart=1
- Receiver URL: https://vdo.ninja/?view=depthkit\&pw=test
Utilizing a Local Area Network for higher video bandwidth and quality
WebRTC does not technically require any internet connection, although in the examples above there are aspects of this system that are hosted on the publicly available internet. An important part of this system is a STUN server, which determines how to route the video stream from the sender to receiver. If the STUN server is not accessible on your LAN, then the IP addresses that it gives to each peer are going to be public IP addresses, meaning your video will be going over the internet, even if your computers are on the same LAN.
To allow WebRTC to discover local network IP addresses of each peer, a locally hosted STUN server must be used. The open source STUN server STUNTMAN is simple to set up and run:
- Download the zip file for windows, extract it, and open a command prompt (cmd.exe) inside the directory where the stunserver.exe is located.
- To start the server, use the following command:\
stunserver.exe --verbosity 3 --protocol udp - To use this stun server with VDO Ninja, add the following parameters to the URL of both the sender and receiver:\
&stun=stun:<IP address or hostname of local STUN server>:3478
If you've successfully used the local STUN server, you should see some output in the command prompt window once you establish a connection between the sender and receiver.
At this point you should be able to set the vb option significantly higher (up to 60000) to take advantage of the increased bandwidth available on the LAN.
Even when running a local STUN server, there are still other parts of this system (VDO Ninja itself) that are using the internet. Luckily VDO Ninja is also open source, and can be locally hosted as well for a more secure and reliable set up, but that is outside the scope of this document for now.
Resources — Running 2x instances of OBS is necessary for receiving a local stream as well as a remote.\ How to run multiple instances of OBS on Windows 10 →
Unity Render Streaming
Unity Render Streaming is an experimental package that enables Unity apps to communicate over WebRTC. This can be used for webcams, microphones, and arbitrary data channels, as well as sending any unity textures you want. Recently support has been added for hardware decoding across a variety of platforms which finally enables sufficient performance for use with Depthkit.
Setting up Unity Render Streaming
Follow these steps to get your project set up with all of the dependent packages required for a simple test.
- Create a new Unity 2022.3.x (LTS) project using the Built-in Render Pipeline.
- Add the Unity Render Streaming package 3.1.0-exp.7 - Follow the instructions here to install the package.
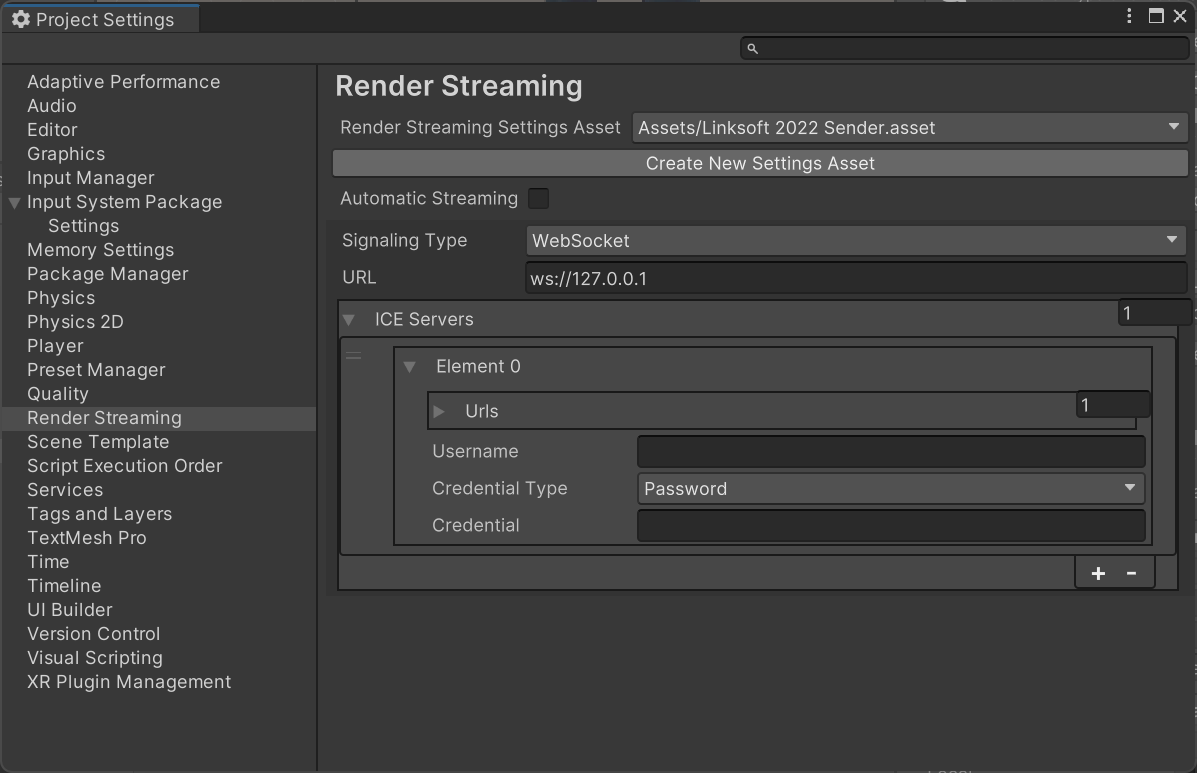
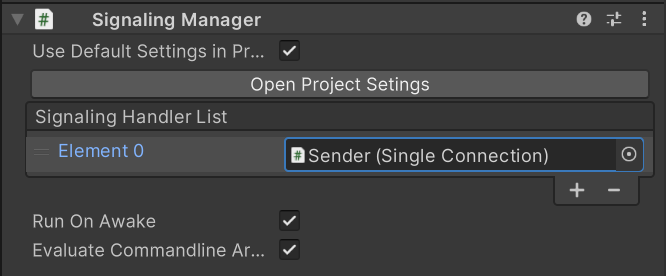
- Download and launch the signaling server which facilitates the connection between Render Streaming applications. Previous versions of this guide required the option
-w(websocket server mode), however this is now the default mode, so the-wflag is unnecessary. The Bidirectional example also requires that the server start in private mode - You can do this with the-m privateoption, making the complete commandwebserver.exe -m private - Note the IP addresses that the server reports upon startup. You should see at least one that is not 127.0.0.1:
$ ./webrtc-utils/webserver.exe
start websocket signaling server ws://192.168.0.214
start as public mode
http://192.168.0.214:80
http://127.0.0.1:80
Take note of this address, as we will need it when testing on different devices.
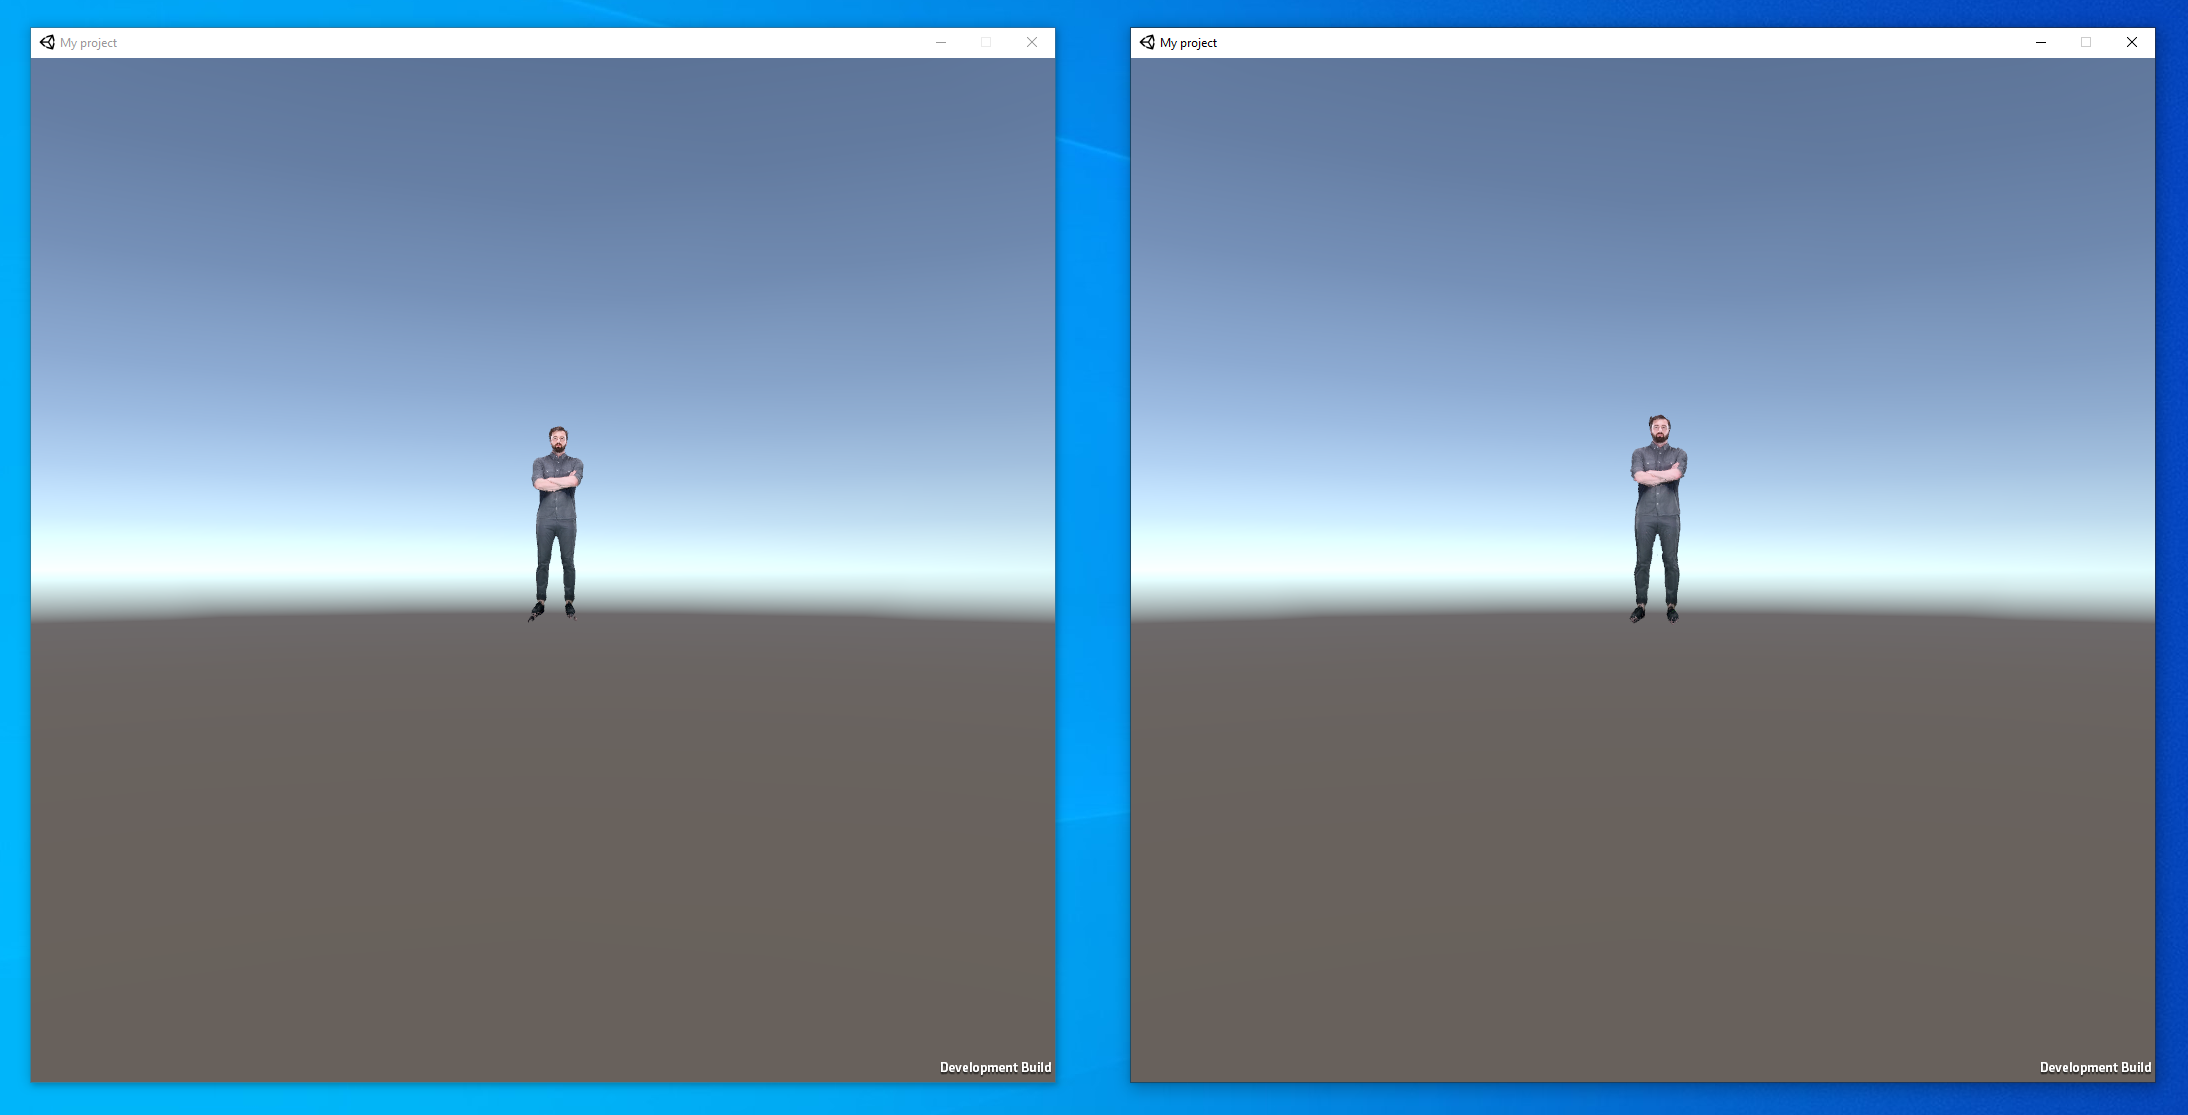
After doing this, make a build and distribute it on two computers running on the same local network as the webserver. You should be able to set up a two-way call between these computers using the Bidirectional example.
Integrating Depthkit
Now that you have the Unity Render Streaming up and running and have played with the Bidirectional example, it's time to add Depthkit to our project and start streaming some holograms!
- Start by adding the Depthkit Studio packages (available to download from the Depthkit website).
At first we will be sending a pre-recorded Depthkit clip.
- Add a Depthkit Studio video, poster, and metadata to your project’s Assets folder as well. (Demo assets will work fine, or you can make your own recording.)
🚧 Unity Render Streaming Resolution Constraints
In our testing, the maximum resolution we've been able to send over Unity's Render Streaming connection is 3840x2160 (UHD). When exporting or livestreaming from Depthkit, set the output width and height constraints within these limits.
Create the Sender scene
- Create a new scene in the project called “Sender”
- Create supporting assets
- Create a RenderTexture asset in your project called “SenderRT”
- Configure the RenderTexture as follows:
- Size → whatever the resolution of your CPP video is. This can be a scaled resolution but the aspect ratio must be the same.
- Depth Stencil → None
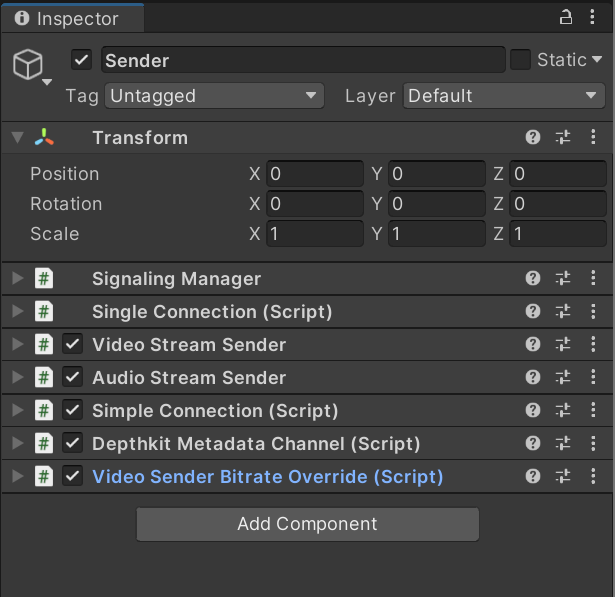
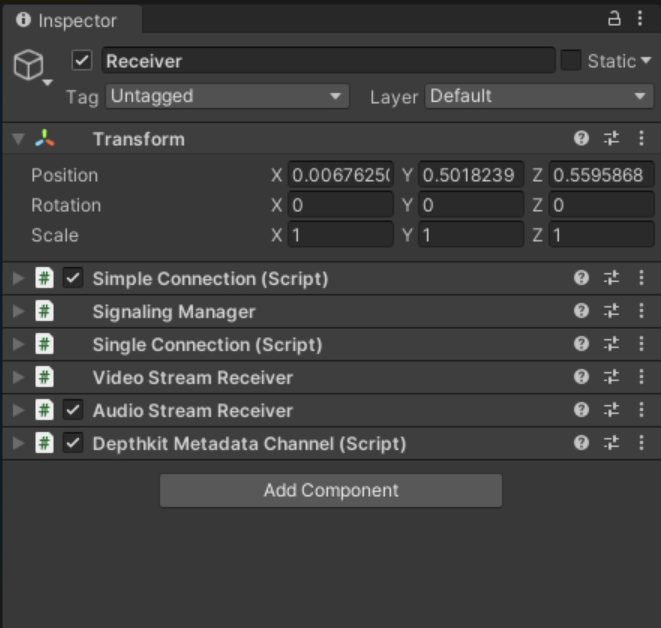
The next step is to create a game object to construct the Depthkit asset which will be sent over WebRTC. For more information on constucting a Depthkit object, see this documentation .
- Create an empty game object.
- Add a Depthkit Clip component
- Add a Depthkit Studio Built-In Look component
- Configure your clip with the Depthkit Studio assets you imported into the project
- Set your clip’s bounding box and reconstruction settings
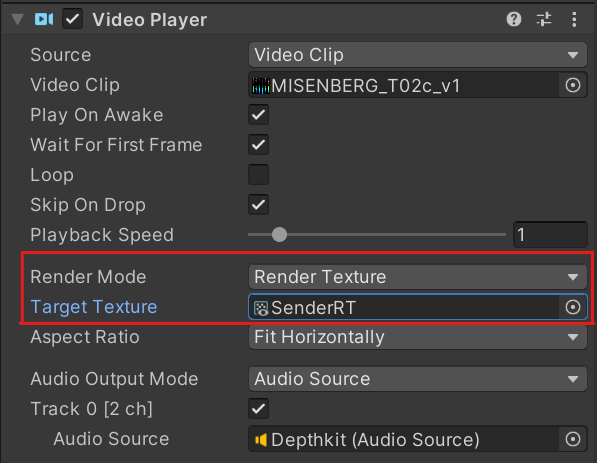
- Set the Video Player component to render to the SenderRT:
- Render Mode → Render Texture
- Target Texture → SenderRT
a. Open the Sender scene, click Add Open Scenes
- Click Build and save your build to its own folder named Sender
- Ensure only the Sender scene is checked in the Scenes In Build list
b. Open the Receiver scene and repeat the above steps
Using a Depthkit Live Stream
The following steps describe how to modify the scenes set up in the previous section to support a running Depthkit Live stream. For more information on this, read the Depthkit Livestreaming documentation.
- Add the Depthkit Spout Livestream Player Package to your project. Don’t forget to add Keijiro’s repository first as this package relies on KlakSpout.
- Start your Depthkit live stream under Edit → Preferences
- Use the maximum width and height values to limit the live stream resolution to something reasonable for webrtc streaming, like 2048x2048
- Copy the livestream_multicam_meta.txt file that Depthkit writes to the Exports directory into your project’s Assets folder
- Modify the SenderRT & ReceiverRT’s sizes to match that of the Depthkit spout stream. Note that this may not be exactly equal to the limit you set in Depthkit. Look at the textureWidth and textureHeight within the
livestream_multicam_meta.txtfile. - In Unity, open the Sender Scene
- Choose the Depthkit object in your scene’s hierarchy
- Modify the Depthkit Clip settings:
- Player → Livestream Player (Spout)
- Metadata:
livestream_multicam_meta.txt - Poster → None
- Spout Receiver Settings:
- Target Texture → SenderRT
- Optional: Audio
- If you want to send live audio from the sender PC to the remote receiver device, you’ll need to use a microphone or other audio input device connected to the sender PC.
- Select the Sender object, and modify the Audio Stream Sender component:
- Audio Source → Microphone
- Microphone Device Index → Choose the device index you want to send audio from.\
The device index can be found by iterating over Unity’s
Microphone.deviceslist.\ Note that the Azure Kinect microphone arrays are not supported by the Audio Stream Sender, so if you choose one of these microphones, it will produce an error upon attempting to stream from the device.
- Select the Sender object, and modify the Audio Stream Sender component:
- That's it! Test it out, the receiver app you built previously should still work without modification (unless the livestream resolution has changed - Then you need to update the ReceiverRT resolution and build a new receiver).
Streaming over the Internet
In order to stream over the internet, you’ll need to host the signaling server so that it is publicly available.
A simple way to do this is to use the source code for the web app in the Unity Render Streaming repo directly. If you need any additional features like security, those will have to be added manually, using their codebase as a starting point.
Clone the repo and find the NodeJS web app source code in the WebApp subdirectory.
Unity has a guide on customizing the web app here
To set up the node.js app on AWS EC2, start an EC2 instance
- SSH into the instance
- Clone the Unity Render Streaming Repo: https://github.com/Unity-Technologies/UnityRenderStreaming
- Check out to appropriate tag for whatever version you're using in unity (for example 3.1.0-exp.7)
- Install the npm dependencies for the signaling server
cd WebAppnpm i- Build & Run the server
npm run buildnpm run start- Note that if you receive a permission denied error, you may need to run the server as root, or some other user that has access to listen on port 80, for example:
sudo npm run start- Note that you may want to start it in the background so the server stays up if your terminal disconnects:
npm run start &
Once the web app is hosted, it should work the same way as it does on the local network. You can use either HTTP or websocket mode, and use the public IP or domain name of the server in your Sender and Receiver object’s configuration.