Depthkit Core Expansion
The Depthkit Core Expansion Package supports both the Unity player and AVPro. When working with Depthkit clips on the Unity timeline, we recommend using the Unity player for best results.
Download Unity’s free Default Playables from the asset store and import it into your project.
In this page
Package contents →\
Setting up a project →\
Creating a Depthkit clip from scratch →\
AVPro Video Player →\
Package contents
This guide includes how to import and work with the Depthkit Studio Expansion package for Unity. It also includes how to create Depthkit clips in your scene.
The Depthkit Studio Expansion Package (as of Phase 9) is made up of the following packages.
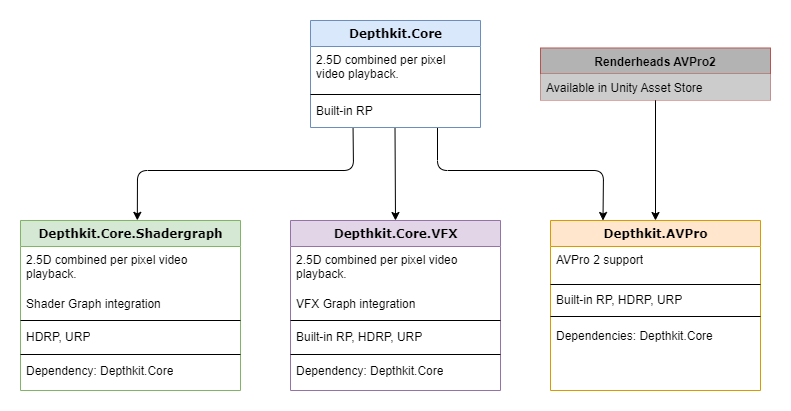
depthkit.core(0.13.2)depthkit.core.shadergraph(0.5.1)depthkit.core.vfx(0.5.2)depthkit.avpro(0.1.2)
The Depthkit Core package provides a direct integration with Unity and must be imported into your project prior to importing the Depthkit Studio packages.
The Depthkit Core Shader Graph package provides compatibility with Unity’s Scriptable Render Pipelines, including URP and HDRP. This package unlocks Depthkit’s support for the Shader Graph. Import this package via the Package Manager after importing the Depthkit Core package.
The Depthkit Core VFX package unlocks Depthkit’s support for the Visual Effect Graph. This package is compatible with Unity’s Scriptable Render Pipelines, including URP and HDRP. Import this package via the Package Manager after importing the Depthkit Core package.
The Depthkit AVPro package (introduced in Phase 6) adds support for Renderheads' AVPro 2 video player.
Package dependencies
Select packages act as dependencies when importing into your Unity project. See the dependency diagram below for import requirements.
Setting up a project
Check out this tutorial as a quick video or explore written guide below.
-
Create a new 3D project via the Unity Hub. This preset uses Unity's Built-in Render Pipeline. For Unity's advance render pipelines, refer to the Shader Graph & Looks and Visual Effect Graph pages.
-
In the Package Manager, click the add icon and select Add package from disk.


- Locate the depthkit.core package folder. Within this folder, select the package.json file and click Open.

- Once imported, you will see the addition of Depthkit Core within the Package Manager. Select this item and expand the Samples toggle. Import the available Depthkit Core Built-in RP Prefab. This will import a Depthkit clip prefab that is preconfigured for your project.

-
In the Project window, go to your Assets folder and locate the prefab you just imported under Samples → Depthkit Core → 0.4.1 → Prefabs - Depthkit Core Built-in RP.
-
Select the Depthkit Clip + Core Built-in RP Look and drag it into the Hierarchy to populate your scene. This prefab has everything you need to playback a Depthkit clip with a Photo Look in Built-in RP. Now we simply need your Depthkit footage!
-
Back in the Project window, create a new folder under Assets. You can do this by right clicking in the Project window and selecting Create → Folder. I like to name this folder Clips. This will hold your Depthkit video files, metadata text files, and optional poster images. Drag your Depthkit assets into this folder in the Project window or copy and paste in the explorer window.
-
Back in the Hierarchy, select your recently created Depthkit clip. In the Inspector, you will notice that the Depthkit Clip component is alerting you that your Depthkit Clip is not set up - To fix this, drag the Depthkit metadata file and poster image to the corresponding fields in the Depthkit Clip component. In the Video player component, drag the Depthkit video to the Video Clip field.
-
If you do not want to use a poster image, simply select the Advanced Settings toggle in the Depthkit Clip component and select Disable Poster.
-
Now your Depthkit clip is set up and ready to play! In the Hierarchy, double click the Game Object to quickly zoom in on your asset in the Scene view. Hit Play to preview your clip in action.
Configuring a Depthkit clip
Once your Depthkit clip is positioned in your scene, there are a few handy settings that will improve the quality and playback of your clip.
Mesh Density allows you to optimize the density of your mesh to suit your scene and intended publishing platform. Full mesh density maximizes the quality that your clip has to offer, especially when it comes to depth detail and edge quality. However, you may be building to a mobile device, in which case performance is key. In this scenario, you may rely on low or medium mesh density.
Clean Up Filters refine depth data and assist in reducing artifacts in your clip.
Edge Noise Triangle Culling will reduce edge artifacts often caused by video compression. It accomplishes this by filtering out triangles with a value below the specified amount. For best results, increase this value to remove all edge artifacts. Be mindful of maxing out this value and introducing depth holes in your asset.
Long Triangle Culling filters out triangles higher than the value specified. This is most helpful when you have unwanted stretching between depth values. Increase this value to reduce the stretched geometry.
Sheer Triangle Culling is designed to remove depth artifacts that are positioned at a sheer angle in relation to the source depth camera. For best results, increase this value to remove unwanted artifacts.
Edge Smoothing introduces an edge mask that provides control over edge blending. This offers the ability to smooth the edge of your asset for a more polished look. Adjust Edge Smoothing with the Edge Smoothing Radius and Strength.
Relighting is an experimental setting that allows you to adjust the surface normals of your clip.
Creating a Depthkit clip from scratch
You can create a Depthkit clip in two ways: by using the Depthkit Core prefab provided in the package or by creating a clip via a game object. If you don’t want to start with a prefab, you can create a fresh Depthkit clip and assign your desired Look via the Component menu.
- In the Hierarchy, right click and create an empty game object.

- With the game object selected, go to the Component menu, select Depthkit → Depthkit Clip.

- Now you can add your desired Look to the clip. Looks are provided for the Built-in Render Pipeline, the VFX Graph, and the Shader Graph. You can assign the Look that works for your creative needs. For example, if I wanted to create a custom aesthetic for my Depthkit clip via the VFX Graph, I would add the Depthkit VFX Look by returning to the Component menu and selecting, Depthkit → Core →VFX → Depthkit VFX Look. This will add the components needed to start working with the VFX Graph immediately.

AVPro Video Player
📘 Phase 6 Update
As of Depthkit Core Expansion Package (Phase 6), AVPro integration is now possible by importing the depthkit.avpro package in the Package Manager.
Phase 5
By default, the Depthkit Clip is set up with the Unity video player. We provide support for the AVPro video player 4 for its performance and for the ability to stream from outside of the Unity project. Follow these steps to set up your clip with AVPro if you have already purchased the AVPro plugin.
If video tutorials are more your speed, check out this quick video that follows the written steps below.
Setting up a Depthkit clip with the AVPro Video Player
- In the Package Manager, in the Packages dropdown menu, select My Assets to view your purchased assets.

- Locate AVPro from this list and click Import.

- Back in the Package Manager, select In Project from the Packages dropdown menu to import your desired Depthkit Core package if you have not already done so.

- Click the add icon and select Add package from disk.

- Locate the depthkit.core package folder. Within this folder, select the package.json file and click open.

- Once imported, you will see the addition of Depthkit Core within the Package Manager. Select this item and expand the Samples toggle. You will see two import options: AV Pro Video Player and the Depthkit Core Built-in RP prefab. Import both into your project.

- Import your Depthkit asset. Create a Clips folder within your Assets folder. Drag your Depthkit metadata file and poster image into this folder. Drag your Depthkit video into the Streaming Assets folder. This folder was automatically generated within the Assets folder when you imported the AVPro package.

-
In your assets folder, locate the Depthkit Clip + Core Built-in RP from the Sample folder and drag it into the Hierarchy. Select the clip and see the Inspector.
-
In the Depthkit Clip component, select the video player dropdown and select AVPro Video Player.

- Drag your metadata file and poster image to the corresponding fields in the Depthkit Clip component. In the Media Player component, click browse and select your Depthkit video from Streaming Assets. Ensure that the Source Path is set to Relative to Streaming Assets Folder. Now your clip is ready for playback using the AVPro Video Player!

🚧 You can switch back to the Unity Video Player at any point.
Just note that you will need to relink the Depthkit video file.