Configuring sensor settings
In this page
Sensor selection (Core only) →\ Stream configuration →\ Sensor video settings: Femto Bolt & Azure Kinect →\ Advanced settings →\ Preview depth range →

Single sensor capture with Depthkit (with a Depthkit Core or Depthkit Cinema license) supports a range of depth sensors including the
- Orbbec Femto Bolt
- Microsoft Azure Kinect
- Microsoft Kinect for Windows v2
Each sensor has unique sensor configurations allowing you to adjust color and depth resolution. Here are the Depthkit Core/Cinema sensor configuration options.
Sensor selection (Core only)
In the Depthkit Core Record context, select your depth sensor in the drop down menu found under Sensor Configuration. With Depthkit you have the freedom to switch back and forth between your available sensors. However, with Depthkit Core and Cinema, only one sensor can be used to capture at a given time.

Stream configuration
Here, you can select your sensor color and depth resolution. This will vary based on your sensor.
For the Kinect for Windows v2, color and depth resolutions can be selected in the Stream Configuration drop down.
For the Femto Bolt and Azure Kinect, color and depth resolutions will have their own configuration menus for individual customization of each stream.

📘 Sensor resolution affects performance.
Different computer hardware supports different capture resolutions. If you're unsure which settings to use, make a few test recordings with different settings to see what your computer can performantly capture.
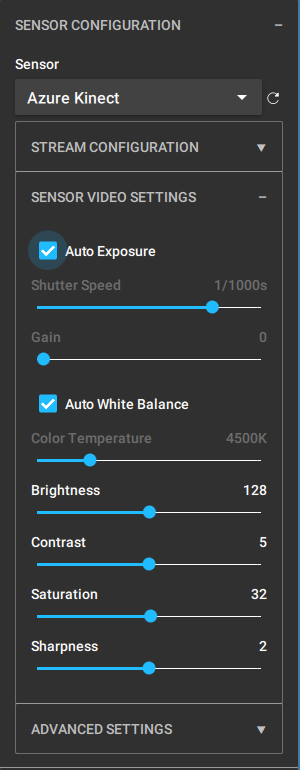
Sensor video settings: Femto Bolt & Azure Kinect
| Azure Kinect | Femto Bolt |
|---|---|
 |
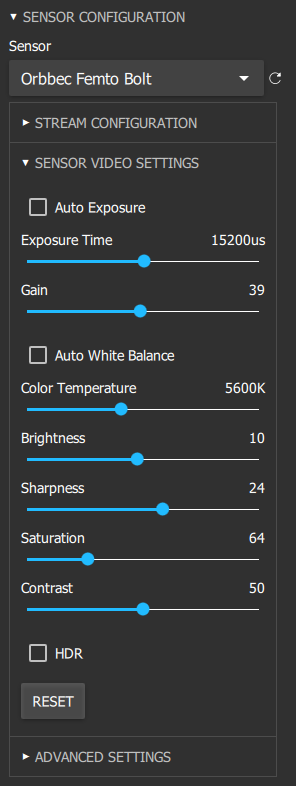 |
- Auto Exposure: similar to camera auto exposure, this parameter will automatically set the exposure time and gain based on the lighting conditions of your surrounding environment. When enabled, the exposure time and gain values will be set for you.
- Shutter Speed (Azure Kinect only): can be adjusted to control the exposure of the sensor’s color video. Sliding this value to the right decreases exposure and reduces motion blur in the color stream.
- Exposure Time (Femto Bolt only) can be adjusted to control the exposure of the sensor’s color video. Sliding this value to the right increases exposure, and may introduce motion blur in the color stream.
- Gain: in combination with exposure time, gain will increase exposure of the sensor color video. Note that similar to camera gain, it may also increase noise, or grain, in the color image.
- Auto White Balance: similar to auto exposure, this parameter will set the recommended color temperature based on the lighting conditions of your surrounding environment. When auto white balance is enabled, the color temperature slider will be set for you.
- Color Temperature: represented in Kelvin, adjusts the characteristic of the light temperature in your sensor color video.
- Brightness: For the Femto Bolt, this changes the exposure value (EV) of the image when Auto Exposure is selected. For the Azure Kinect, this adjusts the overall brightness of the sensor color video in Manual and Automatic exposure modes.
- Contrast: adjusts the overall contrast of the sensor color video.
- Saturation: adjusts the overall saturation of the sensor color video.
- Sharpness: accentuates fine color detail represented in the sensor color video. This may be most noticeable in high contrast areas of the image.
- HDR (Femto Bolt only): Changes the characteristic curve of the sensor's exposure latitude to better capture detail in bright highlights.
Advanced settings
For more custom sensor configurations, see the following Advanced Settings. For the following parameters, we strongly recommend testing before using during recording.

- Powerline Frequency: a parameter often changed to prevent flickering or banding seen in video that is not compatible with the AC frequency of the surrounding capture space. If you find that you have flickering in your sensor color video, you can change the sensor frequency to match the common AC frequency of your environment. Most countries have an AC frequency of 50Hz, while 60Hz is most common in North America. When using the Azure Kinect in the Depthkit Studio Streaming & Record context, the sensor streams must be stopped to change this value.
- Backlight Compensation (Azure Kinect only): can be enabled if you are shooting in a low or inconsistently lit environment. It can also be helpful when shooting on a green screen to compensate for dim areas on the green screen between the subject and your green background.
Preview depth range
The depth range, represented in meters, is the 3D space in which you will be capturing. For recording, this range acts as a preview only. If you reduce the depth range, the maximum sensor range will still be captured. However, it is important to be aware of your near and far planes. These represent that minimum and maximum distance that you can capture from the sensor.

You can adjust this range by setting the position of the near and far planes, represented as hue encoded ranges. Red-orange represents the pixels closest to the near plane, and pink-purple represents the pixels closest to the far plane.
There are two ways to set your depth range; in the 3D preview and in the Record panel. In the 3D preview, you can see the near and far planes as seen from the sensor view frustum. Narrowing that range by bringing the near and far planes closer to your subject increases depth quality of the capture. Select the corners of the near and far planes to adjust this range in the 3D preview or adjust the slider in the Record Panel.
📘
Keep an eye on the movement of your subject so you don't clip fingers and toes when adjusting the near/far planes. It may be helpful to tape or mark your capture space so the subject has a sense of the intended capture space.
You will notice that the black and white striped areas represent areas that fall out of the view frustum that will be clipped. Setting your depth range is non-destructive.When you transition to the Edit & Export window, you can adjust the range again before export. More on that later.