Asset management
Depthkit projects may start as simply as just a calibration and few recordings, but throughout the lifespan of the project, more and more elements can be introduced creating a complex map of files and folders. Without tracking each component that is incorporated into a final asset, it can be challenging to retroactively reproduce or make targeted changes to assets.
As the steward of a Depthkit project, use these organizational methods to stay organized and track various assets through the workflow.
In this page
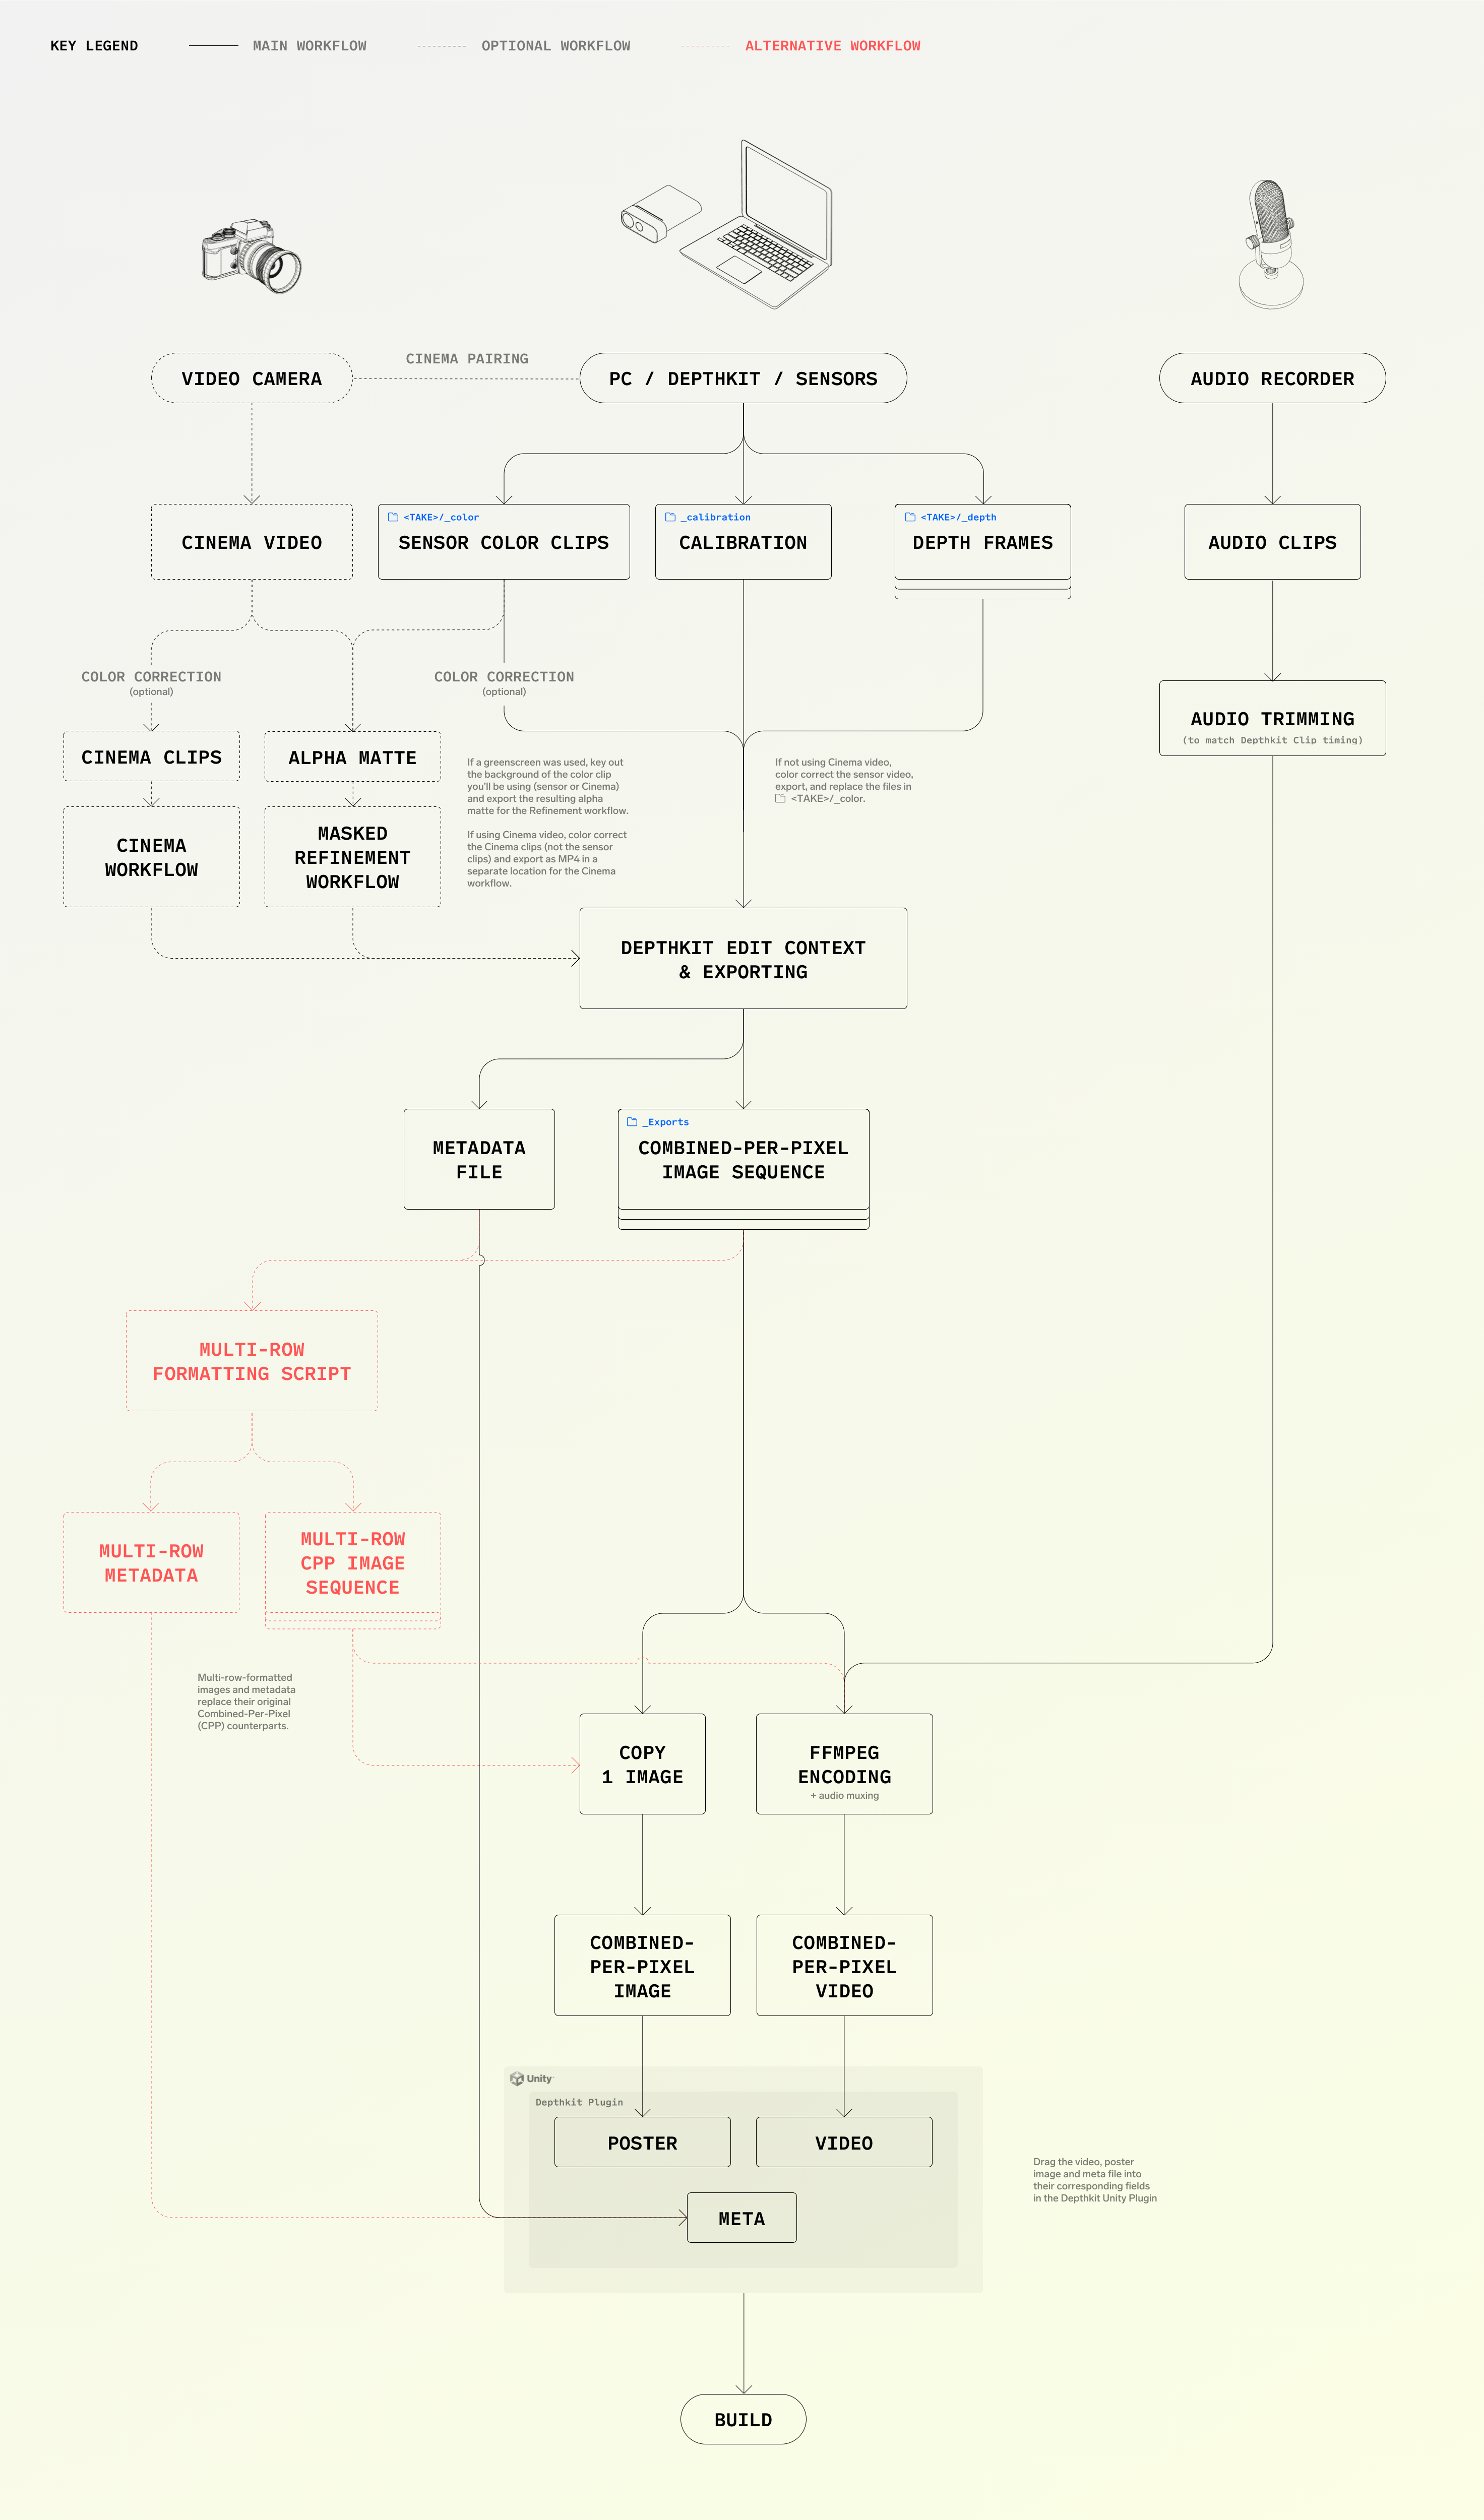
1. Pre-Production →\ 2. Project creation →\ 3. Calibration & Cinema pairing →\ 4. Recording →\ 5. Post-Production →\ 6. Export from Depthkit\ 7. Multi-row formatting & encoding to video →\ 8. Game engine importing →\ Asset iteration process →\ Distributed work and source control →\ Delivery & archiving →
1. Pre-Production
Assets generated:
- Asset Management Document
As you prepare for your Depthkit project, create a document in the workspace of your choice to track all of the assets and processes of the workflow. This can take many forms, but we recommend a database solution like Airtable. You can view our example Airtable asset document.
This will be the central source of all information relating to all of the assets in your project.

If you have a script or other production document, you may pre-populate parts of your asset management document by breaking down how you will capture and process each part of the project to save time on set and in post-production.
2. Project creation
Assets generated:
- Depthkit Project Directory
- Depthkit Project JSON File
Each Depthkit project creates a directory of files and folders in a particular hierarchy. Though files and folders can be added to this directory, some components (e.g. the dkproject.json file, and _calibration and take folders) must remain where they are originally generated.
The entire Depthkit project directory can be moved to a different folder or even a different drive or computer, as long as the file structure within remains intact.
Each time you create a new Depthkit project as part of a broader project, add the Depthkit project to your asset document.
Since each Depthkit project only stores one calibration, it may be necessary to track multiple Depthkit projects through the course of your overall production to be able to capture with multiple sensor position configurations. Be sure to tag each recording with the project folder and Depthkit version from which it originated.

Noting the version of Depthkit (found by clicking Help → About Depthkit) at the time of project creation, recording, and exporting becomes valuable when needing to later revisit the project and a newer version of Depthkit is available. The original version informs how compatible the project is with newer versions of Depthkit, and if you should migrate the project or continue working in the original version.
3. Calibration & Cinema pairing
Assets generated:
- Depthkit_calibration folder and contents
- Lens Profile for Cinema camera
Depthkit stores one multi-cam calibration and one Cinema pairing per sensor in each project. It's always a good idea to capture multiple calibrations (each in their own Depthkit project) so that you have a couple of options to apply to your recordings. These alternative calibrations can later be applied before exporting your assets by swapping out the _calibration folder - As always, make backups any time you delete or replace this folder.
📘 Take note of:
- Stage Configuration: All measurements needed to be able to physically reconstruct sensor, lighting, and background positions.
- Sensor Configuration: A table and map of each sensor's serial number, position & orientation, and which ID number is assigned by Depthkit.
- Calibration Context Settings:
- Precision/Coverage and Filter positions, as well as disabled links & samples
- Cinema Camera Specifications:
- Camera Make & Model
- Lens Make, Model, & Focal Length
- Recording Resolution & Crop Factor
- Lens Profile applied to each Camera Pairing
If you create a new calibration, or replace a project's _calibration folder with an alternate, update your asset document to reflect the change.
4. Recording
Assets generated:
- Depthkit recorded take folders, depth frames, and sensor video
- Cinema camera recordings
- Audio recordings
Recording often involves using multiple devices at once. Existing production conventions can be used here to help stay organized.
- Assign each device an identifying letter. (e.g. 'A' Cam - Front-facing Cinema, etc.)
- If possible, change the recording settings on each device so that the file name includes the device's ID, as well as additional information like scene and take number; In Depthkit, edit the file prefix to include this information. This will make it easier to associate recordings of the same take with each other.
Keep Cinema recordings in a folder within your Depthkit project directory to preserve the project's media links when moving the project between drives or computers.
📘 Take note of:
- Slate: The name or code assigned to a take
- Corresponding Recordings: Which files from different recording devices (Depthkit, Cinema, audio, etc.) are all associated with a particular take
- Circle and Garbage Takes, Timecodes of Selected Moments
- Depthkit Sensor Settings: Shutter Speed, Gain, Color Temperature
- Lighting Configuration & Settings
Each time you record a new take, make a record in your asset document. Similar to conventional camera notes, all of the sensors' settings should be documented in case you need to recreate or pick-up a matching recording in the future.
5. Post-Production
Assets generated:
- Refinement Mask Project Files
- Refinement Matte Videos
- Color-correction / Grading Project Files
- Color-corrected / Graded Videos

As with the unaltered Cinema recordings, keep the color-corrected Cinema recordings and matte videos in a folder within your Depthkit project directory to preserve the project's media links when moving the project between drives or computers.
📘 Take note of:
- Name & Version of Software Tools Used to Make Color Corrections and Mattes
- A unique identifier (often a version number) to track different iterations of the same color or matte video
Each time you create a new color correction or matte, add it to your asset document.
Most DCC tools support backward compatibility for projects from earlier versions, but opening your project in the software version you originally used will guarantee full compatibility.
6. Export from Depthkit
Assets generated:
- Depthkit Combined-per-Pixel Image Sequence & Metadata file
📘 Take note of:
- Depthkit Recording Name
- Matte Videos Source
- Color Video Source and/or Cinema Video Source
- In/Out Timecode
- Values for Cinema, Refinement, and Isolate settings per sensor
- A unique identifier (often a version number) to track different iterations of the same recording
- Output Resolution and Multi-row layout
- Video Bitrate
Each time you export an asset out of Depthkit, make a record in your asset document that lists all of the sources and settings which went into the creation of that asset.
Most of the above items to note can quickly be preserved by simply saving a copy of the dkproject.json file in its current state immediately after exporting. This snapshot of the JSON includes all of the values in the Edit context, as well as file paths and filenames for linked color and matte files. If using the same version of Depthkit, you're able to perpetually open the project in that state by simply replacing the project JSON with this snapshot version - Just be sure to save a copy of the current JSON before replacing it in case you need to restore that as well.
For maximum quality and longevity, export image sequences as a 'master' asset, and only use Depthkit's video exports for preview purposes.
7. Multi-row formatting & encoding to video
🚧 Multi-row formatting and high-quality video encoding are now built into Depthkit.
Assets generated:
- Multi-row-formatted Combined-per-Pixel Image Sequence
- Depthkit Combined-per-Pixel Video
📘 Take note of:
- FFMpeg command used to encode video, including:
- Image Sequence Source
- Audio Source
- Compression settings
- Codec settings
- Color Space settings
- Scaling settings
- Additional settings, such as Psychovisual Optimization
For more details about encoding, see our Asset encoding guide →
8. Game engine importing
Once you've taken your your assets all the way to encoding, they are ready for the game engine team to import into the real time environment.
Guidance for managing files within Unity or other real-time environments is out of the scope of this guide, as it relies heavily on your engine of choice.
Asset iteration process
Many assets throughout this process will be modified iteratively. For example, once you are evaluating the Depthkit asset in Unity, you may identify an aspect of the recording that can be improved, and may revisit upstream components like calibrations, color-corrections, mattes, and others, then re-process the recording for an improved result.
A useful organizational method is to assign version numbers to each component asset (e.g. Calibrations, Color Corrections, Mattes, Audio Clips, etc.) If a change is made to any underlying asset that is incorporated back into the Depthkit project, it is best to duplicate it before the change and then assign it a new unique version number. By doing this, you are able to trace any issues in the end result all the way back through the exact source versions that contributed to it.
Distributed work and source control
Some of these processes can be parallel tracked, but it is important to be precise with roles, responsibilities, and hand-off points to make sure there are no gaps or redundancies in the workflow. A good example of this is mattes and color corrections. These can be created concurrently as they both only rely on the original color video, and are incorporated into the Depthkit workflow at nearly the same stage.
When multiple people are working in the same project directory for complex projects, it is a good practice to use source control tools like Git to ensure one person's work doesn't conflict with another's.
With or without a formal source control tool, implement a 'checkout' system so that only one person is working on a specific part of the project at a time, and everyone knows who is working on which parts.
Delivery & archiving
When archiving a project, consolidate all project files, resources, and documentation into one location (or multiple for backup), and ensure your asset document is updated with accurate disk locations.
Use the checklist below to confirm that you have all of your resources gathered.
📘 Depthkit Studio delivery & archive checklist
Documentation
- [ ] Asset Management Document
Project
- [ ] Depthkit Project Folder(s)
- [ ] Location on Disk
- [ ] Depthkit Version
- [ ] Offline Installer for Depthkit
Calibration
- [ ] Stage Configuration / Floorplan
- [ ] Sensor Configuration Details
- [ ] Calibration Context Settings
- [ ] Cinema Camera Specifications
Recording
- [ ] Sensor Settings
- [ ] Lighting Configuration / Floorplan
Post-Production
- [ ] Software Name & Version for Color Correction
- [ ] Software Name & Version for Mattes
Exports & Encodes
- [ ] Encoding Command
Depthkit Project Assets
- [ ] Depthkit Project Directory
- [ ] '_calibration' Folder
- [ ] Recorded Take Folders
- [ ] Cinema Camera Recordings
- [ ] Color-Corrected Videos
- [ ] Refinement Matte Videos
- [ ] Audio Recordings
- [ ] '_Exports' folder
- [ ] CPP Image Sequence for Each Export (Full-Quality)
- [ ] CPP Video for Each Export (From Depthkit, Preview-Quality)
- [ ] CPP Video for Each Export (From ffmpeg, Full-Quality)
- [ ] CPP Metadata for Each Export
- [ ] Snapshot Copies of 'dkproject.json' at Various Project States
Supporting Files
- [ ] Cinema Lens Profile(s)
- [ ] Color Correction Project File
- [ ] Refinement Mask Project File